


🎨 Shiki and Prism Syntax Highlighting #
Here we see how you can set up SvelteKit Shiki syntax highlighting in your Svelte app. Shiki and Prism are both fantastic code syntax highlighters. Although Prism is currently more popular, recent projects like Astro are using Shiki as the default. Shiki has many themes built into the package and also supports TextMate themes, used by VS Code. While Prism probably offers easier customization, we will see here that adding line numbers and even applying individual line highlights are not too difficult with Shiki. An additional advantage of using Shiki is that it supports Svelte code highlighting out-of-the-box. We shall focus on Shiki in this post, but let me know if there is something you would like to see in Prism, and I will see what I can do.
🧱 What we’re Building #
Please enable JavaScript to watch the video 📼
We will build a single page of a SvelteKit app to show how you can use Shiki, SvelteKit and mdsvex. mdsvex uses PrismJS by default. However, it also supports bringing your own highlighter. We will use Shiki as the custom highlighter and add line numbers. As well as line numbers, we will add additional highlighting to certain specified lines. Typically, you would want to do this to make a line, which you later refer to, stand out. Finally, we will improve the accessibility of the output code blocks with a further tweak. If that sounds like what you were looking for, then let’s get cracking!
⚙️ SvelteKit Shiki Syntax Highlighting: Setup #
We’ll start with a new SvelteKit project. Spin it up now from the Terminal:
pnpm dlx sv create sveltekit-shiki-code-highlightingcd sveltekit-shiki-code-highlightingpnpm installpnpm dev
Choose a Skeleton project from the CLI init tool. We will use Type-checked JavaScript in the demo code, but feel free to pick TypeScript or None if you prefer. For the other options,
select what you are happiest with!
We will use a couple of packages in this project, let’s add them now:
pnpm add -D @fontsource/ibm-plex-mono mdsvex \ node-html-parser shiki @shikijs/transformers
That’s the initial prep. We have a touch more setup to do for mdsvex, and once that’s done, the plan of action is to move straight on to creating an initial code highlight function. After that, we’ll create some Markdown code to test on and some styling. Finally, we level up, making the highlight function more robust and accessible. Next up is the mdsvex config.
🔧 mdsvex Configuration #
First, create an mdsvex config file, mdsvex.config.mjs in the project root directory:
1 import { join, resolve } from 'node:path';2 import highlighter from './src/lib/utilities/codeHighlighter.mjs';3 4 const __dirname = resolve();5 6 const config = {7 extensions: ['.svelte.md'],8 highlight: {9 highlighter,10 },11 // layout: join(__dirname, './src/lib/components/MarkdownLayout.svelte'),12 };13 14 export default config;
We will create the highlighter function imported
in line 2 in the next section. In lines 8 – 11 we see how we let mdsvex
know about our custom highlighter. We will see it is a function, which takes three
arguments: code, language and meta. language is the language of the code block, while meta is the extra parameters we can specify in a fenced Markdown code block. As an
example, we will later add a fenced code block, which looks like this:
```svelte {1,5-8} <script context="module" lang="ts"> <!-- TRUNCATED... --> ```
So here, the language is Svelte and the code is everything between the first
and last line. {1,5-8} is our own custom
syntax, the meta, which we will parse in the highlighter function. You can add more bells and whistles if you build on the code for this
project, here though we will just use this as a way to pass in the lines we want
to style differently to add additional highlighting.
svelte.config.js #
svelte.config.js #
Finally, finish the config step by updating svelte.config.js in the project root directory to include our mdsvex config:
1 import adapter from '@sveltejs/adapter-auto';2 import { vitePreprocess } from '@sveltejs/vite-plugin-svelte';3 import { mdsvex } from 'mdsvex';4 import mdsvexConfig from './mdsvex.config.mjs';5 6 /** @type {import('@sveltejs/kit').Config} */7 const config = {8 extensions: ['.svelte', '.svelte.md'],9 preprocess: [vitePreprocess({}), mdsvex(mdsvexConfig)],10 kit: {11 adapter: adapter(),12 },13 };14 15 export default config;
👋🏽 highlighter: Initial Version #
highlighter: Initial Version #
We will keep the code below but build on it as we go along. For now create a src/lib/utilities directory and add a codeHighlighter.mjs file
there with the following content:
1 import { codeToHtml, createHighlighter } from 'shiki';2 3 const THEME = 'github-dark';4 5 /**6 * @param code {string} - code to highlight7 * @param lang {string} - code language8 * @param meta {string} - code meta9 * @returns {Promise<string>} - highlighted html10 */11 async function highlighter(code, lang, meta) {12 await createHighlighter({13 langs: [lang],14 themes: [THEME],15 });16 const html = codeToHtml(code, {17 lang,18 });19 20 return html;21 }22 23 export default highlighter;
We are using the github-dark theme here. If you
use a different theme, be sure to run an accessibility checker on your output to
make sure the contrast ratios are good. You can see a list of all inbuilt Shiki themes on the Shiki project GitHub page .
With that in place, why don’t we create some code to highlight?
🖥 Code #
mdsvex lets us write source files in Markdown. We just need to register the
file extensions we plan to use for Markdown. We did this in line 7 of mdsvex.config.mjs as well as line 7 of svelte.config.js. Here is some Rust and
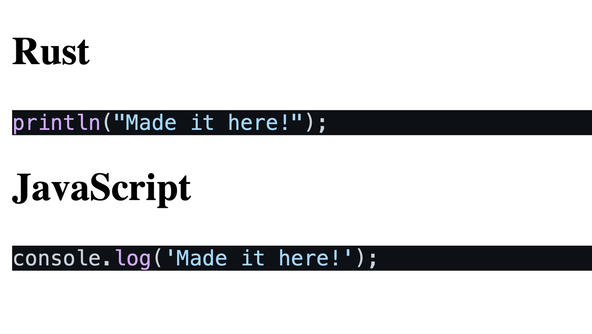
JavaScript code we can test on. Rename src/lib/routes/+page.svelte to +page.svelte.md and replace the content:
1 ## Rust2 3 ```rust4 println!("Made it here!");5 ```6 7 ## JavaScript8 9 ```javascript10 console.log('Made it here!');11 ```
When you paste in these code blocks, make sure the lines with backticks, which
start and end the fenced code blocks are not indented. If you open up the page
in a browser, you should now see some highlighted code. We will add more
styling later. If this does not work for you, try stopping your dev server,
running rm -r .svelte-kit and then restarting the
dev server.

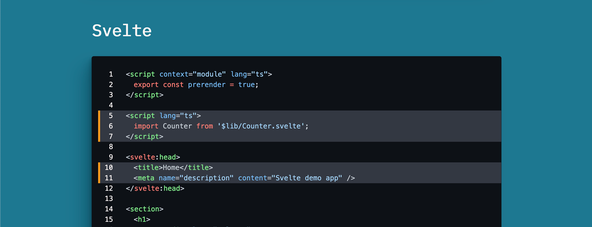
Next try adding some Svelte code to the bottom of the same file (this is taken from the Svelte demo code):
13 ## Svelte14 15 ```svelte {1,5-8}16 <script lang="ts">17 import Counter from '$lib/Counter.svelte';18 </script>19 20 <svelte:head>21 <title>Home</title>22 <meta name="description" content="Svelte demo app" />23 </svelte:head>24 25 <section>26 <h1>27 <div class="welcome">28 <picture>29 <source srcset="svelte-welcome.webp" type="image/webp" />30 <img src="svelte-welcome.png" alt="Welcome" />31 </picture>32 </div>33 34 to your new<br />SvelteKit app35 </h1>36 37 <h2>38 try editing <strong>src/routes/index.svelte</strong>39 </h2>40 41 <Counter />42 </section>43 44 <style>45 section {46 display: flex;47 flex-direction: column;48 justify-content: center;49 align-items: center;50 flex: 1;51 }52 53 h1 {54 width: 100%;55 }56 57 .welcome {58 position: relative;59 width: 100%;60 height: 0;61 padding: 0 0 calc(100% * 495 / 2048) 0;62 }63 64 .welcome img {65 position: absolute;66 width: 100%;67 height: 100%;68 top: 0;69 display: block;70 }71 </style>72 ```
You should get an error because Vite is parsing the code in the Svelte code
block we just added. We can prevent this by escaping the HTML generated by the highlighter function. We will address this next.

🏃🏽 highlighter Escaping Generated HTML Code #
highlighter Escaping Generated HTML Code #
We can create an escapeHtml function, which replaces
some characters with their HTML entity equivalents. Specifically, we will replace
“{”, “}” and “`”. Add this function to src/lib/utilities/codeHighlighter.mjs:
5 /**6 * Returns code with curly braces and backticks replaced by HTML entity equivalents7 * @param {string} html - highlighted HTML8 * @returns {string} - escaped HTML9 */10 function escapeHtml(code) {11 return code.replace(12 /[{}`]/g,13 (character) => ({ '{': '{', '}': '}', '`': '`' }[character]),14 );15 }
Then use the function in line 25:
18 async function highlighter(code, lang, meta) {19 await createHighlighter({20 langs: [lang],21 themes: [THEME],22 });23 const html = shikiHighlighter.codeToHtml(code, {24 lang,25 });26 return escapeHtml(html);27 }
You might need to restart the dev server for this to take effect. The browser
will now show the Svelte code without errors. We are not yet done with the highlighter but will look at some styling before returning to it.
💄 SvelteKit Shiki Syntax Highlighting: Styling #
First, create a global CSS file. Make a new directory src/lib/styles/ and in it create styles.css with the following
content:
1 html {2 font-family: IBM Plex Mono;3 }4 5 h1 {6 font-size: var(--font-size-5);7 font-weight: var(--font-weight-bold);8 margin-bottom: var(--spacing-12);9 }10 11 h2 {12 font-size: var(--font-size-4);13 font-weight: var(--font-weight-semibold);14 }15 16 body {17 margin: 0;18 font-weight: var(--font-weight-normal);19 background-color: var(--colour-brand);20 }21 22 code {23 counter-reset: step;24 counter-increment: step 0;25 }26 27 .shiki {28 border-radius: var(--spacing-1);29 padding: var(--spacing-6) var(--spacing-4);30 margin: var(--spacing-4) auto var(--spacing-18);31 box-shadow: var(--shadow-elevation-medium);32 overflow-x: auto;33 max-width: var(--max-width-full);34 }35 36 .highlighted {37 display: inline-block;38 background-color: var(--colour-code-background-highlighted);39 width: calc(var(--max-width-full) + var(--spacing-4));40 border-left: var(--spacing-1) solid var(--colour-code-line-highlight);41 margin-left: calc(-1 * var(--spacing-1));42 }43 44 :root {45 --colour-brand: hsl(193 67% 34%); /* elm */46 --colour-light: hsl(7 53% 97%); /* fantasy */47 48 --colour-code-line-numbers: hsl(219 14% 71% / 0.8);49 --colour-code-line-highlight: hsl(34 96% 55%);50 --colour-code-background-hue: 220;51 --colour-code-background-saturation: 13%;52 --colour-code-background-lightness: 18%;53 --colour-code-background-highlighted: hsl(54 var(--colour-code-background-hue) var(--colour-code-background-saturation)55 calc(var(--colour-code-background-lightness) + 5%)56 );57 58 --spacing-px: 1px;59 --spacing-px-2: 2px;60 --spacing-0: 0;61 --spacing-1: 0.25rem;62 --spacing-2: 0.5rem;63 --spacing-4: 1rem;64 --spacing-6: 1.5rem;65 --spacing-12: 3rem;66 --spacing-18: 4.5rem;67 --max-width-wrapper: 48rem;68 --max-width-full: 100%;69 70 --font-size-root: 16px;71 --font-size-3: 1.563rem;72 --font-size-4: 1.953rem;73 --font-size-5: 2.441rem;74 --font-size-6: 3.052rem;75 76 --font-weight-normal: 400;77 --font-weight-semibold: 600;78 --font-weight-bold: 700;79 80 --line-height-normal: 1.5;81 82 /* CREDIT: https://www.joshwcomeau.com/shadow-palette/ */83 --shadow-color: 194deg 84% 18%;84 --shadow-elevation-medium: -1px 1px 1.6px hsl(var(--shadow-color) / 0.36),85 -3.3px 3.3px 5.3px -0.8px hsl(var(--shadow-color) / 0.36),86 -8.2px 8.2px 13px -1.7px hsl(var(--shadow-color) / 0.36),87 -20px 20px 31.8px -2.5px hsl(var(--shadow-color) / 0.36);88 }89 90 code .line::before {91 display: inline-block;92 content: counter(step);93 counter-increment: step;94 width: var(--spacing-6);95 margin-right: var(--spacing-6);96 text-align: right;97 font-variant-numeric: tabular-nums;98 color: var(--colour-line-numbers);99 }
Then we create a layout file, which mdsvex will use for all pages it
processes. Make a src/lib/components directory and
add a MarkdownLayout.svelte file:
1 <script>2 import '$lib/styles/styles.css';3 import '@fontsource/ibm-plex-mono';4 </script>5 6 <svelte:head>7 <title>SvelteKit Shiki Syntax Highlighting: Markdown Code Blocks</title>8 <meta9 name="description"10 content="SvelteKit Shiki syntax highlighting: use any VS Code colour theme to accessibly syntax highlight code on your SvelteKit app with line numbers."11 />12 </svelte:head>13 <main class="container">14 <h1 class="heading">SvelteKit Shiki Code Highlighting</h1>15 <slot />16 </main>17 18 <style>19 .container {20 background-color: var(--colour-brand);21 color: var(--colour-light);22 width: min(100% - var(--spacing-12), var(--max-width-wrapper));23 margin: var(--spacing-0) auto;24 padding: var(--spacing-12) var(--spacing-0);25 font-size: var(--font-size-1);26 line-height: var(--line-height-normal);27 }28 .heading {29 text-align: center;30 }31 </style>
The final missing piece here is to use the new layout, uncomment line 11 in mdsvex.config.mjs:
10 },11 layout: join(__dirname, './src/lib/components/MarkdownLayout.svelte'),12 };13 14 export default config;
You might need to restart your dev server once more for any changes to take
effect. The code blocks should look a lot nicer now. You will also notice we
now have line numbers. These come from the CSS in lines 22 – 25 & 90 – 99 in the src/lib/styles/styles.css file.
🤗 Accessibility Improvement #
Exploring the HTML from the first block, we can see it looks something like this:
<pre class="shiki" style="background-color: #0d1117"> <code> <span class="line"> <span style="color: #D2A8FF">println</span><span style="color: #C9D1D9">(</span><span style="color: #A5D6FF">"Made it here!"</span><span style="color: #C9D1D9">);</span></span> </code></pre>
For long lines, the <pre> block will be
horizontally scrollable. For accessibility, it will need to be focusable. This is
possible by adding a tabindex attribute to the element.
At the time of writing, it is not possible to do this within Shiki, though there
is a pull request to modify the API . Instead, we will just update the output HTML using node-html-parser. Add this new function to src/lib/utilities/codeHighlighter.mjs:
18 /**19 * @param html {string} - code to highlight20 * @returns {string} - highlighted html21 */22 function makeFocussable(html) {23 const root = parse(html);24 root.querySelector('pre').setAttribute('tabIndex', '0');25 return root.toString();26 }
Then use the function in line 42:
34 await createHighlighter({35 langs: [lang],36 themes: [THEME],37 });38 const html = await codeToHtml(code, {39 lang,40 theme: THEME,41 });42 43 html = makeFocussable(html);44 return escapeHtml(html);
⭐ Using SvelteKit with Shiki: Extra Line Highlighting #
We might want to add additional highlighting to particular lines. One way to
do this with Shiki is to add a new class to certain lines. This is possible
using the transformers field in the Shiki codeToHtml, with a transform function from @shikijs/transformers function call options. Here is the final version of the highlighter function:
23 /**24 * @param code {string} - code to highlight25 * @param lang {string} - code language26 * @param meta {string} - code meta27 * @returns {Promise<string>} - highlighted html28 */29 async function highlighter(code, lang, meta) {30 await createHighlighter({31 langs: [lang],32 themes: [THEME],33 });34 35 let html;36 if (!meta) {37 html = await codeToHtml(code, {38 lang,39 theme: THEME,40 });41 } else {42 html = await codeToHtml(code, {43 lang,44 theme: THEME,45 meta: { __raw: meta },46 transformers: [transformerMetaHighlight()],47 });48 }49 50 html = makeFocussable(html);51 return escapeHtml(html);52 }53 54 export default highlighter;
So here we check if there is range meta passed into the highlighter. When we do have meta, we use tje transformerMetHighlight function to add a highlighted class to matching lines. We added styling for this earlier in src/styles/styles.css (lines 36 – 42), though we did
not mention it at the time.
Restart your dev server once more if the changes do not appear in the browser. Try adding highlight meta to the other code blocks or changing the highlight ranges for the Svelte block. Do not include any spaces in the ranges you specify.

🗳 Poll #
💯 SvelteKit Shiki Syntax Highlighting: Test #
It should all be working now. We focussed on getting through the demo, rather than explaining every detail. Because of that, please do let me know if there is some part, which needs some clarification. Also, remember to run accessibility contrast checks, especially if you have changed the themes.
Please enable JavaScript to watch the video 📼
🙌🏽 SvelteKit Shiki Syntax Highlighting: Wrapup #
In this post we looked at:
- how to add Shiki syntax highlighting in SvelteKit, including line numbers and extra highlighting styles for some lines,
- generating your own code highlighter with mdsvex,
- how to manipulate the output Shiki HTML to make the result more accessible.
I do hope there is at least one thing in this article, which you can use in your work or a side project. Also, let me know if you feel more explanation of the config is needed.
This post is related to a question I got on Twitter on adding line numbers to code blocks, so do reach out if you have questions I might be able to write a post on. I also create short videos focussed on a particular topic.
You can see the full SvelteKit code for this project on the Rodney Lab Git Hub repo . If you run into any issues, you can drop a comment below as well as reach out for a chat on Element . Also, Twitter @mention if you have suggestions for improvements or questions.
🏁 SvelteKit Shiki Syntax Highlighting: Summary #
Does Shiki work with mdsvex? #
- Although out-of-the-box, mdsvex uses PrismJS for code highlighting, you can define a custom highlighter using Shiki (or even your own hand-rolled highlighter). To do this, just pass a highlighter function to the mdsvex configuration. The highlighter function takes three arguments, the code itself, the coding language of the code and some optional meta. The meta will be helpful if, for example, you want to add extra highlighting to certain lines.
How can you make a scrolling code fragment focusable? #
- Making scrolling elements focusable helps users navigating the site by keyboard scroll those elements. For that reason, it is important these elements are focusable for accessibility reasons. To make an element scrollable, add a tabindex attribute. Set the value of this element to a non-negative value. Negative tabindex values are only used when the element should not be focusable. For positive tabindex values, the order of the values sets the sequence in which users will tab through the elements. That said, you should arrange elements in a logical order and set tabindex to 0 for all focusable element whenever possible.
How can you add line numbers to Shiki highlighted code? #
- At the time of writing, Shiki does not have an API for adding line numbers, however, it is fairly easy to do so with CSS. We have seen you can use CSS counters to add line numbers as a pseudo-element at the start of each line.
🙏🏽 Feedback #
If you have found this video useful, see the links below for further related content on this site. I do hope you learned one new thing from the video. Let me know if there are any ways I can improve on it. I hope you will use the code or starter in your own projects. Be sure to share your work on Twitter, giving me a mention, so I can see what you did. Finally, be sure to let me know ideas for other short videos you would like to see. Read on to find ways to get in touch, further below. If you have found this post useful, even though you can only afford even a tiny contribution, please consider supporting me through Buy me a Coffee.


Just dropped a new blog post showing you how to use mdsvex with Shiki syntax highlighting in your ❤️ Svelte blog.
— Rodney (@askRodney) April 27, 2022
You see how to add line numbers and also extra classes to code particular lines for alternative highlighting.
I hope you find it useful!
https://t.co/Iko9hZuH2l
Finally, feel free to share the post on your social media accounts for all your followers who will find it useful. As well as leaving a comment below, you can get in touch via @askRodney on Twitter and also askRodney on Telegram . Also, see further ways to get in touch with Rodney Lab. I post regularly on SvelteKit as well as Search Engine Optimization among other topics. Also, subscribe to the newsletter to keep up-to-date with our latest projects.