


📐 Capsize Typography Tooling #
In this post, we will see how you can add Svelte Capsize styling to your SvelteKit app. Although we use SvelteKit you should be able easily to adapt the code for Astro or Slinkity. Before that though we should have a look at what Capsize is and the problems it solves. Capsize is a tool which helps you to design text layouts in a predictable way. Typically, to adjust how big a piece of text appears in the browser window, we change the CSS font-size property. This works, but the spacing above and below the text as it appears in the browser is not easy to determine. The space below the baseline and above the text is unpredictable and changes from font to font, even with fixed font size.
In summary, if you set a font size of 16px or
even 1em, you will not know predictably what
the height of any displayed character will be. This is quite different to,
for example, how img or other block elements are
defined — we can reliably and predictably set height for these. Capsize
lets us define a cap height to adjust the size of rendered characters.
Further, it gives us parameters needed to trim a snug bounding box. This is fantastic for creating predictable text layouts.
🧱 Svelte Capsize Styling: Building #


In the image above, we can see Capsize makes it possible to generate snug text elements. Capsize does this by generating a styles object similar to those created by CSS in JS frameworks. To sveltify these styles objects, we will use Svelte actions and custom properties. Interested to hear if you have another method of attack! Drop a comment below if you do.
Rather than build out an app, in this post we will look at how to set up Capsize and then see a way to apply the generated styles in Svelte. Although we won’t build out an app, there is a full demo on the Rodney Lab GitHub page if you want a closer look at how the implementation works. We will look at SvelteKit code here, though the code should work in Astro or Slinkity.
⚙️ Capsize Setup #
The only setup for Capsize is to install a couple of packages:
pnpm add -D @capsizecss/core @capsizecss/metrics
📏 Font Metrics #
To get a better understanding of Capsize inputs and outputs, here is a screenshot from a tool on the Capsize site. It shows metrics for the Courier New font, which we use in the demo code.

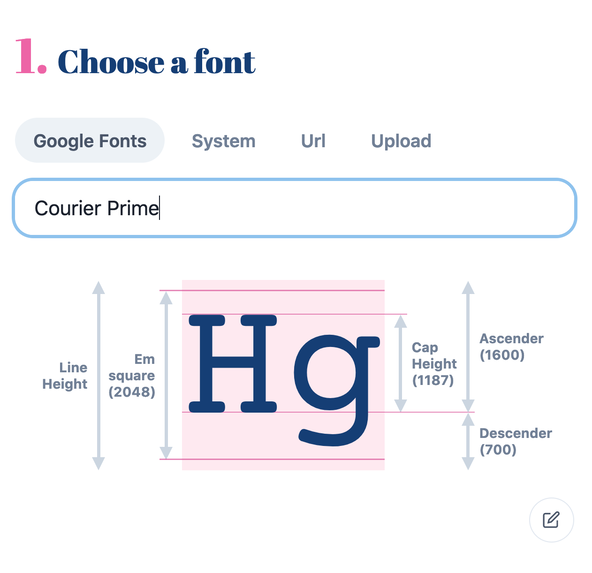
The Em square is a fundamental unit which originates from printing. It is a square with sides set equal to the width of an uppercase ‘M’ printed using the typeface. For us, it represents the space the element takes up on screen and is used to set font size.
We can specify font size or cap height as a Capsize input. Let’s
say we need tighter control over the height of each row in our comparison chart
(above). Setting cap height gives us the control and predictability we are looking
for; if we want capital letters to be 48px high,
we can easily have that by setting cap height to that value. If we were replicating
a Figma or Penpot design with font heights set, we might instead opt for setting
font size.
🚤 Using Capsize in Svelte #
Let’s start by seeing what Capsize creates for us. The second row of the
With Capsize / Wihtout Capsize comparison charts has cap height set to 48px. We’ll use that as a concrete value to examine Capsize inputs and
outputs. Since the metrics vary from font to font, we need to specify our font
as an input. Here’s the Svelte code for the 48px cap height example:
1 <script>2 import { createStyleObject } from '@capsizecss/core';3 import courierPrimeMetrics from '@capsizecss/metrics/courierPrime';4 5 const styles = createStyleObject({6 capHeight: 48,7 lineGap: 24,8 fontMetrics: courierPrimeMetrics,9 });10 </script>
We import Courier Prime font metrics from @capsizecss/metrics/courierPrime in line 3. These are then used to
generate the styles (lines 5 – 9). Let’s take
a peek at these metrics:
{ familyName: "Courier Prime", capHeight: 1187, ascent: 1600, descent: -700, lineGap: 0, unitsPerEm: 2048, xHeight: 924}
These match the data from the screenshot of the tool on the Capsize size above.
The first question you will ask is probably how these numbers relate to the
font size. For our precise use case, we want to set cap height, so we know how
high our upper case letters in the chart will be. The unitsPerEm field in the metrics is just the height of the em square. So, the ratio of em
square height to cap height is 2048 / 1187 = 1.725. This means if we set capHeight to 48px when
using Capsize, we want a 48px * 1.725 = 82.8px font
for the without Capsize comparison.
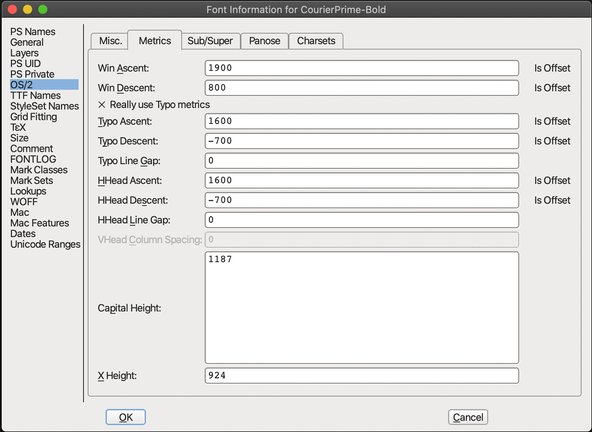
You can examine the precise font measurements using FontForge.

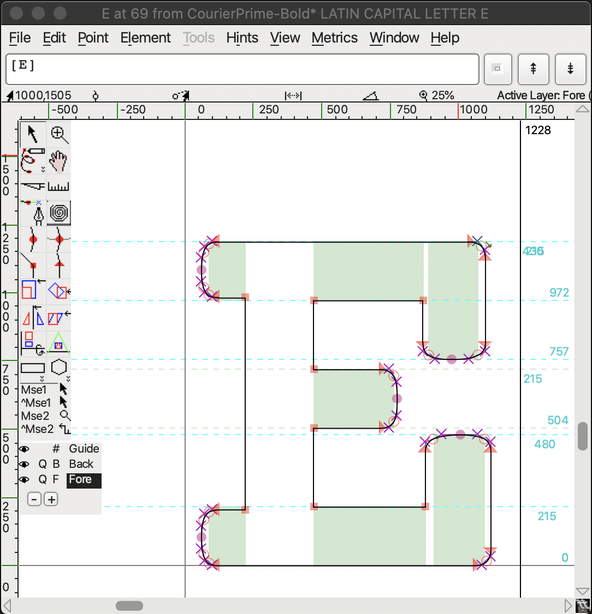
It also provides another route to the metrics above.

We won’t go into more detail on metrics here, though there is an excellent Deep dive on font metrics by Vincent De Oliveira . Google Fonts also provide an alternative explanation of em square .
In the rest of the article, we focus on the Svelte implementation.
💄 Styles object #
The styles object generated for our example looks like this:
{ fontSize: "82.8172px", lineHeight: "72px", "::before": { content: "''", marginBottom: "-0.0748em", display: "table" }, "::after": { content: "''", marginTop: "-0.215em", display: "table" }}
You will notice we have ::before and ::after pseudo-element s in there. Svelte has style directives (we will see an example
shortly) which can set styles for an element itself, but not for pseudo-element
s. Using Svelte actions, it is possible to set custom CSS properties (often also
called CSS variables). Our plan of attack is to use Svelte actions to define all
the CSS values we need (pseudo and actual element). We will define these on a parent
wrapper element, so that they are in scope on the actual lines we want to use them
in. So markup is roughly something like this:
<span class="container"> <div class="line with-capsize-line"><slot /></div></span>
with scoped CSS
.with-capsize-line { font-size: var(--font-size); line-height: var(--line-height); } .with-capsize-line::before { content: var(--before-content); margin-bottom: var(--before-margin-bottom); display: var(--before-display); } .with-capsize-line::after { content: var(--after-content); margin-top: var(--after-margin-top); display: var(--after-display); }
🎬 Styles Action #
Svelte lets you define CSS custom properties on an element . It takes care of making them available within CSS for you. With that helping hand, effectively, we need to transform the container span above into something like:
<span --font-size={X} --line-height={Y} --before-content={Z} class="container"> <div class="line with-capsize-line"><slot /></div></span>
That is what we will use Svelte actions for. Svelte actions have the node they are applied to as the first parameter. There can also be a second parameter which takes the value we set on the node. We will use that to pass the styles object in. Then the action’s job is to split the styles object up into custom properties we want added to the node. Here is the code:
1 /**2 * @param {HTMLElement} node - action element3 * @param {{fontSize: string; lineHeight?: string; '::before'?: {content?: string; marginBottom?: string; display?: string}; '::after'?: {content?: string; marginTop?: string; display?: string}}} styles - element styles4 */5 function setCustomProperties(node, styles) {6 const { fontSize, lineHeight, '::before': before, '::after': after } = styles;7 8 fontSize && node.style.setProperty('--font-size', fontSize);9 lineHeight && node.style.setProperty('--line-height', lineHeight);10 11 if (before) {12 const { content, marginBottom, display } = before;13 content && node.style.setProperty('--before-content', content);14 marginBottom && node.style.setProperty('--before-margin-bottom', marginBottom);15 display && node.style.setProperty('--before-display', display);16 }17 if (after) {18 const { content, marginTop, display } = after;19 content && node.style.setProperty('--after-content', content);20 marginTop && node.style.setProperty('--after-margin-top', marginTop);21 display && node.style.setProperty('--after-display', display);22 }23 }24 25 /**26 * @param {HTMLElement} node - action element27 * @param {{fontSize: string; lineHeight: string; '::before': {content: string; marginBottom: string; display: string}; '::after': {content: string; marginTop: string; display: string}}} styles - element styles object28 * @returns{{update: (styles: {fontSize: string; lineHeight?: string; '::before'?: {content?: string; marginBottom?: string; display?: string}; '::after'?: {content?: string; marginTop?: string; display?: string}}) => void}} - 29 */30 function styles(node, styles) {31 setCustomProperties(node, styles);32 return {33 update(styles) {34 setCustomProperties(node, styles);35 },36 };37 }38 39 export default styles;
🧩 Using the Action: Line Component #
The structure of the app is that we create each of the two charts using a Chart Svelte component. Then each line in a chart is a line Svelte component. The line components are where we use Capsize. Here is a possible implementation of the line component, using the new action:
1 <script>2 import { createStyleObject } from '@capsizecss/core';3 import courierPrimeMetrics from '@capsizecss/metrics/courierPrime';4 import capsizeStyles from '$lib/shared/actions/styles';5 6 /** @import {Snippet} from 'svelte' */7 8 /** @type {{capHeight: number; children: Snippet}} */9 let { capHeight, children } = $props();10 11 const styles = createStyleObject({12 capHeight,13 lineGap: 24,14 fontMetrics: courierPrimeMetrics,15 });16 </script>17 18 <span use:capsizeStyles={styles} class="container">19 <div class="line with-capsize-line">{@render children?.()}</div>20 </span>
You see how we use the action in code in line 18.
💄 Chart Component Styling: Svelte Style Props #
As an aside, the two charts have different background colours. In the code where we consume them, we can set the CSS custom property for the background right on the element:
<!-- ...TRUNCATED> --><Chart --background-colour="hsl(340deg 70% 70%)" withCapsize={false} />
Then in the chart component itself, we use this in the CSS
20 <style>21 .container {22 padding: var(--spacing-12) var(--spacing-4);23 background-color: var(--background-colour);24 width: var(--max-width-full);25 height: 100%;26 }27 </style>
These are called style props. You can read more on style props in the Svelte docs .
⏱ Final Line Component #
For completeness, here is the final Line component code:
src/lib/components/Line.svelte — click to expand code.
1 <script>2 import capsizeStyles from '$lib/shared/actions/styles';3 import { createStyleObject } from '@capsizecss/core';4 /** @ts-ignore */5 import courierPrimeMetrics from '@capsizecss/metrics/courierPrime';6 7 /** @import {Snippet} from 'svelte' */8 9 /** @type {{capHeight: number; withCapsize: boolean; children: Snippet}} */10 let { capHeight, withCapsize, children } = $props();11 12 const styles = createStyleObject({13 capHeight,14 lineGap: 24,15 fontMetrics: courierPrimeMetrics,16 });17 18 const { capHeight: capHeightEm, unitsPerEm } = courierPrimeMetrics;19 const fontSizeToCapHeight = unitsPerEm / capHeightEm;20 const fontSize = `${capHeight * fontSizeToCapHeight}px`;21 </script>22 23 {#if withCapsize}24 <span use:capsizeStyles={styles} class="container">25 <div class="line with-capsize-line">26 {@render children?.()}27 </div>28 </span>29 {:else}30 <span class="container">31 <div style:font-size={fontSize} class="line">32 {@render children?.()}33 </div>34 </span>35 {/if}36 37 <style>38 .line {39 background-color: var(--colour-light);40 color: var(--colour-dark);41 margin: var(--spacing-4) auto;42 font-weight: var(--font-weight-bold);43 font-size: var(--font-size);44 text-align: center;45 width: fit-content;46 line-height: calc(1 / 1.2);47 }48 49 .with-capsize-line {50 line-height: var(--line-height);51 }52 53 .with-capsize-line::before {54 content: var(--before-content);55 margin-bottom: var(--before-margin-bottom);56 display: var(--before-display);57 }58 59 .with-capsize-line::after {60 content: var(--after-content);61 margin-top: var(--after-margin-top);62 display: var(--after-display);63 }64 </style>
The promised style directive example comes in line 31. We set font-size on the div. We use a style directive here because we have a dynamic property.
This value overrides the one set in the style block.
🗳 Poll #
🙌🏽 Svelte Capsize Styling: Wrapup #
In this post we looked at:
- how to use Capsize with Svelte for more predictable text layouts,
- adding CSS custom properties to a Svelte element using Svelte actions,
- how you can add style props to Svelte components, setting CSS custom properties (CSS variables).
I do hope there is at least one thing in this article which you can use in your work or a side project. Also, let me know if you feel more explanation of the config is needed.
You can see the full SvelteKit code for this project on the Rodney Lab Git Hub repo . If you run into any issues, you can drop a comment below as well as reach out for a chat on Element . Also, Twitter @mention if you have suggestions for improvements or questions.
🏁 Svelte Capsize Styling: Summary #
How can you target a pseudo-element in Svelte CSS custom properties? #
- You can add custom CSS properties (also known as CSS variables) directly to Svelte elements or even as style props to Svelte components. We are talking about placing the properties directly on elements and components in the Svelte markup here, rather than in the style element. You might want to do this to change the value of a CSS custom property using JavaScript. Although you can target regular elements this way, you need a workaround if you ever need to change pseudo-elements. One way to accomplish this is to add a wrapper around the element and add the styles for the pseudo-element as CSS custom properties using a Svelte action. Custom CSS properties set on the wrapper will be in scope for the original element (including its pseudo-element s). We have seen an example of implementing this.
How can size text elements with Capsize? #
- Capsize gives you more control over text layouts. It exists because the way font sizes are defined can make it difficult to determine the height of a text block in the browser. Capsize lets you set the cap height, for more predictable text layouts, especially across different fonts. On top, it calculates CSS adjustments to create a tighter element for your text, making your text layout more predictable.
Does Capsize work with Svelte? #
- Capsize generates a set of CSS adjustments needed for each font in your layout. You then add these to text nodes to get a snugly fitting element. Capsize creates these CSS styles as a JavaScript object. They include margin adjustment on the text element's before and after pseudo-element s. This makes it slightly harder to add the JavaScript styles in Svelte markup. As a workaround, you can add CSS custom properties to the before and after pseudo-element s in your Svelte file style element. Then, you use a Svelte action to adjust these custom properties on a wrapper element. We have seen using a wrapper element lets you target the pseudo-element s in your Svelte action.
🙏🏽 Feedback #
If you have found this video useful, see links below for further related content on this site. I do hope you learned one new thing from the video. Let me know if there are any ways I can improve on it. I hope you will use the code or starter in your own projects. Be sure to share your work on Twitter, giving me a mention, so I can see what you did. Finally, be sure to let me know ideas for other short videos you would like to see. Read on to find ways to get in touch, further below. If you have found this post useful, even though you can only afford even a tiny contribution, please consider supporting me through Buy me a Coffee.
Finally, feel free to share the post on your social media accounts for all your followers who will find it useful. As well as leaving a comment below, you can get in touch via @askRodney on Twitter and also askRodney on Telegram . Also, see further ways to get in touch with Rodney Lab. I post regularly on SvelteKit as well as Astro among other topics. Also, subscribe to the newsletter to keep up-to-date with our latest projects.