


✨ SvelteKit Image Plugin #
After finding your feet with SvelteKit, probably one of the most sought after features is a SvelteKit image plugin. If you are coming from a React background, you might be thinking of something along the lines of next/image . The great news is that there is a plugin for generating Next-Gen, responsive images in SvelteKit. The bonus is you don't sacrifice SvelteKit's lightning fast development experience to use it.
In this post, we have a look at how you can leverage the slick Vite
environment at the heart of SvelteKit to generate Next-Gen, responsive
images. We also look at some techniques pioneered by image optimization guru Addy Osmani to minimize Cumulative Layout Shift. If you don’t yet know what that is,
don’t worry, we'll visit some terms used here, next. We'll also have a brief
introduction to the async/await API, which you will find handy if you
are new to JavaScript.
🧑🏽🎓 What do Responsive, Next‑Gen, Cumulative Layout Shift and Lazy Loading all Mean? #
Responsive is just a way of saying your app adjusts to the user device's display width. This means the buttons are not so small that when you open the app on your phone, it’s difficult to press them. Responsiveness is a ranking factor for Google, mostly because responsive sites create great user experience. Responsive images scale down to fit the browser window width (so you don't have to scroll across to see the rest of the image, or have it abruptly cropped). For these devices, with smaller screens, we can safely serve a lower resolution image. This will be smaller, allowing the page to load faster. Which brings us back to enhanced user experience.
Next‑Gen Images #
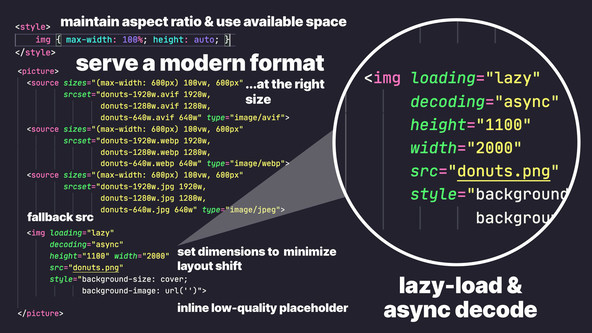
Talking of serving smaller images, that's what Next-Gen images are all about. WebP (which we focus on today) as well as AVIF and JPEG XL format images are created using algorithms designed to preserve image quality, while shrinking the image size. Although WebP celebrates wider support than its newer cousins AVIF and JPEG XL, none of these are supported by older browsers. This means to play it safe, when we serve Next-Gen images we also include a fallback in our markup. The fallback is shown if the other formats are not supported by the user's browser. You can set a fallback chain, trying JPEG XL first, then falling back to AVIF, then WebP and finally if all else failed JPEG (or PNG).
Cumulative Layout Shift #
Most popular sites today are well-designed. There are still a few that can be a little frustrating to use because of cumulative layout shift. This is when the page is slow to load, you get impatient and hit a button, while waiting to interact. Just as you hit the button (but too late for you to pull out of the button press), the layout changes. You push a button or click a link you didn't intend to. Now a page you have no interest in at all is loading (slowly) and you have to wait to go back, re-click and then wait again, while the page you actually wanted loads.
What an awful user experience! Which is why cumulative layout shift is a core metric used by Google's page ranking algorithm. Pictures can be a cause of CLS. We will see that if we add a placeholder (smaller file which takes up the same layout space as the ultimate image) we can eliminate Cumulative Layout Shift.
Lazy Loading #
This is important where you have a lot of content to load on a page. Lazy loading is a way for us, as developers, to tell the browser which images to focus on and which it can wait until the user scrolls down. Imagine an Instagram feed. You can scroll down and eventually see hundreds of images. However, when you first open up the feed, you only need to see a handful of images. If the device tried to load the hundreds of images in the feed initially, you would have to wait forever even to see the handful of images at the top of the feed (as it tried to load all the images).
A more sensible approach is to focus on loading the images in view and lazy
load the others (this is something like client:visible hydration when using Astro). In other words, wait for the user to scroll down before loading another
handful of images. We can load our placeholders initially (these will be
smaller than the ultimate image) and defer loading the actual image until it
is needed.
We will dovetail all these techniques together to create the ultimate user experience. This should lead to higher ranking for our site pages.
🧱 What are We Building? #
We'll start with the SvelteKit MDsveX starter and add a responsive image to the home page. We will see how you can generate a low resolution placeholder as well as an alternative dominant colour placeholder. We will generate a WebP Next-Gen format image together with the original JPEG in different sizes, so the image looks good on large retina displays without having to download a huge image for small mobile displays. Using the placeholders, we will eliminate image layout shift.
Please enable JavaScript to watch the video 📼
Please enable JavaScript to watch the video 📼
If that all sounds good, then why don't we get cracking?
🚀 Getting Started #
To get the ball rolling, clone the MDsveX SvelteKit starter and get your local clone ready for development:
git clone https://github.com/rodneylab/sveltekit-blog-mdx.git sveltekit-image-plugincd sveltekit-image-pluginpnpm installcp .env.EXAMPLE .envpnpm run dev
Here we clone the repo into a new directory, change into that directory,
install packages and create some placeholder environment variables. Finally,
we spin up the dev server. Swap pnpm for npm if you prefer npm, or use the yarn equivalent, if you are a yarn person.
We will need a couple of packages later, let's install them now:
pnpm install -D sharp vanilla-lazyload
We are installing the same version of sharp here which is used in vite-imagetools (see below). We will use sharp to help create the placeholder images.
We are also using vite-imagetools . This is already included in the repo. If you are following along on your
own existing project, install vite-imagetools now.
Also, see how to configure it in your vite.config.js file (no need to do this if you cloned the starter as described above):
vite.config.js — click to expand code.
1 import { sveltekit } from '@sveltejs/kit/vite';2 import { imagetools } from 'vite-imagetools';3 4 /** @type {import('vite').UserConfig} */5 const config = {6 define: {7 'process.env.VITE_BUILD_TIME': JSON.stringify(new Date().toISOString()),8 },9 plugins: [imagetools(), sveltekit()],10 };11 12 export default config;
🖼 Basic Image with vite‑imagetools #
Now let's add a JPEG, as a starting point. Download the file me.jpg and save it in the src/lib/assets/ directory in
the project. That image is 1344 pixels wide. We will display the image at a
maximum width of 672 px and need the input to be double that to cater for retina
displays. The next step is to render the image, edit src/routes/index.svelte:
19 <script> ogSquareImageSrc from '$lib/assets/home/home-open-graph-square.jpg';20 import ogImageSrc from '$lib/assets/home/home-open-graph.jpg';21 import twitterImageSrc from '$lib/assets/home/home-twitter.jpg';22 import featuredImageSrc from '$lib/assets/home/home.jpg';23 import meImage from '$lib/assets/me.jpg?w=672';24 import BlogRoll from '$lib/components/BlogRoll.svelte';25 import Card from '$lib/components/Card.svelte';26 import SEO from '$lib/components/SEO/index.svelte';27 import website from '$lib/config/website';28 // ...29 </script>
Here we import the image into the meImage variable.
Note, we added a query string onto the end: ?w=672. vite-imagetools will process the import and
generate a 672 pixel wide output for us. This will be our base fallback image,
we will include the 1344 px wide retina image later. SvelteKit will copy the
image to the build directory and cache it. For now, working on the dev server, the
meImage variable just links to a temporary file.
You can see this if you console log it. As the variable
points to the image source we want to use, we can use it as the src attribute in an img tag. Let's do that next:
86 <SEO {...seoProps} />87 <header>88 <h1>Climate — Sveltekit Starter</h1>89 <h2>SvelteKit MDsveX (Markdown for Svelte) Blog</h2>90 </header>91 <img92 alt={featuredImageAlt}93 loading="lazy"94 decoding="async"95 width="672"96 height="448"97 src={meImage}98 />99 <Card>100 <h2><span>About me</span></h2>101 <p>102 I live and breathe analogue photography. I show you my favourite analogue film cameras on this103 site. Hopefully if you are not into analogue photography yet, some of my enthusiasm will rub off104 onto you.105 </p>106 </Card>
There is a lot to remember in setting up responsive images and I find this tweet from Addy Osmani really helpful:

img Element Attributes #
img Element Attributes #
We will work towards something along those lines. Anyway, going back to the img element we just created, you are probably already aware the alt attribute is important for users with visual impairments and describes the image.
Next, the loading attribute can be eager (default) or lazy. This determines whether
the browser defers loading until the image is in the viewport. As a rule of
thumb, the largest image, initially in the visible viewport (before the user
scrolls down), should be eager loading. This is
so that the page looks interactive quicker. Any other images can be set to lazy. Here, since we want to see how to set up a lazy loading image in our
example we will set it to lazy, even though our image is initially in the
visible viewport. loading is not supported by all
browsers, so we have a couple more lazy loading tricks later.
The decoding attribute set to async hints that the browser should start decoding the image and immediately continue
parsing the remaining content, rather than waiting for decode to complete before
proceeding. This is another measure to improve user experience, so we get more content
visible quicker.
Finally, it is important to set height and width, to reduce cumulative layout shift. By setting both height and width, the
browser knows the aspect ratio of the image and can reserve the right amount
of space for it in the layout, while it waits for it to load. Read more about img element tags from MDN .
Let's also update the styling of the image at the bottom of our home page file:
109 <style lang="scss">110 header > h2 {111 font-size: $font-size-3;112 }113 114 img {115 border-radius: $spacing-1;116 margin: $spacing-6 $spacing-0 $spacing-12;117 max-width: 100%;118 height: auto;119 }120 </style>
💫 Creating Low Resolution and Dominant Colour Placeholders #
Placeholders are another trick for reducing cumulative layout shift. To do this, they need to be exactly the same size as the actual image (though they are typically lower resolution). On top, they make the page look more interesting, while the actual image loads, again improving user experience.
We will use the sharp imaging plugin to generate the placeholders. sharp will encode these as Base64 strings for us. We will make our placeholder generation functions available via a server
endpoint. Within the load function (first script block) on our page, we load the
placeholders before we render the page. Let's tackle things in that order.
The starter already includes some image utility functions. Let's have a look
at src/lib/utilities/image.js (no need to change
anything in the project here):
1 import sharp from 'sharp';2 3 export async function dominantColour({ source }) {4 try {5 const image = sharp(source);6 const { dominant } = await image.stats();7 return dominant;8 } catch (error) {9 console.error('Error determining dominant colour: ', source);10 }11 }12 13 export async function lowResolutionPlaceholder({ source }) {14 try {15 const image = sharp(source);16 const buffer = await image17 .resize(10)18 .jpeg({19 quality: 50,20 progressive: true,21 optimiseScans: true,22 chromaSubsampling: '4:2:0',23 trellisQuantisation: true,24 quantisationTable: 2,25 })26 .toBuffer({ resolveWithObject: false });27 return `data:image/jpeg;base64,${(await buffer).toString('base64')}`;28 } catch (error) {29 console.error('Error generating low resolution placeholder: ', source);30 }31 }
async/await in Brief #
async/await in Brief #
We are using async/await here. As an example, in line 6, generating
the image stats might not be immediate. The result however is needed in the
next line. Normally, JavaScript code runs asynchronously, which means it won't
wait for the result of line 6 before starting work
on line 7, (it just starts execution and hopes
for the best!). This is different to how code generated by many other
languages runs.
To help us out, the sharp library authors implemented the stats() function to return a promise instead of the result. A promise will either fail
or eventually resolve to the result. By including the keyword await, we tell the server not to continue to line 7 until the promise is resolved, and we have a result. Whenever we use the await keyword in a function, we also need to add the async keyword to the function signature (you can see this in line 3). Finally, since the promise can fail, it is a good idea to wrap the block
in a try/catch block.
Where to Learn More #
That is a very basic explanation. I found Jonas Schmedtmann's Udemy course fantastic on explaining some key JavaScript concepts (please don't pay the full price... you should be able to get it much cheaper if you set up a new account). Also, see MDN Using Promises documents as a free alternative.
Dominant Colour Placeholder Function #
The dominantColour function uses the sharp library,
and we can use the result to generate a placeholder which is a block in a single
colour, much like the image placeholders you see on Twitter. Let's create a function
which uses it to generate a 3 px × 2 px image (same aspect
ratio as our originals):
13 export const dominantColourPlaceholder = async ({ source }) => {14 try {15 const dominant = await dominantColour({ source });16 const { r, g, b } = dominant;17 const buffer = await sharp({18 create: {19 width: 3,20 height: 2,21 channels: 3,22 background: { r, g, b },23 },24 })25 .jpeg()26 .toBuffer({ resolveWithObject: false });27 return `data:image/jpeg;base64,${buffer.toString('base64')}`;28 } catch (error) {29 console.error('Error determining dominant colour: ', source);30 }31 };
Finally, the lowResolutionPlaceholder function resizes
the input to ten pixels wide and reduces the quality. See sharp API docs on resizing images if you want to tweak the parameters for your own project. Both functions output
a Base64 encoded string.
Before we move on, let's export a path we will use later
1 import sharp from 'sharp';2 3 export const IMAGE_DIR = '/src/lib/assets/';
Placeholder Endpoint #
Next we want to create an endpoint which we can send our images to for
processing and which uses our new functions. Create a new folder in the
project at src/routes/api and within the new directory
add a image-placeholders.json.js file and add this
content:
1 import {2 dominantColourPlaceholder,3 IMAGE_DIR,4 lowResolutionPlaceholder,5 } from '$lib/utilities/image';6 import path from 'path';7 const __dirname = path.resolve();8 9 export async function POST({request}) {10 try {11 const { images } = await request.json();12 13 const dominantColourPromises = images.map((element) => {14 const source = path.join(__dirname, IMAGE_DIR, element);15 return dominantColourPlaceholder({ source });16 });17 18 const placeholderPromises = images.map((element) => {19 const source = path.join(__dirname, IMAGE_DIR, element);20 return lowResolutionPlaceholder({ source });21 });22 23 const dominantColours = await Promise.all(dominantColourPromises);24 const placeholders = await Promise.all(placeholderPromises);25 return {26 body: JSON.stringify({ placeholders, dominantColours }),27 };28 } catch (err) {29 console.log('Error: ', err);30 31 return {32 status: 500,33 error: 'Error retrieving data',34 };35 }36 };
Our endpoint can process multiple images in a single request. We feed in file
names in an images array, it looks for these files
in the src/lib/assets folder. Once again, we are
using promises. If you looked at promises for the first time in the code block above,
you might want to gloss over the details here, as this is next level promises.
In line 13 we are using Array.map() to go through each element of the provided array of images and map the elements to a new output array; dominantColourPromises. So the first element of images corresponds to
the first element of dominantColourPromises and
so on. You might remember that dominantColourPlaceholder was an async function, which means it returns
a promise. As a consequence, in the last line of the map function (line 15), when we return the result of the call to dominantColourPlaceholder, we are actually adding a promise to the output array, rather than the
result. dominantColourPromises is in fact an array
of promises (the name should make sense now).
Promise.all() #
Promise.all() #
JavaScript has an efficient way to handle an array of promises, so we do not
have to wait for the promise in the first element dominantColourPromises to resolve before we start processing the second. We can start them running immediately,
one after the other. This is convenient here, as there is no link between the dominant
colour of one image and the next. We just need to make sure all the promises are
resolved before we return the entire array. That is what the code in line 23 does. It takes the input array of promises and once they have all resolved, generates
an output array of the results. As a warning, this works fine with Array.map(), though if we needed to use Array.forEach() instead
(and some other array methods), we would have to handle promises differently.
For our example, we will pass in an array containing a single image, though
the code can handle multiple images efficiently. The endpoint responds with an
object containing two arrays: placeholders and dominantColours. These both map to the input image array and
are returned in line 26. Speaking of which,
let's next call the endpoint from our home page Svelte file.
🗳 Poll #
📱 SvelteKit Image Plugin: Making it Responsive #
We can easily generate images in multiple formats and sizes using the vite-imagetools plugin. However, for generating our placeholders, we will use our endpoint. In
theory, you can create a low-resolution placeholder with vite-imagetools by just setting image width to 10 pixels in the query string. However, we have
created functions, so that you can see how to do it yourself. On top, that trick
wouldn't generate a dominant colour placeholder.
Next in our load function we will call the new endpoint to pull in the
placeholders. Following that, we will generate the responsive images using vite-imagetools. Finally, we set the placeholders to display initially and until the actual
image loads.
First, update the load function in src/routes/index.svelte:
1 <script context="module">2 /**3 * @type {import('@sveltejs/kit').Load}4 */5 export async function load({ fetch }) {6 const url = './index.json';7 const postsPromise = fetch(url);8 const placeholdersPromise = fetch('/api/image-placeholders.json', {9 method: 'POST',10 credentials: 'same-origin',11 headers: {12 'Content-Type': 'application/json',13 },14 body: JSON.stringify({15 images: ['me.jpg'],16 }),17 });18 19 const [postsResponse, placeholdersResponse] = await Promise.all([20 postsPromise,21 placeholdersPromise,22 ]);23 24 if (postsResponse.ok && placeholdersResponse.ok) {25 return {26 props: { ...(await postsResponse.json()), ...(await placeholdersResponse.json()) },27 };28 }29 30 return {};31 }32 </script>33 34 <script>35 // ...36 </script>
In line 15 we can give all the images we want to
generate placeholders for. For our case, it is just the one. In line 27 we make the placeholder available in the following script block.
Let's generate the responsive images now, using vite-imagetools in the main script block:
34 <script>35 import ogSquareImageSrc from '$lib/assets/home/home-open-graph-square.jpg';36 import ogImageSrc from '$lib/assets/home/home-open-graph.jpg';37 import twitterImageSrc from '$lib/assets/home/home-twitter.jpg';38 import featuredImageSrc from '$lib/assets/home/home.jpg';39 import meImageSrcsetWebp from '$lib/assets/me.jpg?w=1344;672;336&format=webp&as=srcset';40 import meImageSrcset from '$lib/assets/me.jpg?w=1344;672;336&as=srcset';41 import meImage from '$lib/assets/me.jpg?w=672';42 // ...43 </script>
As before, we use query parameters to tell vite-imagetools what to
generate. Here we generate a srcset which is needed to create a responsive
image. The srcset is just there to tell the browser what image sizes
are available. In our case we have three image widths which are double width, for
retina displays, 672 pixel wide (for desktop) and half-width, for mobile. You
can add more, depending on common display widths used by your site visitors. In
the two highlighted lines, vite-imagetools generates srcset attributes for WebP and JPEG, which we can use in a picture element
on our page. Check the vite-imagetools documentation for a full list of available query
parameters .
Responsive Markup #
Let’s wrap our img element in a picture element and add the responsive images. We also define sizes in the
last line of the script block. This serves as a guide to browsers to choose the
right responsive image source based on display width. The syntax is similar to the CSS media query syntax. Essentially, here, we tell the browser that the image width will be equal
to the viewport width less our margin. This is in the case that the viewport is
smaller than 672 pixels wide. Otherwise, the image is 672 pixels wide.
The information is handy because it lets the browser download the right images,
while it is still working out the layout.
86 <script>87 //...88 const seoProps = {89 title,90 slug: '',91 entityMeta,92 datePublished: '2021-07-07T14:19:33.000+0100',93 lastUpdated: '2021-07-07T14:19:33.000+0100',94 breadcrumbs,95 metadescription,96 featuredImage,97 ogImage,98 ogSquareImage,99 twitterImage,100 };101 const sizes = '(max-width: 672px) calc(100vw - 32px), 672px';102 </script>103 104 <SEO {...seoProps} />105 <header>106 <h1>Climate — Sveltekit Starter</h1>107 <h2>SvelteKit MDsveX (Markdown for Svelte) Blog</h2>108 </header>109 <picture>110 <source {sizes} srcset={meImageSrcsetWebp} type="image/webp" width="672" height="448" />111 <source {sizes} srcset={meImageSrcset} type="image/jpeg" width="672" height="448" />112 <img113 class="lazy"114 alt={featuredImageAlt}115 loading="eager"116 decoding="async"117 width="672"118 height="448"119 src={meImage}120 />121 </picture>122 <Card>
Here we add the srcset attributes, specifying the
WebP image first, then the JPEG. The order is important here. The browser tries
the sources in the order they appear. If it does not support WebP, it tries the
next source, which is JPEG, and settles for that as a fallback. If you included
AVIF and JPEG XL too, since JPEG XL is new and enjoys less support than AVIF and
WebP the order would be JPEG XL, AVIF, then WebP and finally JPEG as a fallback.
Have a look at the page in your browser, and right-click and save the image. If you have WebP support in your browser, you should see it saves a WebP format image. The final piece missing is the placeholders. Let's get those in and wrap up.
🥱 Adding Lazy Loading #
We will use vanilla-lazyload to do the heavy lifting
with lazy loading. It makes use of the Intersection Observer API so the browser shows placeholders until the image is within the visible viewport.
You will still see the blur-up effect as the image loads.
To use vanilla-lazyload, we need some
JavaScript code to load on every page with lazy loading content. On most
sites, this would be every page, so we can place the code in the layout
component. Edit src/routes/__layout.svelte to import
the plugin and then create an instance if one does not yet exist:
14 <script>15 //...16 import '$lib/styles/normalise.css';17 import '$lib/styles/index.scss';18 import lazyload from 'vanilla-lazyload';19 import { browser } from '$app/env';20 21 import Footer from '$lib/components/Footer.svelte';22 import Header from '$lib/components/Header.svelte';23 import PWA from '$lib/components/PWA.svelte';24 25 if (browser && !document.lazyloadInstance) {26 document.lazyloadInstance = new lazyload();27 }28 </script>
browser is a boolean which is true when code is
running in the browser as opposed to on the SvelteKit server. This is needed here
because accessing the document object on the server
would throw an error.
Let's return to the home page code and finish things off. We need to import
the dominantColours and placeholders props which we created in the load function. We also need to tell our lazyload
code to update when the pages loads:
34 <script>35 import { browser } from '$app/env';36 import meImageSrcsetWebp from '$lib/assets/me.jpg?w=1344;672;336&format=webp&as=srcset';37 import meImageSrcset from '$lib/assets/me.jpg?w=1344;672;336&as=srcset';38 import meImage from '$lib/assets/me.jpg?w=672';39 import BlogRoll from '$lib/components/BlogRoll.svelte';40 import Card from '$lib/components/Card.svelte';41 import SEO from '$lib/components/SEO/index.svelte';42 import website from '$lib/config/website';43 import { onMount } from 'svelte';44 45 export let dominantColours;46 export let placeholders;47 export let posts;48 49 onMount(() => {50 if (browser) {51 document.lazyloadInstance.update();52 }53 });54 // ...55 </script>
Now when the pages loads, vanilla-lazyload will
look for img elements with the lazy class (it also works on iframes, as you can see in this short video). Initially, we want to show the placeholder image so, we set out img element's src to the placeholder image. Although
we are working with Base64 images encoded in a string, instead of a path to an image
file, we can use the src attribute in exactly the
same way. vanilla-lazyload determines when it is
time to load the final image, replacing the placeholder. For it to know what the
final attribute should be, we tweak the code slightly, so where we would have sizes, srcset, and src normally, we use data-sizes, data-srcset and data-src. vanilla-lazyload swaps these out for the right content when it is time to load the image. Let's
update the picture element:
114 <SEO {...seoProps} />115 <header>116 <h1>Climate — Sveltekit Starter</h1>117 <h2>SvelteKit MDsveX (Markdown for Svelte) Blog</h2>118 </header>119 <picture>120 <source121 data-sizes={sizes}122 data-srcset={meImageSrcsetWebp}123 type="image/webp"124 width="672"125 height="448"126 />127 <source128 data-sizes={sizes}129 data-srcset={meImageSrcset}130 type="image/jpeg"131 width="672"132 height="448"133 />134 <img135 class="lazy"136 alt={featuredImageAlt}137 loading="eager"138 decoding="async"139 width="672"140 height="448"141 data-src={meImage}142 src={dominantColours[0]}143 />144 </picture>
💯 SvelteKit Image Plugin: Testing it out #
If you hit refresh on the page, you should see the dominant colour flash and
then the actual image. Inspect the picture element
in your browser. You will see the plugin has worked its magic and the src and data-src attributes match. Similarly, it
will have added sizes and srcset attributes.
Next, let’s replace dominantColours[0] with
placeholders[0] in line 139. Remember we returned an array of placeholders, since we want the first
element in that array (of just one image in our case), we use index 0.
If your image looks a little grainy on the dev server, I noticed this too. However, when I pushed to a live server and published the demo site for this post, it looked fine.
🔌 SvelteKit Image Plugin: Image Component #
It could get tiresome including all the boilerplate code on every image of our
site. As an alternative, you might consider wrapping up some functionality
into a component. There is an Image component which does exactly this in @rodneylab/sveltekit-components :
<script> import { Image } from '@rodneylab/sveltekit-components';</script> <Image {alt} {width} {height} {src} {sources} {placeholder} {sizes} style={'border-radius:12px'} />
You can see docs on the component's Git Hub page .
🙌🏽 SvelteKit Image Plugin: Wrap Up
In this post, we:
-
had an introduction to
async/awaitin JavaScript;
- saw how to generate dominant colour as well as low resolution placeholders using the sharp image processing plugin; and
- learned how to add cached, Next-Gen, responsive images with no cumulative layout shift using a SvelteKit image plugin.
You can see the full code for this tutorial on the Rodney Lab GitHub page . There is also a demo site .
I really do hope you found this SvelteKit Image plugin article useful. You will note we included a static import of the image file in the page Svelte code. This will be perfect for a lot of situations. Where you render a page using a template, and the image included is different for each invocation of the template (for example the banner image in a blog post), you will need to use a dynamic import. That way, you can pull in the right image for each page at build time, without having to include all possible images in the template. We will look at how to do this in this post dedicated to SvelteKit dynamic image import.
🏁 SvelteKit Image Plugin: Summary #
Does SvelteKit have a built-in image plugin? #
- There is currently no built-in image plugin which automatically generates next-generation copies of image in responsive sizes. However, SvelteKit uses Vite tooling and the vite-imagetools plugin is fantastic. You can use the plugin to generate images in the next-gen formats and responsive sizes you want. The plugin takes care of hashing the images so that Vite can cache them. To generate the images, you just import the original JPEG or PNG file in a Svelte component with a special query string on the end. The query string details the image formats you want vite-imagetools to generate together with output image sizes. As well as the images themselves, you can get metadata such as input height and width by tweaking the query string. Although vite-imagetools generates all the images you need for responsive images, you still need to add the responsive markup yourself. This lets you choose low resolution placeholders and add lazy loading.
How can you add lazy-loading images in SvelteKit? #
- You can easily add lazy loading images in SvelteKit using the vanilla-lazyload package. Lazy loading images are ones which do not load initially, but rather just before they are scrolled into view. The advantage of implementing lazy lading is that the browser can focus on loading visible content quicker, improving user experience. To make an image lazy load using the plugin, just add the lazy class. You can also add low-resolution placeholders for your images using vanilla-lazyload. Doing so means the page content will not shift as the images load (known as cumulative layout shift). This is another user experience quick win.
What are responsive images? #
- Responsive images are the set of images your server can make available for different screen formats. For your images to look sharp on Retina displays, you need to provide an image, double the width it will be displayed at. This can be quite large if you want to cater for large desktop screens. That same image on a small mobile screen will be far larger than needed. If the user has a slow internet connection or limited data, you end up degrading the user experience with a far larger image than needed. By making smaller images available and adding some markup to your images, you can let the user browser know what image sizes are available and let it choose the best one for its own display size.
What are next-gen images? #
- The idea behind next-gen images to preserve the image quality, while offering smaller image file sizes. This can mean users download images quicker and get a better user experience. JPEG and PNG are more traditional formats. WebP images can be used to encode either, typically the image is degraded slightly but much smaller than the original. AVIF is a newer, next-gen format offering improvements on WebP compression. WebP currently enjoys wider support than AVIF, so serving fallback alternatives is best practice. The browser can iterate through the alternatives you supply until it finds one it can work with. The latest format is JPEG XL, this looks like a promising replacement as the standard, the support needs to grow a little before it can get there.
🙏🏽 SvelteKit Image Plugin: Feedback #
Have you found the post useful? Which other hosting service would you like to know how to host a SvelteKit site on? Would you like to see posts on another topic instead? Get in touch with ideas for new posts. Also, if you like my writing style, get in touch if I can write some posts for your company site on a consultancy basis. Read on to find ways to get in touch, further below. If you want to support posts similar to this one and can spare a few dollars, euros or pounds, please consider supporting me through Buy me a Coffee.
Finally, feel free to share the post on your social media accounts for all your followers who will find it useful. As well as leaving a comment below, you can get in touch via @askRodney on Twitter and also askRodney on Telegram . Also, see further ways to get in touch with Rodney Lab. I post regularly on SvelteKit as well as other topics. Also, subscribe to the newsletter to keep up-to-date with our latest projects.