


What is Cloudflare Warp? #
Cloudflare were already running global internet infrastructure as part of their regular business when they set up Warp. Offering a VPN service on top did not significantly change the costs of the network already existing under their business model.
Cloudflare runs BoringTun which is their own implementation of the WireGuard protocol coded in Rust. WireGuard is a modern and also secure VPN protocol. It eschews compatibility with existing services in favour of providing cutting edge security. This how-to takes you through creating Cloudflare Warp credentials and setting up the service on your OpenBSD machine. You do not need to provide any personal information (email, for example) to be able to set up and use Cloudflare Warp.
Why Use Cloudflare Warp on OpenBSD? #
There is currently no official version of Cloudflare Warp for OpenBSD, though you should download the official 1.1.1.1 App if you want to use Warp on your Mac, Phone or PC. We will use an unofficial CLI in this how-to. A typical use case would be to add Cloudflare Warp to an existing self-hosted VPN providing additional privacy, security, and speed.
How to Install Cloudflare Warp VPN on OpenBSD: Overview #
You don't need existing Cloudflare Warp credentials to follow this guide. This is because we will set some up in the first step of our how-to. We are going to use the wgcf repo to create the Warp credentials. This is an unofficial, cross-platform CLI for Cloudflare Warp . Warp uses the WireGuard VPN protocol, as mentioned above. OpenBSD 6.8 comes with in-built kernel support for WireGuard. So you will need to be using OpenBSD 6.8 to follow this how-to guide. Once we have credentials, we will configure the new interface then update kernel parameters and firewall settings. You need no expert knowledge of WireGuard, just some familiarity with using bash scripts and comfort with using with git. With the introduction out of the way, let’s get on to how to set up Cloudflare Warp on OpenBSD.
How to Set up Cloudflare Warp on OpenBSD #
Set up wgcf #
-
Let's start by creating a new directory to keep the files we generate.
Then we change into that directory. At the command line type:
mkdir warp && cd $_
-
Next we clone the repo:
git clone https://github.com/ViRb3/wgcf.git
-
There is currently no pre-compiled OpenBSD version of wgcf on the repo.
But, despite this, it is still easy to get going. First, we need to
install go (assuming you do not already have it installed):
🚀 Generate Cloudflare Warp Credentials #
-
Now we will register as a Warp user and generate credentials with the
commands below. You will need to accept the Terms of Service, when
prompted, to be able to complete this step.
wgcf-profile.conffile. This contains the credentials which we will use in the next step.
🧱 Create WireGuard Configuration #
-
With OpenBSD 6.8 came a much easier way to configure WireGuard, as well
as improved performance over the previous user space implementation. You
put the configuration in a hostname file (like for other interfaces) and
that is pretty much all you need to do. If you have other WireGuard
interfaces which you want to update to use kernel support, see this top
guide from
Thomas Ward's guide on Securely Tunnelling Traffic with WireGuard on
OpenBSD
. Here I will give you a configuration file without much
explanation, so take a look at the guide or the
OpenBSD wg man page
if you are keen to learn more. OK, let's get going. Create a
hostname.wg0file and add the following to it (we will run a script in the next step to fill in the credentials, so no need to make any substitutions. Just type it in as it is):wg0. Change the file extension if you need to call it something else. Also, tweak it if you want to enable IPv6. And, of course, you can change the description if you are not into Star Trek! -
Next, we run a script to take the parameters we generated and place them
in our configuration file. Paste the following code into a new file and
name it
cloudflare-warp-setup.sh: -
Now we move the interface specific config file to its correct location
and secure it:
mv hostname.wg0 /etc/.chown root:wheel /etc/hostname.wg0chmod 0640 /etc/hostname.wg0
-
Next, we need to remember to bring the interface up. Type the command
below into the terminal. Note, this is a one-off. It will automatically
come up next time we reboot.
ifconfig:flags=8051<UP,BROADCAST,RUNNING,NOARP,MULTICAST> mtu 1280returned.
⚙️ Set up System and pf Rules #
-
This last step varies depending on your setup. I assume you are running
a self-hosted VPN with a cloud provider. We have remote devices (e.g.
mobile phones, tables, and laptops) connecting over an already
established WireGuard connection, wg1. You should, of course, feel free
to adjust to suite your own use case. Let me know if you would find a
blog post on setting up a self-hosted OpenBSD cloud VPN useful. We want
our packets sent out over Cloudflare Warp to be NAT'ed out. For that to
happen, we need to allow packet forwarding and also set up pf firewall
rules.
sysctl net.inet.ip.forwarding=1
-
Next we need to update the firewall rules. On a default setup, you will
edit the
/etc/pf.conffile. Add this line above any filtering rules:
☑️ Test the VPN #
-
From one of your remote devices, try checking your IP address by going
to https://icanhazip.com/. Or,
search for ‘IP Address’ on DuckDuckGo instead, if you prefer. If Cloudflare Warp is working, the IP will be different
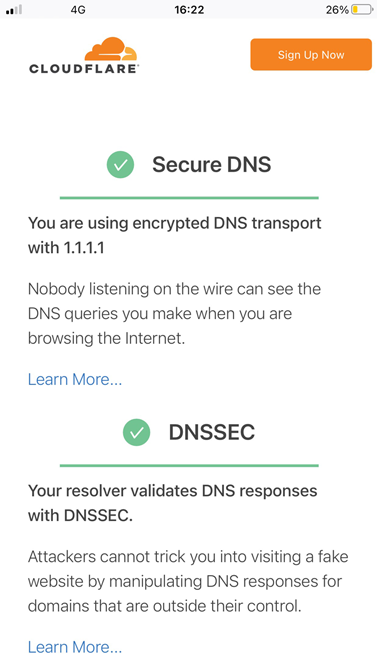
to your OpenBSD machine's IP address. For a further test, go to www.cloudflare.com/ssl/encrypted-sni/ on one of your devices connected to your VPN. You should have a green check
mark next to Secure DNS once the test has run. You might need another way
to test the connection if you have a different use case to the one assumed.
Clean up the
warpdirectory we created earlier once you are happy everything is working.

🙏🏽 Feedback #
Have you found this post useful? Is there anything that I didn't explain too well? Please let me know. Also, get in touch if this post has spawned some new ideas for your next project. If you have found this post useful and can afford even a small contribution, please consider supporting me through Buy me a Coffee.
Finally, feel free to share the post on your social media accounts for all your followers who might find it useful. You can get in touch via @askRodney on Twitter and also askRodney on Telegram . Alternatively, see further ways to get in touch with Rodney Lab. We post regularly on accessible Gatsby website development as well as OpenBSD-centric content. Also, subscribe to the newsletter to keep up-to-date with our latest projects.