


☁️ Why use Rust Cloudflare Workers? #
In this article, we have a look at getting started with Rust Cloudflare Workers. We build out a basic serverless API with router. Before we get into that, though, you might be asking why use serverless Rust? Especially if you already know JavaScript. After all, much of the functionality we would want to implement can also be implemented with JavaScript. For me, however, the motivation is learning Rust. Rust tooling is increasing prevalent, in the Web Development sphere. Examples are swc and Parcel.js. swc compiles TypeScript and JavaScript, and bundles twenty times faster than Babel. Parcel.js saw a 10 times speed improvement moving to the new Rust implementation.
Of course, you might not see these speed improvements in serverless functions. That said, serverless functions are usually small pieces of code which perform a single small task. To me, that makes them a great choice for learning Rust. You can invest small chunks of your time on focussed code, starting with a simple Rust Cloudflare Worker. Then either as the initial functions evolve and require more sophisticated solutions, or indeed, as you consider solving other more detailed problems using Workers, you can gradually improve your Rust understanding.
🧑🏽🎓 Learning in Public #
I should point out I am still relatively new to Rust, so you might know of better Rust implementations of the Rust code below. In fact, I would love feedback on how I could improve the Rust code (drop comments below or add pull requests to the demo code repo ). Instead of best practice Rust, this is more of a guide on how to get up and running with Rust Cloudflare Workers, where I share some of the Rust I have learned. That said, I hope you can benefit from the post if you already know Rust, but want to know how to get going with Rust Cloudflare Workers.
📚 Rust Learning Resources #
If you are learning Rust, here are some free resources you might find useful:
- The Rust Programming Language book — normally just referred to as “The Book” is probably the best starting point. Available online as a number of chapters, it offers a gentle introduction to Rust. Also try Rust by Example , to help push home concepts in the Book, especially if you prefer a more hands-on approach to learning.
- Rustlings — a collection of small exercises you can run through to improve your Rust. Consider this if you prefer a more practical approach to learning, rather than reading the book.
- Rust Cookbook — you will probably use this differently to the other two resources. Rather than work through from start to finish, it is quite handy to dive in to a particular area you need for a problem you are looking at, which you have not yet seen in Rust.
If you prefer videos, Chris Biscardi is behind Rust Adventures which provides another avenue to learning Rust. You can access much of the content for free. Chris is very knowledgable in Rust and I have, in fact, picked up quite a bit from his blog posts.
🗳 Poll #
🧱 Getting Started with Rust Cloudflare Workers: What we’re Building #
We will start by scaffolding the new Rust Cloudflare Worker, setting up all
the necessary tooling. Once we have our hello, world running, we add a router
with a health check route. Adding more features, we learn a little more about
use Rust with Workers, wrapping up with a final message API route which can
listen for and parse JSON POST requests.
⚙️ Rust Setup #
You can set up Rust with Homebrew or other package managers. Rust’s recommended approach though, is to install from the Terminal from their script:
curl --proto '=https' --tlsv1.2 -sSf https://sh.rustup.rs | sh
This installs rustup, which manages your Rust installation. You could use the following command to update your Rust tooling (when the next release is available, for example):
rustup update
For now, we want to be able to cross-compile Rust code into WASM, and will use rustup to add the tooling, locally for us:
rustup target add wasm32-unknown-unknown
🔧 Serverless Rust Cloudflare Worker Setup #
Clone the Cloudflare Rust Worker template using pnpm :
pnpm dlx wrangler generate \ getting-started-rust-cloudflare-workers \ https://github.com/cloudflare/workers-sdk/templates/experimental/worker-rust
You should now have a new getting-started-rust-cloudflare-workers directory containing:
-
src/lib.rs: your Rust worker source file -
Cargo.toml: Rust’s package meta file (analogous to Node’spackage.json) -
package.json: Nodepackage.jsonfile with worker development and deploy scripts -
wrangler.toml: the Wrangler config
📦 Package Meta #
Start by customizing the Cargo.toml for our project:
1 [package]2 name = "my-rust-cloudflare-worker"3 version = "0.1.0"4 edition = "2021"6 description = "My first Rust Cloudflare Worker"7 repository = "https://github.com/example-profile/my-rust-cloudflare-worker"8 license = "BSD-3-Clause"
Currently, the template does not include the last four lines shown, but you
may like to include them, to follow best practice (adapting to suit your
needs). Also, update the name field to match the
project name.
🖥 Dev environment #
To install Wrangler locally, within the project, from your project directory, run the command:
pnpm install
Wrangler is Cloudflare’s worker tooling. Fire up the dev environment from the Terminal:
wrangler dev

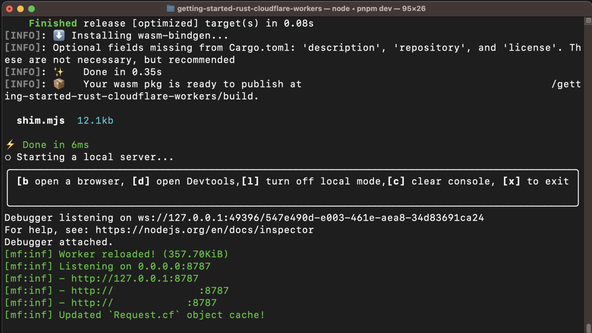
Cargo will compile the code in src/lib.rs.
This will be a little slow this first time. When compilation completes, you
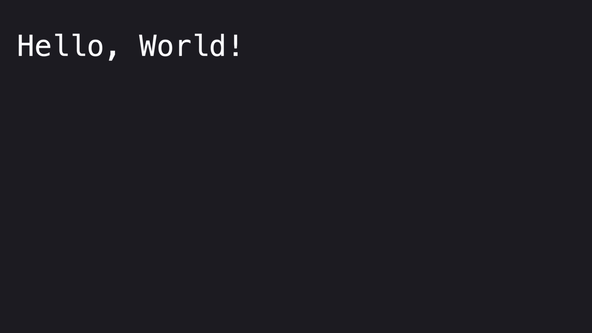
will see a message like Listening on 0.0.0.0:8787 in the Terminal. With Wrangler running, you can jump to your browser by pressing
the B key, or alternatively typing `http://127.0.0.1:8787` in your preferred
browser address bar. Either way, you should get a “Hello, World” message.

🦀 Rust Coding #
It would be nice to get a little log printed to the console on each request.
Update the Rust source code in src/lib.rs,
adding a logging function:
1 use worker::*;2 3 fn log_request(req: &Request) {4 console_log!(5 "{} - [{}], located at: {:?}, within: {}",6 Date::now().to_string(),7 req.path(),8 req.cf().coordinates().unwrap_or_default(),9 req.cf().region().unwrap_or("unknown region".into())10 );11 }12 13 #[event(fetch)]14 async fn main(req: Request, env: Env, ctx: Context) -> Result<Response> {15 log_request(&req);16 Response::ok("Hello, World!")17 }
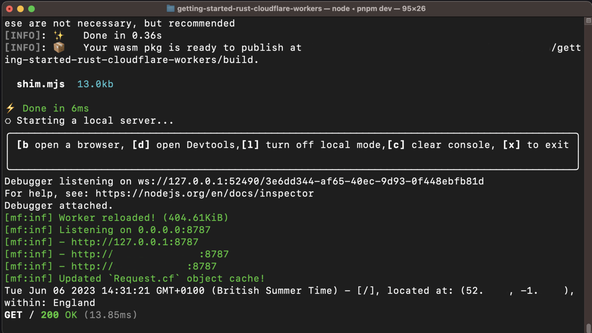
Refresh the browser, and you should see a little log appear. This is handy for debugging, though in production, you might consider a serverless logging provider for your API, like Logtail.
🚢 Cargo tools #
A feature that sets Rust apart from other languages is the helpfulness of the compiler. Although the code works as it is, try running:
cargo check

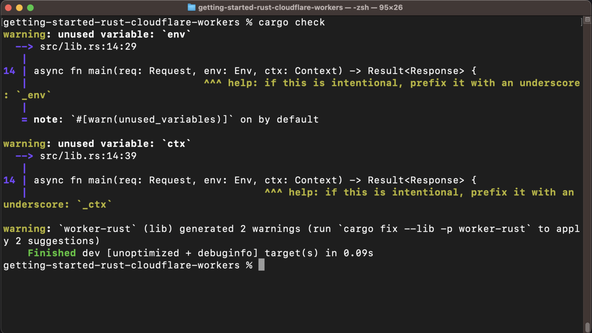
You will get some linting tips! For next-level linting, try Clippy. You won’t see a difference for our short snippet, but generally it will go the extra mile in helping you write more idiomatic Rust.
rustup component add clippycargo clippy
The first command is a one-off piece of setup, installing Clippy, if it is not already on your system.
Finally, here is another tool in the Rust tool chain; this time for formatting your code:
cargo fmt
🛣️ Adding Some Routes #
For an API, you will, typically, need more than a single route. We can set up
the typical health_check route on a router for our
worker:
13 #[event(fetch)]14 async fn main(req: Request, env: Env, ctx: Context) -> Result<Response> {15 log_request(&req);16 let router = Router::new();17 18 router19 .get("/health_check", |_, _| Response::ok("OK"))20 .run(req, env)21 .await22 }
Router here comes from the worker crate . We do not need to import it explicitly as, in line 1 of src/lib.rs, we bring all structs from worker into scope.
🍃 Environment Variables #
Rust procedural macros provide syntactic sugar for common tasks. Let’s
see a couple here. First, we can extract meta from the Cargo.toml file using the env! macro. The current package
version will be handy if you are putting together the API docs, for example. Access
the package version using CARGO_PKG_VERSION:
13 #[event(fetch)]14 async fn main(req: Request, env: Env, ctx: Context) -> Result<Response> {15 log_request(&req);16 let router = Router::new();17 18 router19 .get("/health_check", |_, _| Response::ok("OK"))20 .get("/api-version", |_,_| {21 let version = env!("CARGO_PKG_VERSION");22 Response::ok(format!("API version: {version}"))23 })24 .run(req, env)25 .await26 }
Notice, we used format! (another procedural macro)
to build the response using an interpolated string.
📮 POST Requests #
POST Requests #
We have only looked at REST GET requests so far.
Let’s create a basic message route, listening for JSON POST requests. If you are just starting out in Rust, you will quickly find one of
the most useful crates (Rust packages) is Serde (a contraction of serialize and
deserialize). We will use it here to parse the JSON request body, and you will find
there are YAML and plenty of other alternatives.
Getting Started with Rust Cloudflare Workers: adding Dependencies #
To add a crate to your project, you just update Cargo.toml, including the version number for the crate:
17 [dependencies]18 serde = "1"19 worker = "0.0.15"20 21 # TRUNCATED...
Currently, cargo fmt will format Rust source only
and not Cargo.toml, but you can install and configure the dprint code formatter (written in Rust) if you want that formatted too:
cargo install --locked dprint
Rust derive Procedural Macros #
derive Procedural Macros #
Serde uses a derive macro; this is a different type
of Rust procedural macro to env! and format! function-like procedural macros seen earlier. derive macros again provide syntactic sugar; under the hood, our convenient, clean code
will get re-written, by Serde, to something more verbose and a little unwieldy!
To bring the Serde Deserialize macro into scope,
add this line at the top of src/lib.rs:
1 use serde::Deserialize;2 use worker::*;
Next, with Rust being a typed language, we want to define the types for the
JSON data we are expecting to receive. Add this struct in src/lib.rs defining the Message:
14 #[derive(Deserialize)]15 struct Message {16 name: String,17 email: String,18 19 #[allow(dead_code)]20 message: String,21 }
In production code, we would use message as well
as name and email. However, here we just do a quick console log. The line: #[allow(dead_code)] is an instruction to Cargo linting tools to ignore the fact that message exists on the Message struct, but is never used.
If you are curious to see what the expanded derive macro code looks like, set up and run the cargo-expand tool . This uses some unstable Rust features, so run rustup toolchain install nightly --allow-downgrade to make the nightly toolchain available locally before running cargo expand for the first time.
POST Route Code #
Finally, add a POST route to the main function, to listen for messages:
23 #[event(fetch)]24 async fn main(req: Request, env: Env, _ctx: Context) -> Result<Response> {25 log_request(&req);26 let router = Router::new();27 28 router29 .get("/health_check", |_, _| Response::ok("OK"))30 .get("/api-version", |_, _| {31 let version = env!("CARGO_PKG_VERSION");32 Response::ok(format!("API version: {version}"))33 })34 .post_async("/message", |mut req, _| async move {35 let Message { name, email, .. } = match req.json().await {36 Ok(value) => value,37 Err(_) => return Response::error("Bad request", 400),38 };39 console_log!("New message from {name} ({email})");40 Response::ok(format!("Thanks {name}, we'll be in touch!"))41 })42 .run(req, env)43 .await44 }
We use a console_log! macro provided by the worker
crate to print the message to the console. In general, in Rust code, you will use
println! or dbg! instead. Be careful no to log Personal Identifiable Information (PII), and be sure to comply with legal requirements. We only include the
fictitious email here to demonstrate Rust features. Be sure to protect any
real user data you work with. You might consider using the secrecy crate for such private data , which will help you obfuscate PII, by default, and opt-in to reveal the
data to authorized users.
💯 Getting Started with Rust Cloudflare Workers: Check your Work #
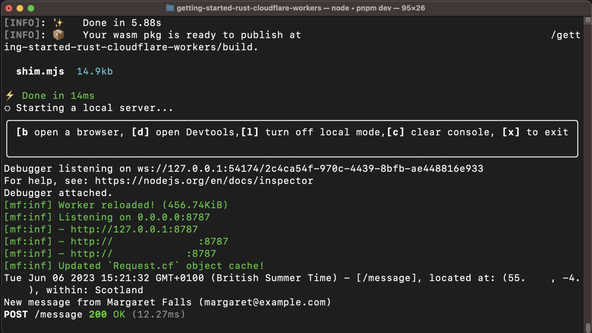
You can check this new POST route work by sending
a message using curl in a separate tab:
curl http://localhost:8787/message \ -H "Content-Type: application/json" \ -d '{ "name": "Margaret Falls", "message": "Hello, everybody!"}'
🙌🏽 Getting Started with Rust Cloudflare Workers: Wrapping Up #
We have learned all about getting started with Rust Cloudflare Workers in this post. More specifically, we have seen:
- how to set up Cloudflare Rust worker tooling;
- how you can create a Rust worker API router; and
-
some worker features like
console_log.
The Getting started with Rust Cloudflare Workers demo code is in the Rodney Lab GitHub repo .
I hope you found this article useful and am keen to hear where you will go next, as well as potential improvements, both to the Rust code and explanations above.
🏁 Getting Started with Rust Cloudflare Workers: Summary #
How do you spin up a new Rust Cloudflare Workers project? #
- Before getting started with Rust Cloudflare Workers, you need to have the Rust toolchain (rustup) set up on your machine. You will also need a Cloudflare account (which is free to sign up for). With those preliminaries out of the way, use the `pnpm dlx wrangler generate` command from the Terminal to create a project. Try https://github.com/cloudflare/workers-sdk/templates/experimental/worker-rust as your template. You will also need to run `pnpm install` from the new project directory. This will install Wrangler, which is worker tooling. You can run pnpm dev to spin up a test server. The project will include the wrangler config in wrangler.toml, project config in Cargo.toml and some skeleton Rust code in the src directory.
Can you access Cargo.toml fields from your Rust code? #
- Yes! As an example, you might want to get the current version of the project, as defined in the `package.version` filed of `Cargo.toml`. To access that field from Rust source, use the env marco: `let version = env!("CARGO_PKG_VERSION");`. Other available fields include `CARGO_PKG_NAME` and `CARGO_PKG_DESCRIPTION`.
How can you console log or println from a Rust Cloudflare Worker? #
- Typically, when writing Rust code, the println and dbg macros are useful, for printing messages to the console and debugging issues. Because Rust Cloudflare worker code compiles to WASM, these two procedural macros will not work as expected. When working in WASM, you can define your own console_log macro with a mapping to JavaScript’s console.log. Luckily, the worker crate, used in Rust Cloudflare workers includes such a macro, and you can log by calling `console_log!`. The arguments will be just like the ones you are already familiar with from Rust’s `println!`.
🙏🏽 Getting Started with Rust Cloudflare Workers: Feedback #
Have you found the post useful? Would you prefer to see posts on another topic instead? Get in touch with ideas for new posts. Also, if you like my writing style, get in touch if I can write some posts for your company site on a consultancy basis. Read on to find ways to get in touch, further below. If you want to support posts similar to this one and can spare a few dollars, euros or pounds, please consider supporting me through Buy me a Coffee.
Finally, feel free to share the post on your social media accounts for all your followers who will find it useful. As well as leaving a comment below, you can get in touch via @askRodney on Twitter and also askRodney on Telegram . Also, see further ways to get in touch with Rodney Lab. I post regularly on Astro as well as SvelteKit. Also, subscribe to the newsletter to keep up-to-date with our latest projects.