


🚀 SvelteKit Tooling: Putting your Continuous Integration Process on Skates #
Adding SvelteKit tooling to your continuous integration (CI) process can help you work more efficiently as well as keep your code base more consistent. This is useful when you need to hand your project over to a client, or even get assistance from colleagues or external sources. We look at some tools you might consider adding to your CI process in this article. We cover checking your code follows best practices, that it has consistent styling, as well as how you can create consistent commit messages. I hope you are able to apply at least a couple of the aspects covered to your regular SvelteKit development process.
🖥 VS Code Extensions #
Since 70% of professional developers use Visual Studio Code , let’s have a quick look at some extensions you might want to add to your SvelteKit workflow before we get on to the main tooling items. Although the tools we look at later are mostly standalone tools, you will get additional benefits when working with VS Code if you add the corresponding extension. We will look at the dot files as we go along.
- ESLint — working in conjunction with the main ESList package (see below), this will highlight errors in your code, often helping you realize early that you mistyped a variable name or forgot to import or install a package.
- Prettier — prettier is probably the best known code formatter. Rather than argue over whether to use it, I think the argument has shifted to whether it should be used to enforce tab or space indenting — I'm not getting into that one!
- stylelint — this will flag up accessibility as well as CSS code style issues in VS Code. I run stylelint before committing code, but it's nice to have errors highlighted in the editor, so you can fix them individually as they crop up. That is, rather than having to tackle a stack of them just before you commit at the end of a long session.
- SvelteCode — official Svelte VS Code extension adds syntax highlighting for your Svelte code.
Base VS Code Configuration #
Everyone has their own favourite VS Code settings. Personally, I prefer a
light-touch approach, so hopefully this might be used as a starting point for
anyone. You can set these globally, though typically I add a config file to
each project (at .vscode/settings in the project
folder) so I can tweak settings based on what the project uses.
1 {2 "editor.formatOnSave": true,3 "editor.codeActionsOnSave": {4 "source.organizeImports": true5 }, 6 "[markdown]": {7 "editor.wordWrap": "bounded",8 "editor.wordWrapColumn": 80,9 "editor.quickSuggestions": false10 },11 "[svelte]": {12 "editor.defaultFormatter": "svelte.svelte-vscode"13 }14 }
formatOnSave is my most loved setting! I have mixed
feelings about organizeImports and omit it on most
projects — it can get a touch annoying when it removes imports which you still
need. You can run organize imports manually using the Shift + Alt + O key combination. The markdown options make your content a little
easier to read in the editor (you might prefer 100 or 120 character lines instead
of 80). I have had a couple of Svelte projects where formatting stopped working,
and found adding the last setting fixes this. As I say, this is just a base, and
you will probably have your own favourites. I'm keen to hear what I am missing (remember
I prefer a minimalist approach though)!
🔥 SvelteKit Tooling: 1. pnpm #
pnpm is a packet management tool like npm or yarn. I like to look at it as a more
modern imagination of a package manager. The main selling points are speed and
efficiency. When you install packages in your project, yarn and npm will download the package and save it
to a node_modules folder in your project. These
folders can get huge, and you have to scan though old projects, deleting them whenever
your machine starts running low on free disk space. In contrast, pnpm creates a central repository for packages on your machine and just adds a link
from the node_modules folder of your project to
the particular package in the central repo.
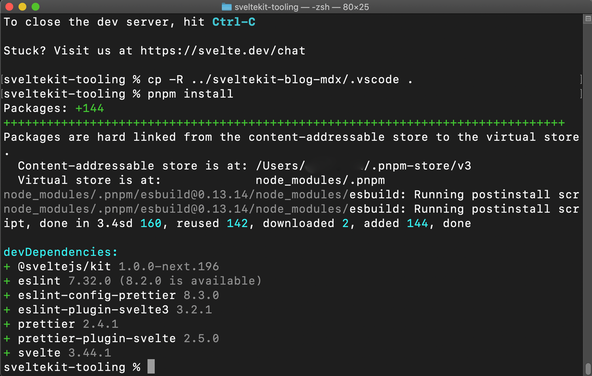
The two main advantages of the central local repo approach (which pnpm follows) are that it is quicker to start up new projects, as many of the packages
you need to install will already be on your machine. Then, on top, you save on disk
space. In the screenshot below, you see in the last long line, 142 packages were
reused in this particular case. That's 142 packages that did not need to be freshly
downloaded. You will also see the output is a little more terse and cleanly formatted
than with other tools.

You need a one-off installation to get pnpm running
on your machine. After that, it accepts commands similar to the ones you will be
using to with npm or yarn. If you already have npm on your machine, just
run this command to install pnpm globally:
npm i -g pnpm
To check for updates for pnpm and other global packages,
run:
pnpm outdated -gpnpm add -g outdated-package-one outdated-package-two
🧑🏽 SvelteKit Tooling: 2. Prettier #
You can automatically add prettier to a new skeleton Svelte project from the init tool:
pnpm dlx sv create sveltekit-tooling && cd $_
The default prettier script installed into package.json uses the .gitignore file to decide which files
to ignore for formatting. I like to commit the pnpm-lock.yaml file but am not too bothered about how it is formatted, so go update the script
and add a .prettierignore file to my project root
folder:
1 .svelte-kit/**2 static/**3 build/**4 functions/**5 node_modules/**6 pnpm-lock.yaml
1 {2 "name": "sveltekit-tooling",3 "version": "0.0.1",4 "scripts": {5 "dev": "svelte-kit dev",6 "build": "svelte-kit build",7 "preview": "svelte-kit preview",8 "format": "prettier --write --plugin=prettier-plugin-svelte .",9 "prettier:check": "prettier --check --plugin=prettier-plugin-svelte .",10 "lint": "prettier --check --plugin=prettier-plugin-svelte . && eslint --ignore-path .gitignore .",11 },
Notice I add a prettier:check script too! I use
this for a final check before committing, even though I set formatOnSave in VS Code.
If you prefer tabs to spaces, ignore the rest of this paragraph! By the way
I’m not saying spaces are better than tabs, just letting you know how to
switch if you don’t want to go with the default, just saying! Here's my .prettierrc file:
1 {2 "useTabs": true,3 "arrowParens": "always",4 "singleQuote": true,5 "trailingComma": "all",6 "printWidth": 1007 }
We use default filenames here for the ignore and config file, so we don’t need to specify them explicitly in the scripts.
For completeness, here is a typical .gitignore file
for one of my SvelteKit projects:
1 # SvelteKit Files2 build/3 functions/4 /.svelte-kit5 6 # Dependency directories7 node_modules/8 /package9 10 # Optional eslint cache11 .eslintcache12 13 # dotenv environment variable files14 .env*15 !.env.EXAMPLE16 17 # Mac files18 .DS_Store19 20 # Local Netlify folder21 .netlify
While we're slightly off-topic and since this does not fit neatly anywhere
else, it is worth adding a .nvmrc file to new SvelteKit
projects. This sets the node version when your host builds the project. Not setting
it can result in builds failing, as some hosts use an older node version by default.
1 16
🗳 Poll #
👀 SvelteKit Tooling: 3. ESLint #
ESLint is a well-know JavaScript linting tool. There are various rules you can set, though the defaults set by the Svelte init tool do work quite well. If you have set up your project using another method, you can run the ESLint setup tool to get you going:
pnpm add -D eslint./node_modules/.bin/eslint --init
Here is the .eslint.cjs file that I go with (default
for JavaScript skeleton project from init tool):
1 module.exports = {2 root: true,3 extends: ['eslint:recommended', 'prettier'],4 plugins: ['svelte3'],5 overrides: [{ files: ['*.svelte'], processor: 'svelte3/svelte3' }],6 parserOptions: {7 sourceType: 'module',8 ecmaVersion: 20199 },10 env: {11 browser: true,12 es2017: true,13 node: true14 }15 };
Here's the lint package.json script I typically use:
1 {2 "name": "sveltekit-tooling",3 "version": "0.0.1",4 "scripts": {5 "dev": "svelte-kit dev",6 "build": "svelte-kit build",7 "preview": "svelte-kit preview",8 "format": "prettier --write --plugin=prettier-plugin-svelte .",9 "prettier:check": "prettier --check --plugin=prettier-plugin-svelte .",10 "lint": "prettier --check --plugin=prettier-plugin-svelte . && eslint --ignore-path .gitignore .",11 },
😇 SvelteKit Tooling: 4. svelte‑check #
svelte-check is a handy tool for finding TypeScript errors in your code, though I also like to use it on JavaScript projects. You might find it spits out a lot of errors. If you are just starting out, you will not understand all of them or know which ones are safe to ignore. In this case, if your code works, just fix the accessibility errors and tackle the others one by one as you gain more experience.
Anyway, to set it up, run:
pnpm add -D svelte-check
Then add a script to package.json to run it when
you need to:
1 {2 "name": "sveltekit-tooling",3 "version": "0.0.1",4 "scripts": {5 "dev": "svelte-kit dev",6 "build": "svelte-kit build",7 "preview": "svelte-kit preview",8 "format": "prettier --write --plugin=prettier-plugin-svelte .",9 "prettier:check": "prettier --check --plugin=prettier-plugin-svelte .",10 "lint": "prettier --ignore-path .gitignore --check --plugin=prettier-plugin-svelte . && eslint --ignore-path .gitignore .",11 "svelte:check": "svelte-check --fail-on-warnings",12 },
You can set a stricter --fail-on-hints flag as an
alternative.
💄 SvelteKit Tooling: 5. stylelint #
stylelint is great for checking accessibility issues
in your CSS code. You can also use it to prevent colour drift and to keep your code
more maintainable. As an example, setting a rule for no named colours will flag
up an error if add something like border-color: red for debugging and forget to remove it. More likely though, you might set a hex
or HSL value, while fixing or setting something up instead of using a named variable
like --theme-colour. When you later need to
tweak the theme colour, the manually added hex value will persist, creating
inconsistencies in the site.
stylelint is one way to fix this problem. Another,
if you're a TypeScript fan, is to be super strict and use vanilla-extract with contracts. For stylelint there’s a dedicated video on vanilla CSS linting in
SvelteKit. Also follow that link for another video which looks at SCSS linting in
SvelteKit.
I add this script to package.json for vanilla CSS
projects:
"lint:css": "stylelint "src/**/*.{css,svelte}"",
this is the SCSS alternative:
"lint:scss": "stylelint "src/**/*.{css,scss,svelte}"",
⛔️ SvelteKit Tooling: 6. precommit #
When working in a team, your colleagues will probably appreciate consistent
and concise commit messages. There is a whole system for commit message etiquette named conventional commits . That is just one option, and you might prefer one of the other various
options. With conventional commits, your commit messages take a particular
format. In this example our commit type is refactor (we could also choose fix, style or feature among others).
refactor(services/narcissus-api): 🏄🏽♂️ add Supabase client
Following the type of commit in brackets, we have a description for the part of the project affected. Then the commit message itself. The emoji is not required! If you want to try out conventional commits, you might like the commitizen command line tool . As well as holding your hand as you write commit messages, it can handle version bumping and generate changelogs for you. We won't go into details here, but definitely try it on a new side project to see if it suits you.
I like to include the commitlint tool in all my
SvelteKit projects to enforce the conventional commit syntax. If you want to try
it, install a couple of packages and then add the config file:
pnpm add -g commitlintpnpm add -D @commitlint/config-conventional
Next, create a commitlint.config.cjs file in your
project's root folder:
module.exports = { extends: ['@commitlint/config-conventional'] };
Because SvelteKit uses ES modules by default, it is important that the file
extension is .cjs rather than .js.
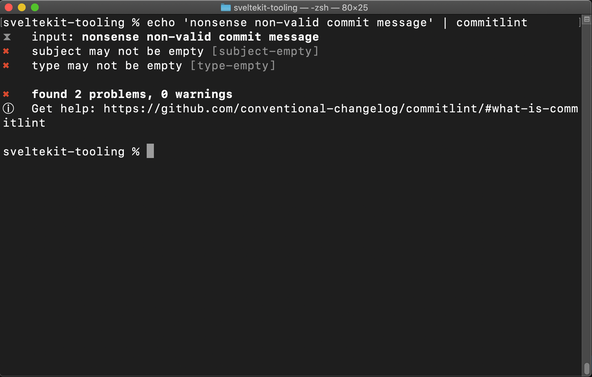
To test it out, run a command from the Terminal like:
echo 'nonsense non-valid commit message' | pnpm exec commitlint
This is asking commitlint to consider nonsense non-valid commit message to be a commit message and to check it for us.

We will see how to integrate commitlint into the
continuous integration process next.
🏋🏽 SvelteKit Tooling: 7. Husky #
Husky pulls together a few of the other tools we have already seen.
Essentially, it runs git hooks locally, before committing your code. If you
have ever pushed code to an upstream repo only to realize you forgot to format
it or didn't save a file with an error in it before committing Husky will have
your back. So, as an example, you can make sure you pass svelte-check and a host of other things before pushing to your remote repo. Here's my setup,
but you can go to town and add a lot more.
To get going, install Husky as a dev dependency:
pnpm add -D husky
Next, you can add config files to run at different stages in the continuous integration process:
pnpm exec commitlint --edit "$1"
pnpm prettier:check && pnpm run lint:css#pnpm prettier:check && pnpm run lint:scss # scss alternative
pnpm svelte:check
Finally, install your Husky configuration:
pnpm exec husky install
🙌🏽 SvelteKit Tooling: What we Learned #
In this post we looked at:
- how tooling can be used to streamline the continuous integration process;
- configuration of seven continuous integration tools to work with SvelteKit; and
- how Husky can be used ultimately to enforce all the coding conventions and rules created by other tools.
I do hope there is at least one thing in this article which you can use in your work or a side project. I'm keen to hear what tools you use in your own process and any further recommendations you might have. Drop a comment below with your thoughts.
You can see an example project with all of this set up on the Rodney Lab Git Hub repo .
🏁 SvelteKit Tooling: Summary #
What Svelte tooling is available? #
- Continuous integration tooling can be used to make updating and maintaining your Svelte code base less of a chore. It also brings benefits of code consistency by enforcing rules you choose. We look at how you can set up VS Code, pnpm, Prettier, ESLint, svelte-check, stylelint, precommit and Husky in your SvelteKit project.
How can you streamline your continuous integration process working in SvelteKit? #
- The biggest advantages might be gained from adding svelte-check and stylelint to your Svelte project. These will point out some common accessibility issues which might exist in your code. Husky can be used to make sure code is not pushed to your repo whenever those tools identify issues.
How can you configure Husky and commitlint to work with SvelteKit? #
- SvelteKit uses ES modules by default, which means you will need to tweak configuration files for commitlint and some other continuous integration tooling for it to work with SvelteKit. Typically, you will have to use a .cjs config file instead of a .js one.
🙏🏽 SvelteKit Tooling: Feedback #
Have you found the post useful? Would you prefer to see posts on another topic instead? Get in touch with ideas for new posts. Also, if you like my writing style, get in touch if I can write some posts for your company site on a consultancy basis. Read on to find ways to get in touch, further below. If you want to support posts similar to this one and can spare a few dollars, euros or pounds, please consider supporting me through Buy me a Coffee.


🏋🏽how you can use Husky and 6 other continuous integration tools to level up your ❤️ Svelte CI workflow.
— Rodney (@askRodney) November 17, 2021
Also see how to configure the tools to work with ES Modules used by SvelteKit.
Hope you find it useful!
https://t.co/aiCobHq7QB #askRodney #sveltekit @typicode @sveltejs
Finally, feel free to share the post on your social media accounts for all your followers who will find it useful. As well as leaving a comment below, you can get in touch via @askRodney on Twitter and also askRodney on Telegram . Also, see further ways to get in touch with Rodney Lab. I post regularly on SvelteKit as well as other topics. Also, subscribe to the newsletter to keep up-to-date with our latest projects.