


🤞🏽 Making your SvelteKit Form Work #
We start with some basic SvelteKit Form example snippets, in this post. SvelteKit form issues are one of the topics I get asked for help on most often. So, with the basic example out of the way, we look at 10 pitfalls you should try to avoid in your SvelteKit forms. This should help you debug any issues. If you are still having issues not covered here though, the best piece of advice I can offer is to cut out features until you have things working. Then, once you have the issues fixed, add the features back in one-by‑one.
Let’s start with that base example. We will later add feedback for missing fields, server-side validation using Zod and user experience enhancements.
🧱 Minimal SvelteKit Form Example #

This minimal code is missing some common user experience and feedback features, but should be enough to get us going!
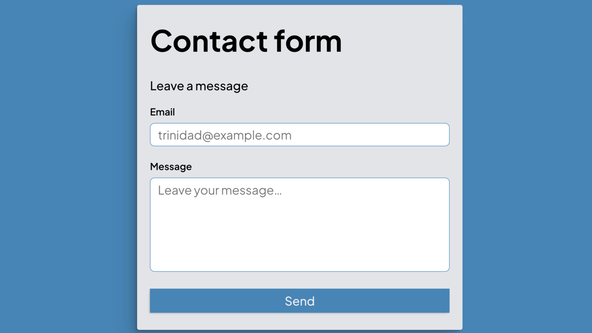
1 <script lang="ts">2 </script>3 4 <main>5 <h1>Contact form</h1>6 <form method="POST">7 <p>Leave a message</p>8 <label for="email">Email</label>9 <input10 id="email"11 type="email"12 required13 name="email"14 autocomplete="username"15 placeholder="[email protected]"16 />17 <label for="message">Message</label>18 <textarea id="message" required name="message" placeholder="Leave your message…" rows={4}></textarea>19 <button type="submit">Send</button>20 </form>21 </main>
+page.svelte: what we Have so Far #
+page.svelte: what we Have so Far #- basic form using web standards
-
input fields have corresponding label elements, with
forvalue matching the inputid -
there is no
preventDefault, because we are relying on browser primitives to submit the form
Corresponding Server Code #
1 import { redirect } from '@sveltejs/kit';2 import type { Actions } from './$types';3 4 export const actions: Actions = {5 default: async ({ request }) => {6 const form = await request.formData();7 const email = form.get('email');8 const message = form.get('message');9 10 if (typeof email === 'string' && typeof message === 'string') {11 // Remember to obfuscate any real, personally identifiable information (PII) from logs,12 // which unauthorised personnel might have access to.13 console.log({ email, message });14 15 // Add logic here to process the contact form.16 }17 18 redirect(303, '/');19 }20 };
+page.server.ts: what we Have so Far #
+page.server.ts: what we Have so Far #-
The handler is named
defaultin line5, because there is noactionattribute on theformelement in the Svelte markup. We see how to use named handlers later. -
email&messageinform.getmethod calls (lines7&8) match thenameattribute value on theinputandtextareaelements in the Svelte markup. -
Working in TypeScript, form elements are of type
FormDataEntryValue, and we should narrow the type to a more usefulstring, ahead of processing (line10).
+page.server.ts: what is Missing #
+page.server.ts: what is Missing #-
We just
console.log()the input email and message values. A typical workflow would involve emailing the message details to a team member who is authorized to handle personally identifiable information (PII). See example code for sending this email using the Postmark REST API below. - There is no check that the email is valid nor that the visitor left a message. We see how to use Zod for validation further down.
-
There is no feedback. We redirect the user to the home page, even if the
data was not as expected. We will return a SvelteKit
failobject, below, to provide feedback in the markup.
Postmark Example: Emailing Form Details to a Team Member #
src/routes/basic-start/+page.server.ts — click to expand code.
1 import { fail, redirect } from '@sveltejs/kit';2 import type { Actions } from './$types';3 import { POSTMARK_SERVER_TOKEN } from '$env/static/private';4 5 export const actions: Actions = {6 default: async ({ request }) => {7 const form = await request.formData();8 const email = form.get('email');9 const message = form.get('message');10 11 if (typeof email === 'string' && typeof message === 'string') {12 await fetch('https://api.postmarkapp.com/email', {13 method: 'POST',14 headers: {15 Accept: 'application/json',16 'Content-Type': 'application/json',17 'X-Postmark-Server-Token': POSTMARK_SERVER_TOKEN18 },19 body: JSON.stringify({21 To: email,22 Subject: 'Contact form message',23 TextBody: JSON.stringify({24 email,25 message26 }, null, 2),27 MessageStream: 'outbound'28 })29 });30 }31 32 redirect(303, '/');33 }34 };
See Postmark docs for more on the REST API .
🗳 Poll #
⚠️ SvelteKit Forms: 10 Mistakes to Avoid #
Next, we can add some missing features, pointing out trip hazards along the way.
-
⛔️ No SSG allowed! In your
svelte.config.jsfile, use@sveltejs/adapter-auto(the default) or another SSR compatible adapter, such as@sveltejs/adapter-cloudflareor@sveltejs/adapter-netlify. Also, make sure you do not have prerender directives in your server code for form handling routes.
You can build a completely static site with forms in SvelteKit, though you will probably want to use edge functions or serverless functions to handle form submissions. The techniques in this post will not work with prerendered pages. -
📮 Most of the time you will want the
POSTform method. As best practice, when there is a side effect (e.g. you log a user in, add a row to the database etc.), use thePOSTmethod on the form element. UseGETwhen the user just needs to request a document . See MDN HTTP request method docs -
🫱🏾🫲🏼 Add an
actionattribute to the form element for named handlers. Above, we used thedefaulthandler in the server action code. You might want to name your handlers, and if you do, you must include anactionattribute on the form element in the markup. Use this approach to make code intention clearer, or when you have more than one form on a single route. This approach also helps avoid the SvelteKit “no action with name 'default' found” error.src/routes/+page.sveltesvelte1 <form action="?/contact" method="POST">2 <!-- TRUNCATED -->3 </form>src/routes/+page.server.tstypescript1 export const actions: Actions = {2 contact: async ({ request }) => {3 const form = await request.formData();4 /* TRUNCATED... */5 }6 } - 🫣 Don’t trust users! By all means, use client-side validation, to enhance user experience, but do not rely on it. A savvy user might manipulate the form response, wreaking havoc in your server logic! The Zod library is a common choice for validation, and we see how to integrate it further down. Zod saves you having to work out your own Regex to validate email addresses and such like.
-
💯 Send the user helpful feedback when their input is invalid. This goes hand-in-hand with validation, from the previous tip. SvelteKit
server actions can return an
ActionFailureusing thefailhelper method. This lets you send error messages to the client, as well as track valid inputs (saving the user having to re-enter them). -
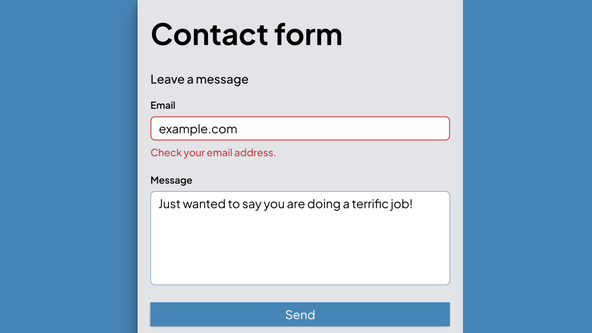
🤗 Make sure feedback is accessible. We can make use of
the new feedback from the previous tip to let the user know when the
inputs were not as expected. You can use
aria-invalidandaria-describedbyattributes to keep this feedback accessible.src/routes/+page.sveltesvelte1 <script lang="ts">2 import type { ActionData } from './$types';34 let { form }: { form: ActionData } = $props();56 let { email, error, message } = $state(7 form ?? {8 email: '',9 error: { field: '', message: '' },10 message: '',11 },12 );13 </script>1415 <main>16 <h1>Contact form</h1>17 <form action="?/contact" method="POST">18 <p>Leave a message</p>19 <label for="email">Email</label>20 <input21 id="email"22 type="email"23 required24 name="email"25 autocomplete="username"26 placeholder="[email protected]"27 aria-invalid={error?.field === 'email'}28 aria-describedby={error?.field === 'email' ? 'email-error' : undefined}29 />30 {#if error?.field === 'email'}31 <small id="email-error">{error?.message}</small>32 {/if}33 <!-- TRUNCATED... -->34 </form>35 </main>SvelteKit plumbing makes the
email,errorandmessagevariables returned from the action available on the frontend, viaexport let form. See the Grammar check post for an explanation of why there is a double assignment for these identifiers.
Any email field error will be displayed by the template code in lines30–32. Notice, we will display the exact message set on the server, saving us re-creating a message. Theidon thesmallelement in line31is important to link the erroneous field, using anaria-describedbyattribute in line28. Code for the message input is similar. -
🙏🏽 Avoid making the user re-enter details which were perfectly valid. An exception here is a password. Typically, you will ask the user to
re-enter a password when a form input was rejected. For other fields,
though, avoid winding up users; use a
valueattribute to repopulate the fields when a rejected form reloads:src/routes/+page.sveltesvelte1 <script lang="ts">2 import type { ActionData } from './$types';34 let { form }: { form: ActionData } = $props();56 let { email, error, message } = $state(7 form ?? {8 email: '',9 error: { field: '', message: '' },10 message: '',11 },12 );13 </script>1415 <main>16 <h1>Contact form</h1>17 <form action="?/contact" method="POST">18 <p>Leave a message</p>19 <label for="email">Email</label>20 <input21 value={email}22 id="email"23 type="email"24 required25 name="email"26 autocomplete="username"27 placeholder="[email protected]"28 aria-invalid={error?.field === 'email'}29 aria-describedby={error?.field === 'email' ? 'email-error' : undefined}30 />31 <!-- TRUNCATED... -->32 </form>33 </main> -
🏋🏽 Let Zod do the heavy lifting. Writing and testing
validation code can eat up a lot of time. Use a validation library like Zod to save your back! There is minimal extra code for this example. Add Zod as
a dev dependency (
pnpm add -D zod) then, define a schema for the form data:src/lib/schema.tstypescript1 import z from 'zod';23 export const contactFormSchema = z.object({4 email: z.email({5 error: (issue) =>6 issue.input === undefined7 ? 'Don’t forget to enter your email address!'8 : 'Check your email address',9 }),10 message: z11 .string({12 error: (issue) =>13 issue.input === undefined ? 'Don’t forget to leave a message!' : issue.message,14 })15 .min(1, 'Don’t forget to leave a message!')16 .max(1024, 'That’s a long message, try getting to the point quicker!'),17 });Here, we specify two fields:
emailandmessage. By default, with Zod, all fields are required, and you can add.optional()if the field is accepted, but not necessary. The schema supportsemailas a type, so you don’t have to dust of your go-to email Regex! We specify error messages to return if the email is missing or invalid. Similarly, formessage, we setminandmaxlengths.
As a final step, we want to validate the form entries, on the server, using this new schema:src/routes/with-zod-validation/+page.server.tstypescript1 import { fail, redirect } from '@sveltejs/kit';2 import type { Actions } from './$types';3 import { ZodError } from 'zod';4 import { contactFormSchema } from '$lib/schema';56 export const actions: Actions = {7 contact: async ({ request }) => {8 const form = await request.formData();9 const formEntries = Object.fromEntries(form);1011 try {12 const { email, message } = contactFormSchema.parse(formEntries);1314 // Remember to obfuscate any real, personally identifiable information (PII) from logs,15 // which unauthorised personnel might have access to.16 console.log({ email, message });1718 redirect(303, '/');19 } catch (error: unknown) {20 if (error instanceof ZodError) {21 const { fieldErrors } = flattenError(error);22 type FieldError = Record<string, string | string[]>;23 const validationErrors = Object.fromEntries(24 Object.entries(fieldErrors as FieldError).map(([key, value]) => [25 key,26 value.length === 1 ? value[0] : value,27 ]),28 );29 const { email, message } = formEntries;30 return fail(400, {31 email: typeof email === 'string' ? email : '',32 message: typeof message === 'string' ? message : '',33 error: {34 ...(validationErrors?.email35 ? { field: 'email', message: validationErrors?.email[0] }36 : {}),37 ...(validationErrors?.message38 ? { field: 'message', message: validationErrors.message[0] }39 : {}),40 },41 });42 }43 }44 }45 };-
we validate the form entries in line
12 -
note, we create a form entries plain JavaScript object in line
9 -
if the validation fails, Zod throws an error, which we catch in the
block starting at line
19, and then return entered values and error messages, using the same format as earlier
We need zero changes in the front end code, as the return value maintains the earlier format.
-
we validate the form entries in line
-
⚾️ Rethrow unhandled errors in SvelteKit handlers. This
is possibly the easiest pitfall to fall into! You might code everything
up, test it, see the form submitting just fine, but then not get the
expected redirect to the thank-you page! This comes from the way
SvelteKit manages redirects. Like Remix, it throws redirects. In the Zod
code above, we had to catch an error. The missing line, though, is a
rethrow of any errors we did not handle. Without adding that rethrow, we
will catch the redirect in line
18and just swallow it, preventing Svelte from redirecting. An easy fix is to rethrow any errors which we do not handle:src/routes/with-zod-validation/+page.server.tstypescript1 import { fail, redirect } from '@sveltejs/kit';2 import type { Actions } from './$types';3 import { ZodError } from 'zod';4 import { contactFormSchema } from '$lib/schema';56 export const actions: Actions = {7 contact: async ({ request }) => {8 const form = await request.formData();9 const formEntries = Object.fromEntries(form);1011 try {12 const { email, message } = contactFormSchema.parse(formEntries);1314 // Remember to obfuscate any real, personally identifiable information (PII) from logs,15 // which unauthorised personnel might have access to.16 console.log({ email, message });1718 redirect(303, '/');19 } catch (error: unknown) {20 if (error instanceof ZodError) {21 /* TRUNCATED... */22 return fail(400, { /* TRUNCATED... */ });23 }24 throw error;25 }26 }27 };If there is a Zod validation error, the code returns early (from line
22), so the rethow in line24is not triggered. Importantly, that rethrow will be invoked on the happy path, though! - 🔐 Help users follow security best practices. For signup and login, consider implementing multifactor authentication (MFA), to help protect users from credential stuffing attacks. Also encourage them to set strong and unique passwords. See more best-practices for SvelteKit login forms.
- how to pass form data from the client to the server;
- how to return feedback on invalid fields from the server, repopulating valid fields; and
- debugging a common issue where redirects do not work on SvelteKit server handlers.
How can I fix server redirects not working in SvelteKit? #
- A common cause of redirects inexplicably failing in SvelteKit server code is accidental consumption of SvelteKit thrown objects. SvelteKit uses the throw mechanism (usually used with errors) to handle redirects. Often, you will add a try-catch block in your server handler to manage any exceptions in your own logic. In doing so, it is easy unwittingly to consume SvelteKit thrown objects like redirects. Luckily, this is quick to remedy. Just make sure you rethrow any errors which are not handled by your code. That way, thrown redirects live long enough for SvelteKit to act on them!
How can you do server-side form validation in SvelteKit? #
- Zod is a great fit for server-side form validation in SvelteKit. Zod works performs validation on plain JavaScript object. To get the ball rolling, convert your SvelteKit action form data by calling `Object.fromEntries(form)` on it. Next, you will need a schema. Remember, any fields in your schema are assumed required, by default, though you can chain on a .optional() method, where required. Finally, you will find the flatten() method on Zod errors useful when manipulating errors, to create feedback.
How do SvelteKit form action names and default work? #
- Use default, for your action name, in the server code if you do not provide an action attribute value in the form element markup. However, to make your code easier to follow, you might want to name the handler more descriptively. Let’s say you want to name it `login`. In this case, add an `action` attribute to the form element tag in the markup: `<form … action="?/login">`
1 import { fail, redirect } from '@sveltejs/kit';2 import type { Actions } from './$types';3 4 export const actions: Actions = {5 contact: async ({ request }) => {6 const form = await request.formData();7 const email = form.get('email');8 const message = form.get('message');9 10 if (typeof email !== 'string') {11 return fail(400, {12 message: typeof message === 'string' ? message : '',13 error: { field: 'email', message: 'Check your email address.' }14 });15 }16 17 if (typeof message !== 'string') {18 return fail(400, {19 email,20 error: { field: 'message', message: 'Don’t forget to leave a message!' }21 });22 }23 /* TRUNCATED... */24 }25 }
Improving on the initial version, here, if the email is not a string (we introduce further checks when we look at Zod below), we
can: (i) send back the existing input for the message field, (ii) return the custom
error object which shows which field is awry and
what the issue is.
10 SvelteKit Form Mistakes and how to Avoid Them (6 – 10) #

🙌🏽 SvelteKit Form Example: Wrapping Up #
In this post, we saw a concrete SvelteKit form example, as well as 10 mistakes to avoid. More specifically, we saw:
Please see the full repo code on the Rodney Lab GitHub repo . The repo includes complete working examples from various stages in the journey above. I do hope you have found this post useful and can use the code in your own SvelteKit project. Let me know if you have any suggestions for improvements. Drop a comment below or reach out on other channels.
🏁 SvelteKit Form Example: Summary #
🙏🏽 SvelteKit Form Example: Feedback #
If you have found this post useful, see links below for further related content on this site. I do hope you learned one new thing from the video. Let me know if there are any ways I can improve on it. I hope you will use the code or starter in your own projects. Be sure to share your work on Twitter, giving me a mention, so I can see what you did. Finally, be sure to let me know ideas for other short videos you would like to see. Read on to find ways to get in touch, further below. If you have found this post useful, even though you can only afford even a tiny contribution, please consider supporting me through Buy me a Coffee.


Just dropped a new post looking at 10 SvelteKit form errors to avoid.
— Rodney (@askRodney) August 7, 2023
Starting with a basic contact form, we add:
- internal email alert with 📮
@postmarkapp;
- validation with Zod,
- user feedback & a11y enhancements.
Hope you find it useful!https://t.co/IYBhVsMd2A
Finally, feel free to share the post on your social media accounts for all your followers who will find it useful. As well as leaving a comment below, you can get in touch via @askRodney on Twitter and also askRodney on Telegram . Also, see further ways to get in touch with Rodney Lab. I post regularly on SvelteKit as well as Search Engine Optimization among other topics. Also, subscribe to the newsletter to keep up-to-date with our latest projects.