


🧑🏽💻 CMake Coverage Example #
In this post, we see a CMake coverage example using GitHub Actions. We build the project and run unit tests on each git push, before uploading the latest code coverage results to codecov.io. This is all working on a CMake C++ project. Using gcov, genhtml and lcov locally, it is possible to generate an HTML coverage report, with graphs. However, here we automate the process, running tests remotely. This has added advantages. For example, you might configure your repo to reject pull requests that cause the test coverage to drop below a target percentage.
🧱 What we are Building #

We will use an arkanoid-clone project that I set up for testing. This is a clone of the classic arcade game built using CMake and SFML. The repo itself is based on a YouTube tutorial, and you can find a link to the original tutorial in the arkanoid-clone repo README . You might also want to reference the repo for any extra useful details missing here — do let me know, though, if there is anything, extra, I could add here to make the article clearer.
Let’s start by adding Catch2 tests to the repo. We assume you have a CMake repo ready to add tests, too. If you don’t, there is a fantastic JetBrains tutorial on adding Catch2 unit tests in CMake , which you can set up quickly as a toy project.
☑️ Setting up CMake Unit Tests #
I will add Catch2 tests in a new Catch_tests directory,
and need to include the new directory at the bottom of the main CMakeLists.txt file:
# include test folder towards the bottom of CMakeLists.txtoption(RUN_UNIT_TESTS "Run Catch2 unit tests" ON)if(RUN_UNIT_TESTS) enable_testing() add_subdirectory(Catch_tests)endif()
Then, I create Catch_tests/CMakeLists.txt:
include(FetchContent)FetchContent_Declare( Catch2 GIT_REPOSITORY https://github.com/catchorg/Catch2.git GIT_TAG v3.7.0)FetchContent_MakeAvailable(Catch2) add_executable(Catch_tests_run BallTests.cpp) target_link_libraries( Catch_tests_run PRIVATE Ball_lib Brick_lib Paddle_lib arkanoid_compiler_flags)target_link_libraries(Catch_tests_run PRIVATE Catch2::Catch2WithMain)target_include_directories(Catch_tests_run PUBLIC "${PROJECT_SOURCE_DIR}/src") include(Catch)catch_discover_tests(Catch_tests_run)
This fetches the Catch2 dependency from GitHub, adds a test executable and finally, sets up Catch2 to discover the tests.
As an example test, you might have something like src/Catch_tests/BallTests.cpp:
#include "Ball.h" #include <SFML/Graphics.hpp>#include <catch2/catch_test_macros.hpp> TEST_CASE("BallCorrectlyInitialised", "[BallTests]"){ const Ball ball{256, 512}; const sf::Color ball_colour{ball.shape.getFillColor()}; CHECK(ball_colour == sf::Color::Red);}
See the tutorial, mentioned above, for more on creating Catch2 tests and setting them up in CMake.
⛺️ Adding Coverage Tests #
To start, download the CMake lcov Coverage module and add it to a new cmake folder in the root directory
of your project:
cmake/coverage.cmake — click to expand code.
1 function(add_coverage_target exclude)2 3 find_program(GCOV gcov)4 if (NOT GCOV)5 message(WARNING "program gcov not found")6 endif()7 8 find_program(LCOV lcov)9 if (NOT LCOV)10 message(WARNING "program lcov not found")11 endif()12 13 find_program(GENHTML genhtml)14 if (NOT GENHTML)15 message(WARNING "program genhtml not found")16 endif()17 18 if (LCOV AND GCOV AND GENHTML)19 set(covname cov.info)20 add_compile_options(-fprofile-arcs -ftest-coverage)21 add_link_options(--coverage)22 add_custom_target(cov DEPENDS ${covname})23 add_custom_command(24 OUTPUT ${covname}25 COMMAND ${LCOV} -c -o ${covname} -d . -b . --gcov-tool ${GCOV}26 COMMAND ${LCOV} -r ${covname} -o ${covname} ${exclude}27 COMMAND ${LCOV} -l ${covname}28 COMMAND ${GENHTML} ${covname} -output coverage29 COMMAND ${LCOV} -l ${covname} 2>/dev/null | grep Total | sed 's/|//g' | sed 's/Total://g' | awk '{print $1}' | sed s/%//g > coverage/total30 )31 set_directory_properties(PROPERTIES32 ADDITIONAL_CLEAN_FILES ${covname}33 )34 else()35 message(WARNING "unable to add target `cov`: missing coverage tools")36 endif()37 38 endfunction()
Then, update the main CMakeLists.txt to find and
use this, adding these lines towards the top of the file:
set(CMAKE_MODULE_PATH "${CMAKE_MODULE_PATH};${PROJECT_SOURCE_DIR}/cmake")include(coverage)add_coverage_target("*/Catch_tests/*")
The argument of the add_coverage_target function
is passed to lcov and gcov as an exclude path.
That is all you need to run the coverage tests. We will convert the data to XML for codecov.io later, using gcovr.
CMake Coverage Example: GitHub Test & Coverage Action #
Next we need a GitHub action. This runs on every pull request submission. In
our case, we use it to build the project, run tests and then generate a
coverage report in XML format ready for codecov.io. Create a GitHub workflow
flow in .github/workflows/ubuntu.yml to do this:
1 name: Ubuntu CI Test2 on:3 push:4 branches: [main, master, dev]5 pull_request:6 branches: [main, master, dev]7 permissions:8 contents: read9 jobs:10 build:11 runs-on: ubuntu-latest12 steps:13 - uses: actions/checkout@692973e3d937129bcbf40652eb9f2f61becf3332 # v4.1.714 - name: install15 run: sudo apt-get update && sudo apt-get install lcov #libxrandr-dev libxcursor-dev libudev-dev libopenal-dev libflac-dev libvorbis-dev libgl1-mesa-dev libegl1-mesa-dev freeglut3-dev # OpenGL dependencies only needed for SFML16 - name: configure17 run: |18 cmake -H. -Bbuild -G "Unix Makefiles" -DCMAKE_BUILD_TYPE=Debug -DENABLE_COVERAGE=On19 - name: building20 run: |21 cmake --build build --config Debug --target Catch_tests_run22 - name: run unit tests23 working-directory: ./build/bin24 run: |25 ./Catch_tests_run26 - name: generate coverage27 working-directory: ./build28 run: |29 make cov30 - name: Install gcovr31 run: |32 pip install -r requirements.txt --require-hashes33 - name: Generate JSON coverage report34 working-directory: ./build35 run: |36 gcovr -r .. . --branches --cobertura > coverage.xml37 - name: Upload coverage reports to Codecov38 uses: codecov/codecov-action@e28ff129e5465c2c0dcc6f003fc735cb6ae0c673 # v4.5.039 40 env:41 CODECOV_TOKEN: ${{ secrets.CODECOV_TOKEN }}
I use git commit hashes instead of repo tags or version numbers for added
security (in line 13, for example). In line 15 you can install gcovr and lcov as well as any extra dependencies needed to build
your project.
Lines 16 to 21 will
configure, then build the project in the remote environment, after a pull request.
Then, the code in lines 22 to 25 will run the Catch2 unit tests. If we broke something in the pull request, and
the unit tests fail, the whole pull request is rejected: exactly what we are looking
for.
In lines 26 – 29, we generate the
coverage report in a text format. I had most success with codecov.io working
in the XML format. We can convert the report, running:
gcovr -r .. . --branches --cobertura > coverage.xml
Which is exactly what we do in lines 33 – 36, because our
working directory will be build/ we adjust the path
passed to gcovr. You can find more details on gcovr commands in the docs .
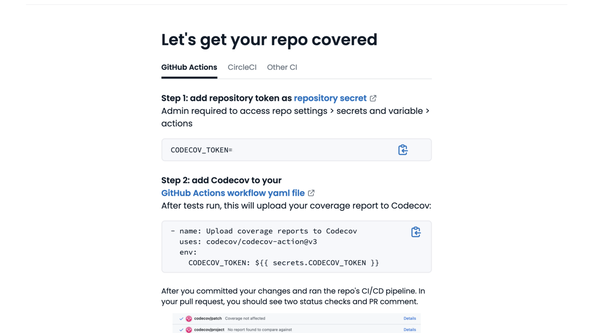
The final lines are where we upload the XML coverage report to codecov.io. You
will need to obtain a codecov token and add this to your GitHub repo. To get a
token, go to https://app.codecov.io/gh/YOUR-GITHUB-ACCOUNT, log in with GitHub and select the repo you want to add coverage for. Then,
follow instructions on adding a repository secret. That will cover step one,
displayed, and we have tackled step 2 above!

Python requirements.txt #
requirements.txt #
Finally, add a requirements.txt file in the project
root directory, which will be used in line 32,
above, to install gcovr (and the lxml dependency):
colorlog==6.8.2 \ --hash=sha256:4dcbb62368e2800cb3c5abd348da7e53f6c362dda502ec27c560b2e58a66bd33gcovr==7.2 \ --hash=sha256:e3e95cb56ca88dbbe741cb5d69aa2be494eb2fc2a09ee4f651644a670ee5aeb3 \ --hash=sha256:fd5cc432c9df863983c530dbd5077937c730b6589117916c188577681469b395jinja2==3.1.4 \ --hash=sha256:4a3aee7acbbe7303aede8e9648d13b8bf88a429282aa6122a993f0ac800cb369 \ --hash=sha256:bc5dd2abb727a5319567b7a813e6a2e7318c39f4f487cfe6c89c6f9c7d25197dlxml==5.3.0 \ --hash=sha256:01220dca0d066d1349bd6a1726856a78f7929f3878f7e2ee83c296c69495309e \ # ...TRUNCATED --hash=sha256:fb66442c2546446944437df74379e9cf9e9db353e61301d1a0e26482f43f0dd8Pygments==2.18.0 \ --hash=sha256:786ff802f32e91311bff3889f6e9a86e81505fe99f2735bb6d60ae0c5004f199 \ --hash=sha256:b8e6aca0523f3ab76fee51799c488e38782ac06eafcf95e7ba832985c8e7b13a
🗳 Poll #
💯 CMake Coverage Example: Testing your Work #
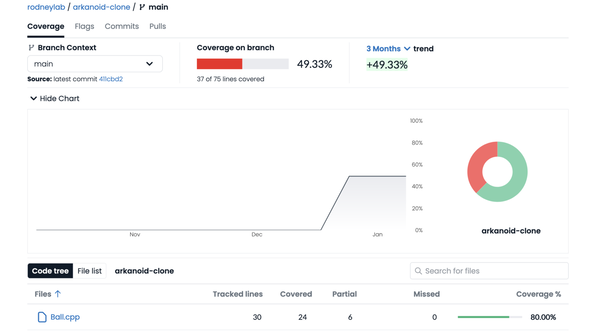
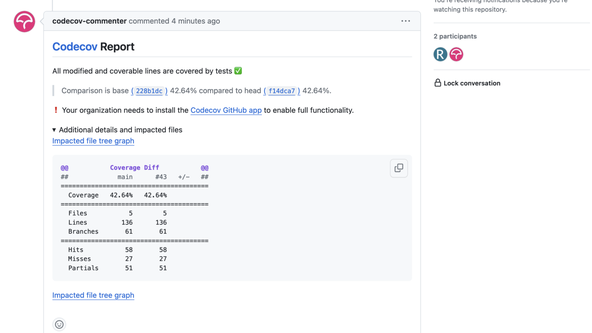
Next time you merge a pull request, after a short delay, you will see a coverage report on the codecov.io console, for your project.

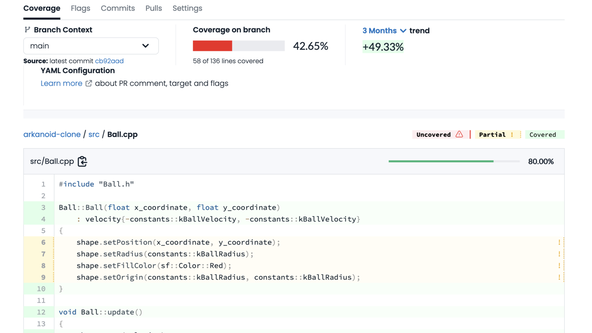
As well as that, new pull requests will include a codecov.io summary within the Pull Request page on GitHub.

🙌🏽 CMake Coverage Example: Wrapping Up #
In this CMake coverage example post, we saw a complete example of adding coverage tests to a CMake repo. We used GitHub actions to run a test coverage report, and push it to codecov.io. More specifically, we saw:
- how you can use run Catch2 unit test in GitHub actions;
- the codecov.io setup process for working in GitHub; and
- how to run code coverage test in CI and push the result to codecov.io.
I hope you found this useful. If you need additional pointers, take a look at the arkanoid-clone repo mentioned at
the start of the post , which fully implements the coverage approach discussed here. Do let me
know, though, if anything here is not clear, or would benefit for further
clarification.
🙏🏽 CMake Coverage Example: Feedback #
If you have found this post useful, see links below for further related content on this site. Let me know if there are any ways I can improve on it. I hope you will use the code or starter in your own projects. Be sure to share your work on X, giving me a mention, so I can see what you did. Finally, be sure to let me know ideas for other short videos you would like to see. Read on to find ways to get in touch, further below. If you have found this post useful, even though you can only afford even a tiny contribution, please consider supporting me through Buy me a Coffee.


Just dropped a new post on adding coverage tests to projects, showing:
— Rodney (@askRodney) January 17, 2024
— adding coverage with CMake and Catch2;
— running coverage in GitHub Actions; and
— how to run automatic coverage pushes to Codecov.
Hope you find it useful!
#askRodney #learncpphttps://t.co/Rmtm65nyYP
Finally, feel free to share the post on your social media accounts for all your followers who will find it useful. As well as leaving a comment below, you can get in touch via @askRodney on X (previously Twitter) and also askRodney on Telegram . Also, see further ways to get in touch with Rodney Lab. I post regularly on Deno as well as Search Engine Optimization among other topics. Also, subscribe to the newsletter to keep up-to-date with our latest projects.