


😕 What is Turnstile, and what does Prerendering mean? #
In this Astro comment form post, we are going to explore the new Hybrid Rendering pattern introduced in Astro 2.0. As well as that, we integrate Cloudflare’s innovative Captcha. It is like no other Captcha you have seen before! Prerendering improves the developer experience, making adding a form handler to an otherwise static site a lot easier. Turnstile improves user experience and saves visitors having to solve a string of Captcha challenges, while still protecting our site from bots.
Prerendering #
Two modern patterns for building websites are Server-side rendering (SSR) and Static Site Generation (SSG). With SSR, each time a visitor loads a web page on their device, the page is generated (from scratch) on a remote server and sent to their device. With SSG, we create all the pages beforehand, and the visitor device instead loads the pre-built page. SSG offers security and speed benefits. On the other hand, SSR makes it easier to customize the page to each visitor (letting a visitor see posts only from friends in a social sharing app as an example).
Before Astro 2, you had to choose either SSG or SSR for the whole site. Those days are now gone and now Astro lets you pick and choose which pages you want to be SSG and which SSR. A bonus is that you can keep the whole site SSG (for speed and security benefits) but use the SSR features to add a form handler. A form handler is just server code to read in form inputs and process them. Hybrid rendering works by setting the default to SSR. We must then override that default for each individual page we want to generate statically or prerender.
Turnstile #
Captchas are the challenges sites use to check you are not a robot! Using proprietary technology, Cloudflare are able to tell bots apart from human users without solving complex puzzles which can present accessibility issues for some users and irritate others.
In this post, we build up a basic comment form component. You could use this as a starting point for a more sophisticated comment form on a blog site.
🧱 What are we Building? #
Please enable JavaScript to watch the video 📼
As mentioned above, we will create a comment form component. This will be fairly basic, as the main objective is to see how to add Turnstile and how Astro hybrid rendering work. For your own project, you will want to incorporate server side sanitization, and validation as well as, perhaps, some client-side user interface progressive enhancements.
⛔️ Astro Comment Form: Turnstile Setup #
You will need a Cloudflare account to use Turnstile . At the time of writing, it is in beta and access is free. Log into the Cloudflare console and select Turnstile from the menu on the left. Next, click the Add site button. Turnstile credentials can be limited to work from one or more site domains. We will generate credentials for localhost (as the domain), for testing locally. When you deploy your site, generate a new set of credentials for your public domain.

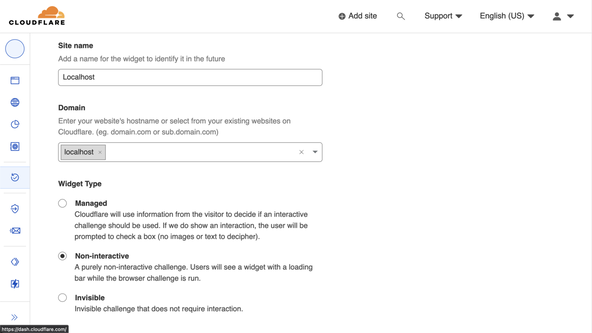
For now, enter Localhost in the Site name field and localhost in the Domain field. I chose the Non-interactive option for Widget type, but
choose whatever best matches your own needs.
⚙️ Getting Started: Astro Comment Form #
If you have an existing site you want to try this code on, create a git branch and follow along. If, instead, you are starting from scratch, spin up a new Astro app:
pnpm create astro astro-prerender-comment-formcd astro-prerender-comment-formpnpm astro telemetry disablepnpm add svelte cloudflarepnpm add -D wranglerpnpm dev
Because our form handler will run in SSR mode, we need to pick a cloud provider, so Astro can customize the build for it. We select Cloudflare here. We will use Svelte for the form markup, though you could probably get away with just an Astro component if you really wanted to.
I chose the default options in the CLI prompts. Once the dev server starts, it
will let you know the URL it is listening on. By default, this will be http://localhost:4321.
If you take a look at astro.config.mjs you should
see something like this:
1 import { defineConfig } from 'astro/config';2 3 // https://astro.build/config4 import svelte from '@astrojs/svelte';5 6 // https://astro.build/config7 import cloudflare from '@astrojs/cloudflare';8 9 // https://astro.build/config10 export default defineConfig({11 adapter: cloudflare(),12 integrations: [svelte()],13 output: 'server',14 });
Line 13 is important here; it tells Astro to build
the whole site as an SSR app. We will override this on our pages, and in fact only
the form handler will be managed by the server.
🤫 Environment Variables #
Add your Turnstile credentials to a new .env file
in the project root directory. Remember not to commit these to
your git repo:
PUBLIC_SITE_URL="http://localhost:4321"#PUBLIC_SITE_URL="http://localhost:8788"PUBLIC_TURNSTILE_SITE_KEY="0x0123456789ABCDEFGHIJKL"TURNSTILE_SECRETKEY="0xABCDEFGHIJKLMNOPQRSTUVWXYZ0123456"
Update the PUBLIC_SITE_URL to wherever your site
is running. You can use the commented out value later when running a Cloudflare
preview locally.
Next, we write some Astro code 🧑🏽🚀.
🏡 Astro Home Page #
Replace the content in src/pages/index.astro:
1 ---2 import CommentForm from '~/components/CommentForm.svelte';3 import Layout from '~layouts/Layout.astro';4 5 export const prerender = true;6 ---7 8 <Layout title="Comment">9 <main>10 <h1>Drop your comment here…</h1>11 <CommentForm client:load />12 </main>13 </Layout>14 15 <style>16 h1 {17 margin-bottom: var(--spacing-6);18 font-size: var(--font-size-3);19 }20 </style>
Line 5 is where we tell Astro we want to prerender
this page, overriding the SSR default set in astro.config.mjs. Astro will generate a static page which can be cached by a global CDN.
I like to use import path aliases (so we have ~/layouts/Layout.astro instead of ../layouts/Layout.astro in line 3). For this to work update tsconfig.json in the
project root directory:
1 {2 "compilerOptions": {3 "baseUrl": ".",4 "paths": {5 "~*": ["src/*"]6 }7 },8 "extends": "astro/tsconfigs/strict"9 }
You might notice we referenced some CSS custom properties in the Astro file
above. We can define those in a global CSS file and import them to the
existing src/layouts/Layout.astro file. That way,
the custom properties will be available to us in any pages which use the layout.
Update the layout file:
1 ---2 import '~/styles/fonts.css';3 import '~/styles/global.css';4 5 export interface Props {6 title: string;7 description?: string;8 }9 10 const { description = '', title } = Astro.props;11 ---12 <!-- TRUNCATED... -->
Create a src/styles/ folder, then add a global.css file with the following content:
src/styles/global.css — click to expand code.
:root { --spacing-px-2: 2px; --spacing-0: 0; --spacing-1: 0.25rem; --spacing-2: 0.5rem; --spacing-4: 1rem; --spacing-6: 1.5rem; --spacing-8: 2rem; --spacing-12: 3rem; --max-width-xs: 20rem; --max-width-wrapper: 48rem; --font-size-root: 16px; --font-size-1: 1rem; --font-size-2: 1.25rem; --font-size-3: 1.563rem; --font-size-4: 1.953rem; --font-size-5: 2.441rem; --font-size-6: 3.052rem; --font-weight-normal: 400; --font-weight-bold: 700; --colour-dark: hsl(132 100% 1%); /* deep fir */ --colour-brand: hsl(210 67% 43%); /* denim */ --colour-theme: hsl(116 46% 50%); /* sugar cane */ --colour-light: hsl(100 100% 99%); /* sandwisp */ --colour-alt: hsl(12 85% 60%); /* mandarin pearl */ --colour-light-alpha-90: hsl(100 100% 99% / 90%); --font-family-body: Urbanist;}html { font-family: var(--font-family-body);}body { display: grid; place-items: center; background-color: var(--colour-brand); padding: var(--spacing-12); color: var(--colour-light); accent-color: var(--colour-alt); caret-color: var(--colour-brand);}main { min-height: 100vh; width: var(--max-width-xs); margin: var(--spacing-4) auto var(--spacing-80);}h1 { font-size: var(--font-size-6); font-weight: var(--font-weight-bold);}p { font-size: var(--font-size-5);}form { display: flex; flex-direction: column; width: var(--max-width-full);}.screen-reader-text { border: 0; clip: rect(1px, 1px, 1px, 1px); clip-path: inset(50%); height: 1px; margin: -1px; width: 1px; overflow: hidden; position: absolute !important; word-wrap: normal !important;}
We are still missing the CSS for the fonts. Create fonts.css in the same folder:
src/styles/fonts.css — click to expand code.
/* See: https://gwfh.mranftl.com/fonts/urbanist?subsets=latin * to customize or download the fonts *//* urbanist-regular - latin */@font-face { font-display: swap; /* Check https://developer.mozilla.org/en-US/docs/Web/CSS/@font-face/font-display for other options. */ font-family: 'Urbanist'; font-style: normal; font-weight: 400; src: url('/fonts/urbanist-v10-latin-regular.woff2') format('woff2'), /* Chrome 36+, Opera 23+, Firefox 39+ */ url('/fonts/urbanist-v10-latin-regular.woff') format('woff'); /* Chrome 5+, Firefox 3.6+, IE 9+, Safari 5.1+ */}/* urbanist-700 - latin */@font-face { font-display: swap; /* Check https://developer.mozilla.org/en-US/docs/Web/CSS/@font-face/font-display for other options. */ font-family: 'Urbanist'; font-style: normal; font-weight: 700; src: url('/fonts/urbanist-v10-latin-700.woff2') format('woff2'), /* Chrome 36+, Opera 23+, Firefox 39+ */ url('/fonts/urbanist-v10-latin-700.woff') format('woff'); /* Chrome 5+, Firefox 3.6+, IE 9+, Safari 5.1+ */}
For this to work, we will serve the .woff and .woff2 files from our project. You can download them and save the four files (.woff and .woff2 for 400 and 700 weight), to a new public/fonts directory in the
project.
We now have the basics out of the way. Hope that wasn’t too quick! Drop a comment below if something needs more explanation. Next we will add the Svelte form component. Then, finally, we can add the SSR form handler.
❤️ Svelte Comment Form #
We will add a script tag to the page html head section
for Turnstile. Svelte makes it quite easy to do this from within the component.
That helps us encapsulate all the client-site Turnstile code in a single file. Create
CommentForm.svelte in the src/components directory with the following content:
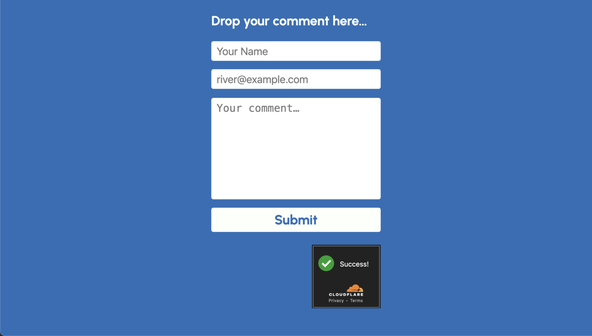
1 <script lang="ts">2 const siteUrl = import.meta.env.PUBLIC_SITE_URL;3 const turnstileSiteKey = import.meta.env.PUBLIC_TURNSTILE_SITE_KEY;4 </script>5 6 <svelte:head>7 <script src="https://challenges.cloudflare.com/turnstile/v0/api.js" async defer></script>8 </svelte:head>9 10 <form action={`${siteUrl}/api/message`} method="post">11 <label for="name" class="screen-reader-text">Name</label>12 <input id="name" name="name" type="text" required placeholder="Your Name" title="Name" />13 <label for="email" class="screen-reader-text">Email</label>14 <input15 id="email"16 name="email"17 type="text"18 required19 placeholder="[email protected]"20 title="Email"21 />22 <label for="email" class="screen-reader-text">Comment</label>23 <textarea id="comment" name="comment" required placeholder="Your comment…" rows="5" ></textarea>24 <button type="submit">Submit</button>25 <div class="cf-turnstile" data-sitekey={turnstileSiteKey} data-size="compact" ></div>26 </form>
You see the Turnstile code we needed to add is minimal. We add a script tag in
the HTML head section (line 7). Then, the
little widget which shows up below the submit button (line 25).
We are using the platform here; we use built-in JavaScript APIs
to submit the form. You will see the form has ${siteUrl}/api/message as the action. That is the route we will set the form handler to listen on.

Turnstile Verification Process #
When a user visits the page, the widget runs in the background and decides if the user is a bot or not (traditionally a user challenge would have been used here). The script sends data from the client browser to Cloudflare. Cloudflare then responds with a code. We use that code server-side to check if the visitor passed the Captcha (more on that later). The Turnstile JavaScript code we added will automatically add an extra field with that response code. This is how we get the code from client to server.
Form Styling #
Spruce up the form a touch with some extra styles at the bottom of src/components/CommentForm.svelte:
src/components/CommentForm.svelte — click to expand code.
28 <style>29 button {30 all: unset;31 cursor: pointer;32 background-color: var(--colour-light);33 color: var(--colour-brand);34 padding: var(--spacing-2);35 margin-bottom: var(--spacing-6);36 font-size: var(--font-size-3);37 font-weight: var(--font-weight-bold);38 text-align: center;39 }40 41 button:focus {42 outline: var(--spacing-px-2) solid var(--colour-alt);43 }44 45 button:focus,46 button:hover {47 background-color: var(--colour-light-alpha-90);48 }49 50 textarea {51 resize: none;52 }53 54 button,55 input,56 textarea {57 border-radius: var(--spacing-1);58 }59 60 input,61 textarea {62 text-indent: var(--spacing-2);63 line-height: 1.75;64 margin-bottom: var(--spacing-4);65 border-radius: var(--spacing-1);66 border-style: none;67 font-size: var(--font-size-2);68 }69 70 .cf-turnstile {71 margin-left: auto;72 }73 </style>
🥹 Thank‑you Page #
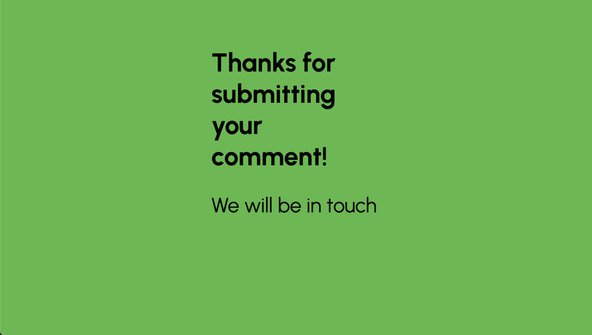
Before we jump to the form handler, let’s add a thank-you page. We will
show this on successful form completion. Create src/pages/thanks.astro with this content:
1 ---2 import Layout from '~layouts/Layout.astro';3 4 export const prerender = true;5 ---6 7 <Layout title="Thanks">8 <main>9 <h1>Thanks for submitting your comment!</h1>10 <p>We will be in touch</p>11 </main>12 </Layout>13 14 <style>15 body {16 background-color: var(--colour-theme);17 color: var(--colour-dark);18 }19 </style>
🍶 Server‑Side Form Handler #
We are on the home straight now. Once we add the form handler, all we will
have left to do is test! In Astro, API routes follow the same file-based
routing system as HTML pages. The main difference is that the file extensions
are different. Create a src/pages/api folder and
in there, add message.ts with the following content:
1 import type { APIRoute } from 'astro';2 3 const siteUrl = import.meta.env.PUBLIC_SITE_URL;4 const turnstileSecret = import.meta.env.TURNSTILE_SECRETKEY;5 6 export const POST: APIRoute = async function POST({ redirect, request }) {7 try {8 const form = await request.formData();9 const name = form.get('name');10 const email = form.get('email');11 const comment = form.get('comment');12 const turnstileResponse = form.get('cf-turnstile-response');13 14 const ip = request.headers.get('CF-Connecting-IP');15 16 if (typeof turnstileResponse === 'string') {17 const bodyFormData = new FormData();18 bodyFormData.append('secret', turnstileSecret);19 bodyFormData.append('response', turnstileResponse);20 ip && bodyFormData.append('remoteip', ip);21 const response = await fetch('https://challenges.cloudflare.com/turnstile/v0/siteverify', {22 method: 'POST',23 body: bodyFormData,24 });25 const { success } = await response.json();26 27 console.log({ name, email, comment, success });28 }29 30 return redirect(`${siteUrl}/thanks`);31 } catch (error: unknown) {32 console.error(`Error in comment form submission: ${error as string}`);33 return redirect(`${siteUrl}/`);34 }35 };
Again, we are using standard JavaScript APIs for form handling. Remember we
said Turnstile adds an extra form field for us? We pull this in, in line 12. The final part of the verification process is to send the client response
to Cloudflare, along with our secret Turnstile API key. The server replies
with a JSON object including a success field. As
you might expect, this is false when Turnstile assesses
the visitor to be a bot and true otherwise.
In a real world app, when success is true we would want to commit the comment data to our database as well as any other
processing needed. We just do a console log here instead. Also, in a production
app, we should want to do some sanitization before inserting the data to the database.
On top, we would have some validation, so we do not commit junk to the database.
If the comments will be displayed publicly, you will also need to filter them, checking
for inappropriate user-submitted content.
Returning to our basic example, finally we respond with a redirect pushing the
visitor browser to our new Thank-You page (line 30).
💯 Astro Comment Form: Testing #
Try submitting the form from your dev server. If all goes well, you should see the Thank-You page.

To build the site locally, we need to run in a Cloudflare wrangler
environment. Add an extra script to the project package.json file to handle this:
1 {2 "name": "astro-prerender-comment-form",3 "type": "module",4 "version": "0.0.1",5 "private": true,6 "scripts": {7 "dev": "astro dev",8 "start": "astro dev",9 "build": "astro telemetry disable && astro build",10 "preview": "astro preview",11 "preview:cf": "wrangler pages dev ./dist",12 },13 // TRUNCATED...14 }
Then run the script from the Terminal:
pnpm preview:cf
This time, the site will be available at http://localhost:8788. If this is your first time running wrangler from your machine, follow the
instructions in the Terminal to log in.
Remember to update PUBLIC_SITE_URL in your .env file to match the new URL (otherwise, the form will not submit as expected).
That’s it! You can now try pushing to Cloudflare Pages. Create a set of Turnstile credentials for your actual public domain first.
🗳 Poll #
🙌🏽 Astro Comment Form: Wrapping Up #
In this post, we saw how you can add a server-side form handler to your static Astro site. In particular, we saw:
- how to add Turnstile Captcha in Astro
- how Astro Hybrid rendering and prerendering work
- some points to consider in a full production comment form
You can see the full code for this project in the Rodney Lab GitHub repo . I do hope you have found this post useful! I am keen to hear what you are doing with Astro and ideas for future projects. Also, let me know about any possible improvements to the content above.
🏁 Astro Comment Form: Summary #
What is Hybrid Rendering? #
- Hybrid Rendering is a technique popularized by Astro which lets you choose between two rendering methods on a page-by-page basis. The two options are SSG (Static Site Generation) and SSR (Server-Side Generation). SSG is great for content or information sites. You generate all the pages ahead of time and serve them from a global CDN. This offer speed and better security. Generally, every visitor will see the same content, so SSG is not great for apps where the user logs in and sees a curated feed. SSR is great in this case though. With SSR, the pages are generated just in time, so it is easy to customize them for each visitor. You can use Hybrid rendering even if you want all your pages to be statically generated (or prerendered) but also want to have interactive forms on the site. Interactive forms (a comment form, for example) require a server to process the entered data. Hybrid rendering can help here. You keep all pages static to gain the speed and security benefits, but have a server-based form handler to sanitize, form inputs and add them to your database.
How is Turnstile Captcha different to other captchas? #
- Captchas are challenges on websites used to tell bots apart from regular human users. Traditionally, the challenges were interactive, and the user had to click images with traffic lights or some similar task supposed to be difficult for artificial intelligence to perform. Some of these interactive challenges pose accessibility issues and some users find them annoying. Turnstile is non-interactive. It is able to distinguish human from bot visitors in the background. In so doing, it addresses those drawbacks
Can you add form handling to an Astro site without writing serverless functions? #
- Astro makes this possible. In the past, to add form processing to a static or JAMStack site, you would add serverless functions. These could run in different environments, and typically their code was segregated from the rest of your project. Hybrid rendering in Astro lets you prerender all your site pages, but include a server handler to process the form inputs. We saw an example, creating a comment form. Now your form handling code becomes a first-class in your project!
🙏🏽 Astro Comment Form: Feedback #
Have you found the post useful? Would you prefer to see posts on another topic instead? Get in touch with ideas for new posts. Also, if you like my writing style, get in touch if I can write some posts for your company site on a consultancy basis. Read on to find ways to get in touch, further below. If you want to support posts similar to this one and can spare a few dollars, euros or pounds, please consider supporting me through Buy me a Coffee.


Amazed by 🚀 Astro 2.0's Hybrid Rendering. It lets you add server form handlers to a static site.
— Rodney (@askRodney) February 1, 2023
Just dropped a new post where we do just that. Also use Cloudflare Turnstile Captcha.
Hope you find it useful!
#JAMStack #learnastro #useThePlatformLukehttps://t.co/9DTAycIRMz pic.twitter.com/SCLOYXgP81
Finally, feel free to share the post on your social media accounts for all your followers who will find it useful. As well as leaving a comment below, you can get in touch via @askRodney on Twitter, @[email protected] on Mastodon and also the #rodney Element Matrix room. Also, see further ways to get in touch with Rodney Lab. I post regularly on Astro as well as SEO. Also, subscribe to the newsletter to keep up-to-date with our latest projects.