This Gatsby post was written for Gatsby 3 and is no longer maintained. If you would like to try out SvelteKit or Astro, check out the maintained posts which are based on those. Astro lets you continue to use React but also with partial hydration which can be used to provide an enhanced user experience. SvelteKit offers server side rendering as well as static site generation. See the post on how performance improved switching from Gatsby to Astro for more background.
🧱 Adding Data into Gatsby GraphQL Data Layer #
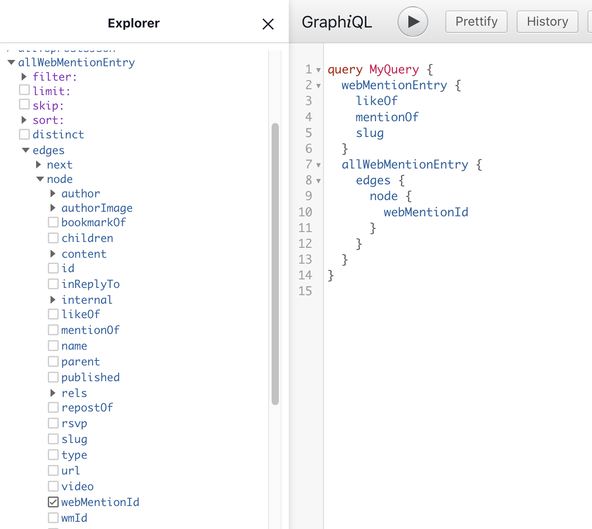
Gatsby’s data API can seem tricky to get to terms with, so here we look at a practical example, using Webmentions. Webmentions is a free service which lets you track user interactions with your website pages on social platforms like Twitter. As an example, once set up, you can use the webmention.io API to query how many people have shared or retweeted a Tweet. If you are familiar with Gatsby, you will know it has a built-in GraphQL data layer, allowing you to access data in your page components. Typically, you will add a plugin to add new data. Here, though, we will add data into Gatsby GraphQL manually, using the Gatsby Node API . We use Webmentions as a practical example which you can add to your existing projects.

There are a couple of Webmentions plugins, though we roll our own here, essentially. That way, we can later leverage the code to add data into Gatsby GraphQL from any API.
⚙️ Configuring the Webmentions Service #
There are a few steps to set up the service. Daily Dev Tips has a fantastic article which tells you how to set up Webmentions . Just follow the five steps in that piece. For step 3, as we are working in a React framework, to add the tag to our page head, we can use the React Helmet package , and add this code to a Layout component :
import { Helmet } from 'react-helmet';const Layout = ({children}) => (<><Helmet><link rel="webmention" href="https://webmention.io/example.com/webmention" /><link rel="pingback" href="https://webmention.io/example.com/xmlrpc" /></Helmet><header>...</header><main>{children}</main><footer>...</footer></>);
Once you have set up Webmentions, you will need your Webmentions API key. You can find this by logging into webmentions.io and heading to the settings page . The API Key is at the bottom of the page. Make a note of it, you will need it shortly.
😕 Querying the Webmentions API #
All the work we need to do for Gatsby to query the Webmentions API and then
add data into Gatsby GraphQL is in the gatsby-node.js file. Let's write a function to query the API, getting the latest mentions:
const getMentions = async ({ domain, token, reporter }) => { try { const mentionsPerPage = 100; const response = await fetch( `A;https://webmention.io/api/mentions.jf2?${queryString.stringify({ domain, token, 'per-page': mentionsPerPage, })}`A;, ); const json = await response.json(); return camelcaseKeys(json.children); } catch (error) { if (error.response) { reporter.warn(error.response.body); } else if (error.request) { reporter.warn('No response received when fetching WebMentions.'); } else { reporter.warn('Error setting up WebMentions fetch. ', error.message); }}return null;};
The domain variable will be the domain you set Webmentions
up on and token your API token. These will be passed
in when we call the function in the next step. reporter is a function in the Gatsby API which we use here to output warnings to the console.
Let's look at the sourceNodes API call next, this is where we do the heavy lifting.
🏋🏽 Gatsby sourceNodes API #
We use the sourceNodes API to pull in data and add it to Gatsby's GraphQL
layer. It is called as Gatsby sets up our site. We will use Angelo Ashmore's gatsby-node-helpers to generate some data sourceNodes. Let's install that first:
npm i camelcase-keys gatsby-node-helpers node-fetch query-string
We also install query-string which we referenced
in the fetch call in the previous section, as well
as node-fetch itself. Finally, camelcase-keys converts the object keys in the Webmentions object we create from the API call
result.
With that out of the way, we'll code up our sourceNodes function:
1 const camelcaseKeys = require('camelcase-keys');2 const { createNodeHelpers } = require('gatsby-node-helpers');3 const fetch = require('node-fetch');4 const queryString = require('query-string');5 6 const { WEBMENTION_DOMAIN, WEBMENTION_TOKEN } = process.env;7 8 exports.sourceNodes = async ({9 actions,10 createNodeId,11 createContentDigest,12 reporter,13 cache,14 store,15 }) => {16 const { createNode, createTypes } = actions;17 18 const nodeHelpers = createNodeHelpers({19 typePrefix: 'WebMention',20 createNodeId,21 createContentDigest,22 });23 const WebMentionEntryNode = nodeHelpers.createNodeFactory('Entry');24 const fetchLimit = 10000;25 26 const typeDefs = `A;27 type WebMentionEntry implements Node {28 type: String29 author: WebMentionAuthor30 authorImage: File @link(by: "id", from: "authorImage___NODE")31 content: WebMentionContent32 url: String33 published: Date @dateformat34 wmReceived: Date @dateformat35 wmId: Int36 wmPrivate: Boolean37 wmTarget: String38 wmSource: String39 wmProperty: String40 likeOf: String41 mentionOf: String42 inReplyTo: String43 repostOf: String44 bookmarkOf: String45 rsvp: String46 slug: String47 }48 type WebMentionAuthor {49 type: String50 name: String51 url: String52 photo: String53 }54 type WebMentionContent {55 text: String56 html: String57 }58 `A;;59 createTypes(typeDefs);60 61 const mentions = await getMentions({62 token: WEBMENTION_TOKEN,63 domain: WEBMENTION_DOMAIN,64 perPage: fetchLimit,65 reporter,66 });67 if (mentions !== null) {68 mentions.forEach(async (element) => {69 const url = new URL(element.wmTarget);70 const node = WebMentionEntryNode({71 ...element,72 id: element.wmId.toString(),73 slug: url.pathname.slice(1),74 });75 createNode(node);76 if (element.author.photo !== null && element.author.photo !== '') {77 const fileNode = await createRemoteFileNode({78 url: element.author.photo,79 parentNodeId: node.id,80 createNode,81 createNodeId,82 cache,83 store,84 });85 if (fileNode) {86 node.authorImage___NODE = fileNode.id;87 }88 }89 });90 }91 };
-
You will see, in line
6, we pull in two environment variables:WEBMENTION_DOMAINandWEBMENTION_TOKEN. Don't forget to add these to your.envfiles. The first is the domain we registered with Webmentions. The second is the API key we got earlier from webmentions.io. -
In lines
26–58we define all the Webmentions types which exist on the object we pull in. The types are needed for GraphQL. It is important to update these if you are using this code for a different API. -
In line
30we pull in the author image as aFiletype. The actual variable is just a string containing the URL for the image. By defining the type this way, we can later access and process the image using the Gatsby Image API . -
In line
61we actually call thegetMentionsfunction which we defined in the previous section.
It's definitely worth setting up Webmentions on one of your projects at least, so you have a working example of how to add data into Gatsby GraphQL. You can then use that code as a starting point if you need to add data from any other API into your project's GraphQL.
🙌🏽 That’s all Folks! #
In this post, we learned:
- how to use the Gatsby sourceNodes API;
- setting up Webmentions for your site; and
- how to add data into Gatsby GraphQL.
I hope you found this useful. Let me know if I can improve the content in any way. Also, I am keen to hear which APIs you will use this code on. You can leave a comment below, @ me on Twitter or try one of the other contact methods listed below.
🙏🏽 Add Data into Gatsby GraphQL: Feedback #
If you have found this post useful, even though you can only afford even a tiny contribution, please consider supporting me through Buy me a Coffee.
Finally, feel free to share the post on your social media accounts for all your followers who will find it useful. As well as leaving a comment below, you can get in touch via @askRodney on Twitter and also askRodney on Telegram . Also, see further ways to get in touch with Rodney Lab. I post regularly on SvelteKit as well as Gatsby JS among other topics. Also, subscribe to the newsletter to keep up-to-date with our latest projects.

