


✨ What is uvu? #
uvu? #
In this post, we will look at using uvu for TypeScript
API testing. uvu is a lightweight and lightning fast test
runner . It is bare-boned, though has enough functionality to run unit and
integration tests on your app’s backend. Being so fast, you can merge it
into your continuous integration process. This means you can run tests before
every push to your git repo. On top, it works well with test driven
development, where you write tests first to define expected behaviour and then
implement your feature.
🧱 What App are we Working On? #
We won’t build an app as we normally do in these posts. I have created a
basic GraphQL API coded in TypeScript and using Fastify and Mercurius though.
So you can clone that from the git repo to follow along or check out details we don’t have time to go into here.
Although that code uses Fastify, you can use uvu with Express or other node-based servers. You can also use it with JavaScript
(not just TypeScript). There is a separate post on the Fastify GraphQL API Stack if you are interested in learning more.

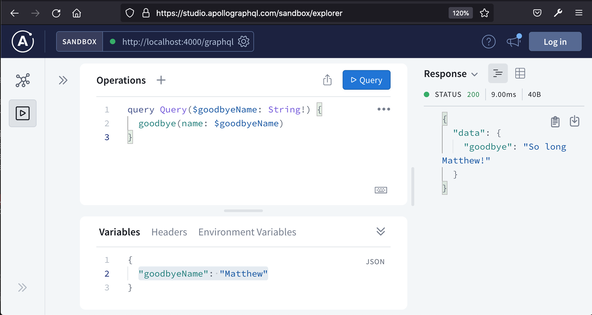
The API just has two available GraphQL queries — enough to see how uvu works.
query Query { hello}
query Query($goodbyeName: String!) { goodbye(name: $goodbyeName)}
We also have a utility function which we will test.
🗳 Poll #
⚙️ uvu Setup #
uvu Setup # uvu is pretty simple to set up for node. Assuming you already have ts-node installed
in your TypeScript project, you just need to install uvu itself. We also install supertest here:
pnpm install -D uvu supertest
SuperTest is helpful for testing the GraphQL endpoints
. We can use it to send HTTP requests and make assertions on the responses. If
you are working on a Fastify project, as we will see, you use inbuilt Fastify functionality
and don’t need to add supertest.
Next up, we can add a script to run our tests in package.json:
1 {2 "scripts": {3 "build": "tsc",4 "dev": "nodemon dist/server.js",5 "format": "prettier --write "**/*.{js,jsx,ts,tsx,json,md}"",6 "prettier:check": "prettier --config .prettierrc --check "**/*.{js,jsx,ts,tsx,json,md}"",7 "start": "node dist/server.js",8 "start:ts": "ts-node src/server.ts",9 "test": "uvu -r ts-node/register tests",10 "watch": "tsc -w",11 "prepare": "husky install"12 },13 // TRUNCATED...
The test script registers ts-node then looks for tests to run in the tests directory.
Change this directory name if you like to put tests in another location.
That’s all the setup we need. Next we’ll code up a unit test, so we can run our first test.
☑️ Unit Testing #
Let’s start by testing our utility function: goodbyeResponse. This function just takes a name as a string input and returns a farewell
greeting as a string:
export function goodbyeResponse(name: string): string { return `So long ${name}!`;}
We set the test script in package.json to look for
tests in the tests folder at the root of our project,
so let’s create a test file. Let’s paste the code below into tests/utilities/hello.ts:
import { test } from 'uvu';import * as assert from 'uvu/assert';import { name } from '../../fixtures/utilities/hello';import { goodbyeResponse } from '../../src/utilities/hello'; test.before.each((meta) => { console.log(meta['__test__']);}); test('it returns expected response from goodbyeResponse', () => { assert.type(goodbyeResponse, 'function'); assert.is(goodbyeResponse(name), 'So long Matthew!');}); test.run();
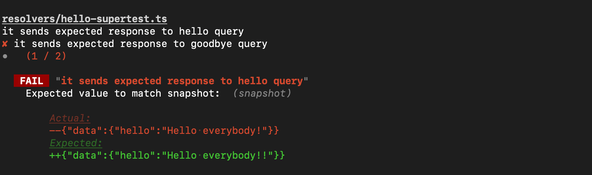
In lines 5 – 6 we are just printing
out the test name before each test. This is not necessary, though I like to do it
as it helps spot which test is failing when there is an error. You can see this
in the image below, where a red “×” appears alongside the name
of the failed test.

Unit Test Code #
Carrying on down the previous code block, you see in lines 10 – 13 we have the actual first
test. uvu defines tests within functions, like many
other test runners. The first argument to the test function is a name for the test. uvu has an assert
module which we use here (imported in line 2),
though this is optional. You can settle for node’s assert if you want to strip things back even more. Here we assert our function does indeed
have a function type. Then we check, we get the expected response back for a given
input.
Finally, in the last line, we trigger the tests by calling test.run(). To run this test from the terminal:
pnpm test
Use npm test or equivalent yarn command if you prefer. Next we will look at integration testing, first with the
supertest package and then using Fastify built in
functionality for sending requests to our GraphQL endpoints.
Integration Testing with SuperTest #
Here we will check our GraphQL endpoints give the expected responses. Although we focus on queries, you can also run mutations and make assertions on the state of a test database (for example).
The main difference, compared to the unit test above, is that we need to spin
up our Fastify server before running the tests. Previously we used a test.before.each function which ran before every test. We only need to start the server once,
then run all tests. In this case, we can use test.before. Let’s see the code:
import type { FastifyInstance } from 'fastify';import supertest from 'supertest';import { test } from 'uvu';import * as assert from 'uvu/assert';import { name } from '../../fixtures/utilities/hello';import build from '../../src/app'; let app: FastifyInstance; test.before(async () => { app = await build(); await app.ready();});test.before.each((meta) => { console.log(meta['__test__']);}); test.after(() => app.close()); test('it sends expected response to hello query', async () => { const query = ` query Query { hello } `; const response = await supertest(app.server) .post('/graphql') .send({ query, variables: {} }) .set('Content-Type', 'application/json') .expect(200); const { body } = response; assert.snapshot(JSON.stringify(body), '{"data":{"hello":"Hello everybody!"}}'); assert.is(body.data.hello, 'Hello everybody!');}); test('it sends expected response to goodbye query', async () => { const query = ` query Query($goodbyeName: String!) { goodbye(name: $goodbyeName) } `; const variables = { goodbyeName: name }; const response = await supertest(app.server) .post('/graphql') .send({ query, variables }) .set('Content-Type', 'application/json') .expect(200); const { body } = response; assert.snapshot(JSON.stringify(body), '{"data":{"goodbye":"So long Matthew!"}}'); assert.is(body.data.goodbye, 'So long Matthew!'); }}); test.run();
This code will differ slightly if you are using Express instead of Fastify,
but most of it will remain unchanged. You will still need to import your app in line 6, but the type and mechanisms for
spinning it up and tearing down (lines 8, 11 – 12, 19) will be slightly different.
In this file, we are testing the GraphQL endpoints. We send the GraphQL queries as JSON objects (see the recent post on SvelteKit GraphQL Queries using fetch only for more detail on structuring the request).
With uvu being so lightweight, there is no built-in
mechanism for creating and updating snapshots, like you have in Jest, for example.
However, as you see in line 36 we can still compare
a returned value against a snapshot string.
This supertest code can be used on Express and other
node servers. If you are using Fastify, you may prefer to use inbuilt functionality
to send test GraphQL queries. Let’s see how to do that next.
Integration Testing with Fastify Inject #
Fastify has a built-in inject method. We can use
that to send GraphQL queries to our endpoints. Although not necessary, for larger
projects, it is helpful to set up test helper functions. We can use these to simplify
the code for writing GraphQL queries in tests and even spin up databases or test
side effects in projects with databases. Here is an example of such a file, making
use of Fastify’s inject method:
import type { FastifyInstance, LightMyRequestResponse } from 'fastify';import { test } from 'uvu';import build from './src/app'; interface TestContext { request: ( query: string, variables?: Record<string, string | number>, ) => Promise<LightMyRequestResponse | undefined>;} export function createTestContext(): TestContext { const ctx = {} as TestContext; let serverInstance: FastifyInstance | null = null; test.before(async () => { serverInstance = await build({ logger: false }); }); test.before.each(async (meta) => { console.log(meta.__test__); async function request(query: string, variables = {} as Record<string, string>) { return serverInstance?.inject({ method: 'POST', url: 'graphql', headers: { 'content-type': 'application/json' }, payload: { query, variables }, }); } Object.assign(ctx, { request }); }); test.after(() => serverInstance?.close()); return ctx;}
With that in place, we can use it in our Fastify tests (note similarities with Supertest code above):
import { test } from 'uvu';import { is, ok, snapshot } from 'uvu/assert';import { name } from '../../fixtures/utilities/hello';import { createTestContext } from '../../testHelpers'; const ctx = createTestContext(); test('it sends expected response to hello query', async () => { const query = ` query Query { hello } `; const response = await ctx.request(query); ok(response); const { data }: { data: { hello: string } } = await response.json(); snapshot(JSON.stringify(data), '{"hello":"Hello everybody!"}'); const { hello } = data; is(hello, 'Hello everybody!');});test('it sends expected response to goodbye query', async () => { const query = ` query Query($goodbyeName: String!) { goodbye(name: $goodbyeName) } `; const variables = { goodbyeName: name }; const response = await ctx.request(query, variables); ok(response); const { data }: { data: { goodbye: string } } = await response.json(); snapshot(JSON.stringify(data), '{"goodbye":"So long Matthew!"}'); const { goodbye } = data; is(goodbye, 'So long Matthew!');}); test.run();
As before, you can test the tests by running pnpm test in the terminal.
🔥 Husky CI Integration #
Finally, for this post on using uvu for TypeScript
API testing, let’s also add automatic testing into the app. This will run
before each push, to reduce the likelihood of us pushing broken code to our repo.
We will use husky to add this functionality.
As a first step, initialize a git repo in your project,
if you have not yet done so:
git init
Next, initialize and install husky:
npx husky-init && pnpm install
Finally, we need to add a trigger to run the test script before each push:
npx husky add .husky/pre-push 'pnpm test'
🙌🏽 Using uvu for TypeScript API Testing: Wrapup #
Please enable JavaScript to watch the video 📼
In this post, we saw:
-
how handy using
uvufor TypeScript API testing can be; - a couple of ways to send GraphQL requests to your API endpoints; and
- how you can integrate testing into your continuous integration workflow.
I hope you have found this useful. If you are not familiar, with Fastify or TypeScript have a look at the code in the repo to help you level-up before you try your own project. The full code for the example app is on the Rodney Lab GitHub repo . Keen to hear feedback on the post as it is a little different to the usual style.
🙏🏽 Using uvu for TypeScript API Testing: Feedback #
uvu for TypeScript API Testing: Feedback #Have you found the post useful? Which other hosting service would you like to know how to host a SvelteKit site on? Would you like to see posts on another topic instead? Get in touch with ideas for new posts. Also, if you like my writing style, get in touch if I can write some posts for your company site on a consultancy basis. Read on to find ways to get in touch, further below. If you want to support posts similar to this one and can spare a few dollars, euros or pounds, please consider supporting me through Buy me a Coffee.
Finally, feel free to share the post on your social media accounts for all your followers who will find it useful. As well as leaving a comment below, you can get in touch via @askRodney on Twitter and also askRodney on Telegram . Also, see further ways to get in touch with Rodney Lab. I post regularly on SvelteKit as well as other topics. Also, subscribe to the newsletter to keep up-to-date with our latest projects.