


✨ Use Apollo Client with SvelteKit #
In this post, we look at how to use Apollo Client with SvelteKit. We will query the GitHub GraphQL API to pull out some data from your repos. If you are new to SvelteKit, you will find this post useful, as we use a few of SvelteKit’s idiosyncrasies. These help Svelte offer an improved developer experience. If you come from a React background, then you might well already be familiar with Apollo Client, so I hope you can leverage that knowledge here to get to learn SvelteKit a little quicker. Instead of building yet another to-do app, you will create some code in this tutorial, which you can leverage to generate a Projects page on your personal developer blog.

To follow along, you might find a GitHub account useful. If you don’t already have one, just hop over to github.com and click the Sign up for GitHub button . We won’t look in too much detail at what GraphQL is, here. If you are new to GraphQL, though, that is not a barrier. You will find this Introduction to GraphQL useful . If you’re ready, let’s get started.
🔧 GitHub GraphQL API #
The GitHub GraphQL API lets you query your repo and other users’ public repos. Here we will just be pulling data about your own repo, such as description, last commit and stars. You can use this code on your blog Projects page. Using GitHub to source the information, you only ever have to update content in one place. You are kind of using GitHub as a Content Management System (CMS) for your projects page. For sparkles, you could pull the repo code languages and tags, and, add filters so future employers can see exactly what you coded in each language. There is so much magic you can do with this API. Your imagination is the limit!
GitHub GraphQL API Explorer #
You don’t have to do this step for the tutorial, though you might find it interesting. GitHub has a GraphiQL explorer for the GitHub API . You can use it to check what GraphQL queries you can make as well as get documentation. If you are extending this project for your own needs, you can generate your queries and mutations in GraphiQL and then paste them into your code editor once you are happy with them. For the Explorer to work, you will need to sign in to your account and then authorize it to access your GitHub account.
Please enable JavaScript to watch the video 📼
Although you don’t need to authorize the Explorer to get going on this
project, you will need to generate a GitHub personal Access Token. You can see full instructions on the GitHub page . In short, once logged in to GitHub, click your profile icon in the top
right corner and select Settings. From the options which
appear on the left of the screen, select Developer settings.
Next, select Personal access tokens followed by clicking the Generate new token button. As the note, you can use sveltekit-graphql-github. For this project, you will only need the public_repo permission under repo. Finally, scroll down to the bottom
of the screen and select Generate token. Make a note of the
token which the console displays, you will need this shortly.
Now we have a GitHub personal access token. Why don’t we create our SvelteKit project?
🗳 Poll #
🧱 Building our SvelteKit App to Query the GitHub API #
If you were creating a blog site, you would start with the SvelteKit Blog Starter. However, we are just building a simple (literally) single page app, so we
will start from scratch. You might find this useful if this is your very first
SvelteKit project (if it is your first, also take a look at the guide on Getting Started with SvelteKit). We start by spinning up a skeleton site. If you prefer yarn or npm, swap
out the pnpm command:
pnpm dlx sv create sveltekit-graphql-github && cd $_pnpm installpnpm dev
The app should be up and running now on your machine at http://localhost:5173 . If something else is already running on port 5173, don’t worry, we’ll see how to change ports in a moment. We
need a few packages for this project, let’s install them all at once:
@fontsource/merriweather \ @sveltejs/adapter-static@next dayjs dotenv [email protected] \ graphql-tag node-fetch sass svelte-preprocess
What do we have here? @apollo/client, graphql and node-fetch will be used to make GraphQL queries.
We will use @fontsource/fira-sans, @fontsource/merriweather, dayjs, sass and svelte-preprocess for styling and formatting.
@sveltejs/adapter-static@next builds a static SvelteKit
site. env-cmd is a handy utility for keeping our
secrets secret. Speaking of which, next we will add some environment variables to
the app.
Apollo Client Version #
Just before we move on: note, we added a particular version of @apollo-client. We have tested this code with that version (latest available version at
time of writing) and upgrades can break compatibility. I would start with our
particular version, and once we have that working then consider testing any
newer version which might be currently available.
Environment Variables #
Our app will have a client part and a server part. We will build a static
site, which means (in production) the server code only runs once when the
static site is being generated. Only the server needs to know our secrets for
this project, so we do not prefix them with VITE_ and we use env-cmd to access them. There is a
little more explanation of environment variables in the Getting Started with SvelteKit post. Anyway, create a .env file in the project’s
root folder and paste in GitHub personal access token from the previous section:
GRAPHQL_ENDPOINT="https://api.github.com/graphql"GITHUB_PERSONAL_ACCESS_TOKEN="PASTE_YOUR_TOKEN_IN_HERE"
The GraphQL endpoint is not really secret in this case, but if you were querying another API which was private, you would definitely not want to add it to your committed repo code. Next, we will set up the backend, and then add the frontend afterwards and finally style it.
Apollo Client Set Up #
This Apollo Client code is based on a Stack Overflow answer . We further updated it based on a GitHub issue to work with the current version of Apollo Client. As the Stock Overflow solution
suggests, we will only import the parts of Apollo Client which we need. Make a src/lib/utilities folder in your project and add an apolloClient.js file with this code:
1 import fetch from 'node-fetch';2 import { ApolloClient } from '@apollo/client/core';3 import { HttpLink } from '@apollo/client/link/http';4 import { InMemoryCache } from '@apollo/client/cache';5 import { setContext } from '@apollo/client/link/context';6 import { GITHUB_PERSONAL_ACCESS_TOKEN, GRAPHQL_ENDPOINT } from '$env/static/private';7 8 class Client {9 constructor() {10 if (Client._instance) {11 }12 Client._instance = this;13 14 this.client = this.setupClient();15 }16 17 setupClient() {18 const link = new HttpLink({19 uri: process.env['GRAPHQL_ENDPOINT'],20 fetch21 });22 const authLink = setContext((_, { headers }) => {23 return {24 headers: {25 ...headers,26 authorization: `Bearer ${process.env['GITHUB_PERSONAL_ACCESS_TOKEN']}`27 }28 };29 });30 const client = new ApolloClient({31 credentials: 'include',32 link: authLink.concat(link),33 cache: new InMemoryCache()34 });35 return client;36 }37 }
We have modified the code from the Stack Overflow question to authorize us on
the GitHub API. If you use this code on another project using an API which
does not need authorization, remove lines 21 – 28 and also change line
31 to read “link,”.
Apollo Client Hack #
Unfortunately, Apollo Client does not currently work out of the box with
SvelteKit. As a hack, we need to add some extra exports to the package.json file inside the @apollo/client package. We can
do this by running a script which backs up the package.json file in that folder, then patches it. Before patching, it checks if there is
already a backup and if there is, it assumes the file is already patched so does
nothing. Here is the shell script:
#!/bin/sh # original source: https://github.com/apollographql/apollo-client/issues/8218 if [[ -f "./node_modules/@apollo/client/package.json.bak" ]]; then exit 0fi sed -i.bak "s/"dependencies":/"exports":{".":{"node":"./main.cjs","default":"./index.js"},"./cache":{"node":"./cache/cache.cjs","default":"./cache/index.js"},"./core":{"node":"./core/core.cjs","default":"./core/index.js"},"./link/schema":{"node":"./link/schema/schema.cjs","default":"./link/schema/index.js"},"./link/context":{"node":"./link/context/context.cjs","default":"./link/context/index.js"},"./link/http":{"node":"./link/http/http.cjs","default":"./link/http/index.js"},"./link/ws":{"node":"./link/ws/ws.cjs","default":"./link/ws/index.js"}}, "dependencies":/" ./node_modules/@apollo/client/package.json
Paste the code into a new file patch-apollo-client.sh in the project folder. Then run it once now to patch the package.json file:
sh ./patch-apollo-client.sh
Finally, we need to integrate the patch into our build script so that it runs
when our host builds the site. Update the build script in the project package.json file:
1 {2 "name": "sveltekit-graphql-github",3 "version": "0.1.0",4 "scripts": {5 "dev": "vite dev",6 "build": "sh ./patch-apollo-client.sh && vite build",7 "preview": "vite preview",8 "lint": "prettier --check --plugin=prettier-plugin-svelte . && eslint .",9 "format": "prettier --write --plugin=prettier-plugin-svelte ."10 },11 # truncated12 }
Server Endpoint #
We will use a server endpoint to pull in the data from GitHub, which the
client needs to render. Create a src/routes/+page.server.js file and paste this code into it:
1 import { client } from '$lib/utilities/apolloClient';2 import gql from 'graphql-tag';3 4 /** @type {import('../../.svelte-kit/types/src/routes/$types').PageLoad} */5 export async function load() {6 const limit = 5;7 const query = gql`8 query RepositoriesQuery($limit: Int) {9 viewer {10 login11 name12 repositories(first: $limit, orderBy: { field: STARGAZERS, direction: DESC }) {13 nodes {14 id15 createdAt16 name17 description18 resourcePath19 pushedAt20 stargazerCount21 }22 }23 }24 }25 `;26 const { data } = await client.query({27 query,28 variables: { limit },29 });30 31 return {32 data,33 };34 }
We only need to respond to POST requests, so our
file at this endpoint only contains a POST function,
-
lines
7–25contain the actual GraphQL query, notice we use thelimitvariable to supply thefirstparameter in our query (line12). You can go to town here, and add other parameters you want to query for, like repo code languages and tags, -
lines
26–29is where we use Apollo Client to make the query. If you are used to using hooks with Apollo Client in React, it might be some time since you have last seen this syntax! We don’t need mutations here, but if you do need a mutation in one of your projects, the equivalent code would look like this:
const { data } = await client.mutate({ mutation, variables: { limit }});
You would need to define your mutation GraphQL similarly to the query we have above.
-
finally, in lines
31–33, we respond, sending the fetched data to the client.
Browser Client Page #
We only have a single page for this app. First replace the svelte code in src/routes/+page.svelte with this, then we will take a closer look:
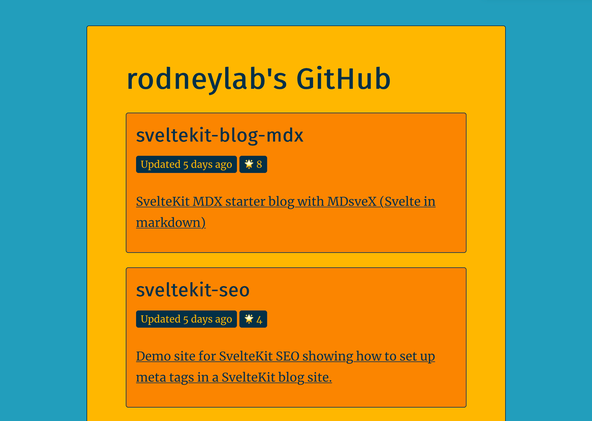
1 <script>2 import dayjs from 'dayjs';3 import relativeTime from 'dayjs/plugin/relativeTime.js';4 5 let { data } = $props();6 7 dayjs.extend(relativeTime);8 9 const { login: user, repositories: repoNodes } = data.data.viewer;10 const { nodes: repos } = repoNodes;11 const repoCount = repos.length;12 13 const fromNow = (date) => {14 const daysJSDate = dayjs(date);15 return daysJSDate.fromNow();16 };17 </script>18 19 <div class="container">20 <div class="content">21 <h1 class="heading">{`${user}'s GitHub`}</h1>22 {#each repos as repo, index}23 <article aria-posinset={index + 1} aria-setsize={repoCount} class="repo">24 <h2>25 {repo.name}26 </h2>27 <span>28 <span class="meta">Updated {fromNow(repo.pushedAt)}</span>29 {#if repo.stargazerCount > 0}<span class="meta stars">🌟 {repo.stargazerCount}</span30 >{/if}31 </span>32 {#if repo.description != null}33 <p><a href={`https://github.com/${repo.resourcePath}`}>{repo.description}</a></p>34 {/if}35 </article>36 {:else}37 <p>No repos found :/</p>38 {/each}39 </div>40 </div>
If this is the first svelte code you’re looking at, you can see it looks like a superset of HTML.
The code has two blocks. The first block, is the script tag and contains the JavaScript logic, while the second contains the page markup.
We will add a third block for styling in a moment. The page should render in your
browser (albeit not styled). Do you see a list of your public repos? As long as
you have more than one public repo in your GitHub, you should see we pull back less
data in the GraphQL query and only that data is rendered.
Rendered Code #
Line 5 of +page.svelte is where we bring in the data from the server endpoint. The rest of the block
is everyday JavaScript you would see in other frameworks.
The rendered content is in the third block. You can see a few Svelte features here:
-
line
23opens aneachblock. This is how we can do conditional rendering in Svelte . We render the code in lines22–38for each repo in the response. If there are no repos, we render the paragraph in line36. -
lines
23–31show how to loop. Looking at line22, thereposvariable refers to an array which is defined in the previousscriptblock. Therepoandindexvariables are temporary loop variables and used to get data from each element as we loop over the array (think something line{repos.map((repo, index)) => <>{renderMe}</>)}if you are used to React).
The remaining code has further examples of conditional rendering and accessing JavaScript variables.
Let’s add some Sass #
I love to use Sass for styling, though you can use vanilla-extract, Tailwind or other tools with SvelteKit. There are a couple of things we
need to do to set up Sass. First, we will configure SvelteKit to use the
preprocessor. Edit vite.config.js:
1 import { sveltekit } from '@sveltejs/kit/vite';2 import { defineConfig } from 'vite';3 4 /** @type {import('vite').UserConfig} */5 export default defineConfig({6 css: {7 preprocessorOptions: {8 scss: {9 additionalData: "@use 'variables.scss';",10 loadPaths: ['src/lib/styles'],11 },12 },13 },14 plugins: [sveltekit()],15 });
To start, create this file at src/lib/styles/variables.scss, then paste in the code from variables.scss in the GitHub repo . Now create index.scss , normalise.css and styles.scss in the same folder and follow the links to find the code you need to paste in.
We will need to import those styles, so they are available for our page. On a
larger site, you would create a layout component and import this data there to
make it available to every page on the site. Even though we have a single page
on our site, we will do the same, so you can see how it’s done. Create a
default layout file at src/routes/+layout.svelte:
1 <script>2 import '$lib/styles/normalise.css';3 import '$lib/styles/index.scss';4 import '@fontsource/merriweather/400.css';5 import '@fontsource/merriweather/700.css';6 import '@fontsource/fira-sans/400.css';7 8 let { children } = $props();9 </script>10 11 {@render children?.()}
Here, we import the fonts we want to self-host (we installed them earlier), as
well as the styles. This is a layout file, and the {@render ...} element in line 11 is a placeholder for our content.
If you are using Svelte for the first time, add a <h1> element above it and a paragraph below, so you can really see it’s a layout
template. On a larger site, we would add any headers and footers which appear on
every page to this file.
Finally, to complete style, paste these style at the bottom of src/routes/+page.svelte
41 <style lang="scss">42 .container {43 background: $color-theme-4;44 border: solid $color-theme-3 $spacing-px;45 border-radius: $spacing-1;46 margin: 0;47 width: 70%;48 margin: $spacing-12 auto;49 padding: $spacing-2 $spacing-4;50 51 p {52 font-size: $font-size-2;53 margin-top: $spacing-8;54 }55 }56 .heading {57 color: $color-theme-3;58 }59 60 .content {61 margin: $spacing-12;62 color: $color-theme-3;63 }64 65 .repo {66 border: solid $color-theme-3 $spacing-px;67 border-radius: $spacing-1;68 background-color: $color-theme-5;69 margin: $spacing-6 $spacing-0;70 padding: $spacing-4;71 color: $color-theme-3;72 73 h2 {74 margin-top: $spacing-0;75 margin-bottom: $spacing-4;76 color: $color-theme-3;77 font-size: $font-size-4;78 }79 80 .stars {81 font-weight: $font-weight-bold;82 }83 }84 85 .repo:hover {86 background-color: $color-theme-3;87 color: $color-theme-5;88 89 h2 {90 color: $color-theme-5;91 }92 93 a {94 color: $color-theme-4;95 }96 97 .meta {98 border: solid $color-theme-4 $spacing-px;99 padding: #{$spacing-1 - $spacing-px} #{$spacing-2 - $spacing-px};100 }101 }102 103 .meta {104 font-size: $font-size-1;105 background-color: $color-theme-3;106 color: $color-theme-4;107 padding: $spacing-1 $spacing-2;108 border-radius: $spacing-1;109 }110 111 @media screen and (max-width: $desktop-breakpoint) {112 .container {113 width: 95%;114 }115 .content {116 margin: $spacing-12 $spacing-2;117 }118 .repo {119 margin: $spacing-10 $spacing-0;120 }121 }122 </style>
We tell SvelteKit our styles are using SCSS in line 71, and then have access to the variable defined in the global styles we
created a moment ago.
Prerendering #
Create a src/routes/+layout.js file with the content:
1 export const prerender = true;
That line sets the whole app to be created as a static site, rather than server side rendering pages. This means we pull all the data during the build process and never update it. If we add new repos and want them to appear on our page, we just have to rebuild it. Prerendering can generally be used where the same data is presented to every site visitor. For the prerendered site, the server endpoint load function only runs during build.
🔥 How Does in Look? #
Please enable JavaScript to watch the video 📼
Normally at this stage in our tutorials, we run some tests. I think all you need to do is refresh your browser, and you should see your repos nicely styled. Let me know if something is not working, or if I haven’t explained some part well. That way, I can update the tutorial for anyone else following later.
🙌🏽 Use Apollo Client with SvelteKit: Wrap Up #
That’s it for this post. We have seen:
- how to build a SvelteKit site from scratch;
- that GraphQL offers a convenient way to access GitHub meta; and
- how to use Apollo Client with SvelteKit to query a GraphQL API.
As always, suggestions for improvements, together with requests for explanations and feedback, are more than welcome. Also, let me know what other features you would like implemented on the starter. The full code for this tutorial on how to use Apollo Client with SvelteKit is on the Rodney Lab GitHub repo . There is also a live demo site running on Render .
🏁 Use Apollo Client with SvelteKit: Summary #
Does Apollo Client work with SvelteKit? #
- Apollo Client, is in the main part built for React. That said, you can also use it with SvelteKit. To avoid importing unnecessary React code, instead of importing the Apollo Client exports you need from the main package export, import them from the CommonJS files they are defined in. As an example, import { ApolloClient } from '@apollo/client/core'. On top, at the time of writing Apollo client does not export Common JS files needed for a SvelteKit build, but there is a workaround.
Is there a hack to get Apollo Client to work with SvelteKit? #
- At the time of writing, the latest version of Apollo Client is 3.5.6. This version does not export some CommonJS files needed to develop and build SvelteKit sites. With a small hack, though, you can work around this. You just need to edit the package.json file for Apollo Client in your project to add the missing exports. We see how you can do this with a few lines of shell script. You can incorporate that script into your site build process.
What alternatives are there to Apollo Client for GraphQL in SvelteKit? #
- Although you can currently make Apollo Client work in SvelteKit with a hack, you might decide to use a more robust alternative. The fetch API is very stable, so might be your first choice as an alternative. There is no in-built caching, though you can always use Svelte stores. Another alternative is urql.
🙏🏽 Use Apollo Client with SvelteKit: Feedback #
Have you found the post useful? Would you like to see posts on another topic instead? Get in touch with ideas for new posts. Also, if you like my writing style, get in touch if I can write some posts for your company site on a consultancy basis. Read on to find ways to get in touch, further below. If you want to support posts similar to this one and can spare a couple of dollars, rupees, euros or pounds, please consider supporting me through Buy me a Coffee.
Finally, feel free to share the post on your social media accounts for all your followers who will find it useful. As well as leaving a comment below, you can get in touch via @askRodney on Twitter and also askRodney on Telegram . Also, see further ways to get in touch with Rodney Lab. I post regularly on SvelteKit as well as other topics. Also, subscribe to the newsletter to keep up-to-date with our latest projects.