


🧑🏽🎓 Why is SvelteKit SEO Important? #
Why write a post on SvelteKit SEO? We'll start by answering that question, before looking at some different types of SEO, and then see how you can add Twitter SEO metadata as well as other metadata to your blog posts and other website pages. The aim will be to have our SvelteKit page shares on Twitter appear something like this:

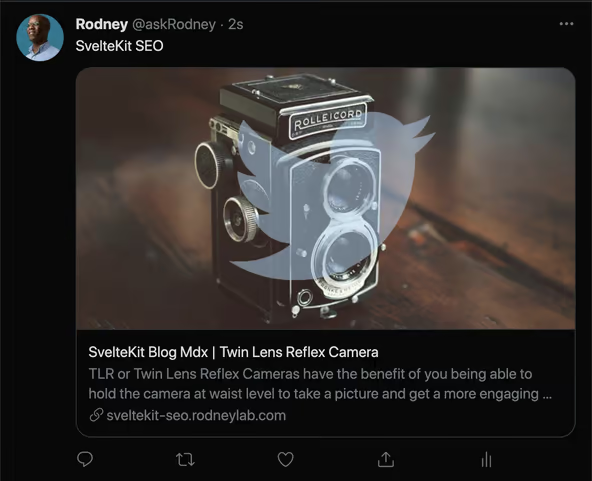
We specify to Twitter which image we want to use, as well as the title and description which appear below it.
Search Engine Optimization (SEO) is all about getting your website pages to appear at the top of search engine results pages. Would you still write content if no-one would ever read it? Probably not. If your page does not appear in the top few search results, there is a risk that very few people will visit your page. This is because up to 90% of search engine users will not go beyond the first page of search results . Around a third of users will click the first result and 17%, the second. In short, Google needs to rank your post well for users to click on it.
We will look at some optimizations you can easily work into your SvelteKit site, you get your posts and pages ranking higher. As well as that, we look at how you can ensure your posts look good whenever visitors share them on social media and messaging apps.
🤖 Which Aspects of SvelteKit SEO are we focussing on? #
Although it is a new discipline, SEO it already has many niches. All branches, however, boil down to providing a good user experience. Google want to connect their users to what they are looking for. A bad user experience translates into users leaving your page without interacting with it (bouncing). If you have a high bounce rate, why would Google want to put your site at the top of a search result list?
Some factors important for good user experience and SEO are:
- good content: writing about what people are interested in (good keyword research can help here ),
- good site structure: essentially this is about sufficient and relevant internal links, be they in breadcrumbs, navigation menus or post tags and categories. You need to optimize your site’s structure, so users can get to what they want in few clicks. On top, more contextual links (links in the main text of a blog post, for example), help search engines determine what the post is all about. Knowing what a post is about gives the search engine more confidence in placing it higher in the results. Linking to (internal and external) related posts is important here.
- technical SEO: fast loading pages (SvelteKit makes fast sites, so you already have a head start here), security, accessibility are critical for user experience and so improve search ranking. Technical SEO also encompasses getting rich results — we'll look at these in a bit more detail.
It is worth stressing that all of these aspects matter for ranking well. You should take a holistic approach for successful SEO. We will focus on the more technical aspects though in this post, as this is what is more specific to SvelteKit. In particular, we’ll look at what metadata you should include on your website's pages.
Rich Results #
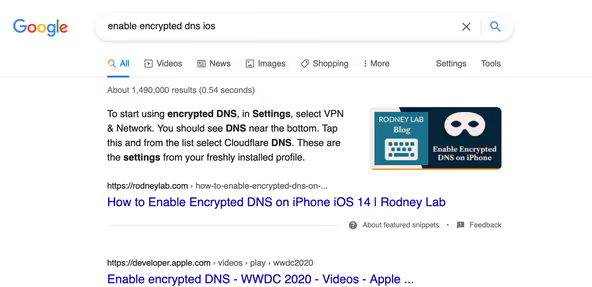
On Google, rich results will make your page stand out from others on a search results page. This might be through a HowTo or a Rich Snippet (including a thumbnail for a video as well as the usual result data). Here SchemaOrg takes a lead role. Google and other search engines developed SchemaOrg. By including JSON objects matching the official schema, the search engine has a better idea of what is on the page and can be more confident in producing a rich snippet. Below is an example of a featured snippet , it appears above all other search results and Google give it prominence, with larger text:

We will return to SchemaOrg in more detail. To start, though, let’s have a look at more general SEO metadata and then Twitter metadata. If you are starting a new site clone the SvelteKit MDsveX starter and follow along. Alternatively, you can follow along and paste the code snippets into your own project.
🧱 General Metadata #
As a minimum, you should aim to include these four pieces of SEO metadata on your sites pages. Lighthouse will give you a warning if some of them are missing.
- Title: If your post has a short on-page title, augment the SEO title to include extra search terms. Although there is no character limit, Google sets a maximum display width of 600 px .
- Meta Description: This is a longer description of the post. Google might not show it in search results (they might instead decide to show an extract from the page). When they do show it, they typically cut it to around 155 characters, though Google do not officially confirm this . Try to keep it within that limit.
- Robots Tag: The robots tag tells search engines you are
happy for them to index your page. They need to index the page to include it
in their search results. A
followdirective tells search engines they can follow links on the page to discover new content. Themax-snippetdirective specifies the limit on the meta description length (in number of characters), a value of-1indicates no limit. - Site Language: This is important for site visitors using screen readers. It helps with pronunciation, especially when there are dialects or regional variations (Brazilian Portuguese vs. European Portuguese, for example).
- why SEO is important and an introduction to the broader topic;
- general SEO metadata; and
- Twitter metadata.
Is SvelteKit good for SEO? #
- Most important for Search Engine Optimization and getting your pages to rank is writing quality content which your site visitors want to read. That said, providing a good user experience typically creates good SEO. SvelteKit excels at creating fantastic user experiences. SvelteKit can generate static site pages (you can choose which pages you want to be statically generated). Static pages get cached by CDNs and will load faster globally. On top SvelteKit compiles to JavaScript, with no libraries needed in the browser for an out-of-the box Svelte site. This also translates to faster loading sites.
How do you add SvelteKit meta to your SvelteKit site? #
- Typically, you need to add meta tags to your site page head section for SEO. These are used by search engines and also by social sites when users share one of your web pages. Some meta is the same for all pages on the site. For example, you might set a robots policy using a meta tag. In this case, you can include the meta tag in the <head> element if `src/app.html` template used by all of your sites pages. Other meta, like the meta description and title varies pages by page. You can add these meta tags directly to the Svelte files for individual pages. At the top of your page template (just below the <script> tag), add a <svelte:head> tag and include the page-specific meta tags there. We have seen as an alternative (for reusability) you can create an SEO component and instead include the <svelte:head> tag there. In this case, just add the SEO component at the top of your page markup.
How does SvelteKit help you out with technical SEO? #
- Svelte makes it easy to add meta tags right into your markup. There is no need to add extra dependencies to get this working, it just works out of the box. This works for basic meta tags as well as the more advanced Schema.org JSON+LD script tags. On top creating a good site structure and tags pages is made easier with SvelteKit’s filed-based routing and templating features.
SvelteKit SEO Component #
The SvelteKit blog starter includes those four pieces of metadata, just mentioned, in the SEO component. You can either use the SvelteKit MDsveX blog starter or just copy the component from below and adapt it to your own project. Here is the code for the component:
1 <script>2 import { VERTICAL_LINE_ENTITY } from '$lib/constants/entities';3 import website from '$lib/config/website';4 5 const { siteLanguage, siteTitle } = website;6 7 let { metadescription, title, } = $props();8 9 const pageTitle = $derived(`${siteTitle} ${VERTICAL_LINE_ENTITY} ${title}`);10 </script>11 12 <svelte:head>13 <title>{pageTitle}</title>14 <meta name="description" content={metadescription} />15 <meta16 name="robots"17 content="index, follow, max-snippet:-1, max-image-preview:large, max-video-preview:-1"18 />19 <html lang={siteLanguage} />20 </svelte>
There are two more robots directives included here (not mentioned
previously): max-image-preview and max-video-preview. We set image preview to large and put no limit on video preview, which
is the number of seconds of video to play as a preview in search results.
You will see we need to pass in a metadescription and title as props when we use the component.
Here is an example (from the BlogPost component):
24 <script>25 const {26 postTitle: title,27 seoMetaDescription: metadescription,28 slug,29 } = post;30 </script>31 32 <SEO article={true} {slug} {title} {metadescription} {timeToRead} />33 <BannerImage {...bannerImageProps} />
In this case, when we create a new post and add postTitle and seoMetaDescription to the front matter,
these will automatically feed through to the html head section and be included
in the post's metadata. We can check SvelteKit has included the metadata by cracking
open the post in a browser and opening Developer Tools Inspector if you use Firefox or Elements in Chrome:

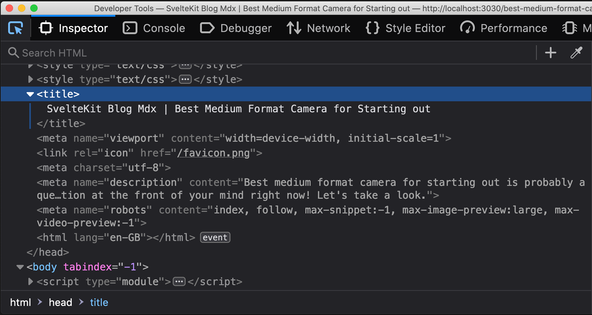
In this screenshot we can see SvelteKit included the title and meta description as well as robots and language. General metadata is important, but it will only get you so far. Next, we have a look at Twitter metadata.
🧑🏽🎓 Twitter Metadata #
You might not know that Slack uses some Twitter meta tags when users share your pages on the app. It's not just Twitter that uses it. If you didn't know that, keep reading to learn even more about Twitter metadata!
We mentioned before that we want to tell social networks which image to use for each page. Not only will you avoid random, unrelated images from your page being picked, but also by providing an image with the right dimensions, you can avoid a poor crop, which can reflect badly on your brand.
I should point out because we include metadata in the pages, it won't matter whether the post is shared from someone clicking a link on your site or just by pasting the link into one of their tweets. Either way, Twitter will use your chosen image and description.
Twitter Cards #
When someone shares your page, Twitter generates a Card to show it. There are different types, but the Summary Card with Large Image serves many purposes, so we will use that. To discover the other types of Twitter sharing card, see the Twitter Developer Docs .
For our chosen type of card, we should provide an image which is 800 px × 418 px. The specification changes with time, so if you are reading this some point well into my future, check the latest specs!
Anyway, here is a component which we can use to add the Twitter metadata to our page:
1 <script>2 let { article = false, author, twitterUsername, image, timeToRead = 0 } = $props();3 </script>4 5 <svelte:head>6 <meta name="twitter:card" content="summary_large_image" />7 <meta name="twitter:description" content={metadescription} />8 <meta name="twitter:url" content={url} />9 {#if image}10 <meta name="twitter:image" content={image.url} />11 <meta name="twitter:image:alt" content={image.alt} />12 {/if}13 {#if twitterUsername}14 <meta name="twitter:creator" content={`@${twitterUsername}`} />15 <meta name="twitter:site" content={`A;@${twitterUsername}`} />16 {/if}17 <meta name="twitter:label1" content="Written by" />18 <meta name="twitter:data1" content={author} />19 {#if article && timeToRead > 0}20 <meta name="twitter:label2" content="Est. reading time" />21 <meta name="twitter:data2" content={timeToRead !== 1 ? `${timeToRead} minutes` : '1 minute'} />22 {/if}23 </svelte:head>
Twitter metadata is based on the OpenGraph standard, though they don't follow the standard to the letter. While in OpenGraph we would use:
<meta property="og:title" content={pageTitle} />
for Twitter, we use:
<meta name="twitter:title" content={pageTitle} />
Twitter meta falls back to OpenGraph meta, where the equivalent OpenGraph
tag is present. So this means if we want to use the same title for sharing
on Twitter as other apps, we can drop the twitter:title meta and just include the OpenGraph equivalent (og:title), which Twitter will pick up.
It's the last two tags (lines 25 – 30) which generate
metadata that appears when your post is shared on Slack:

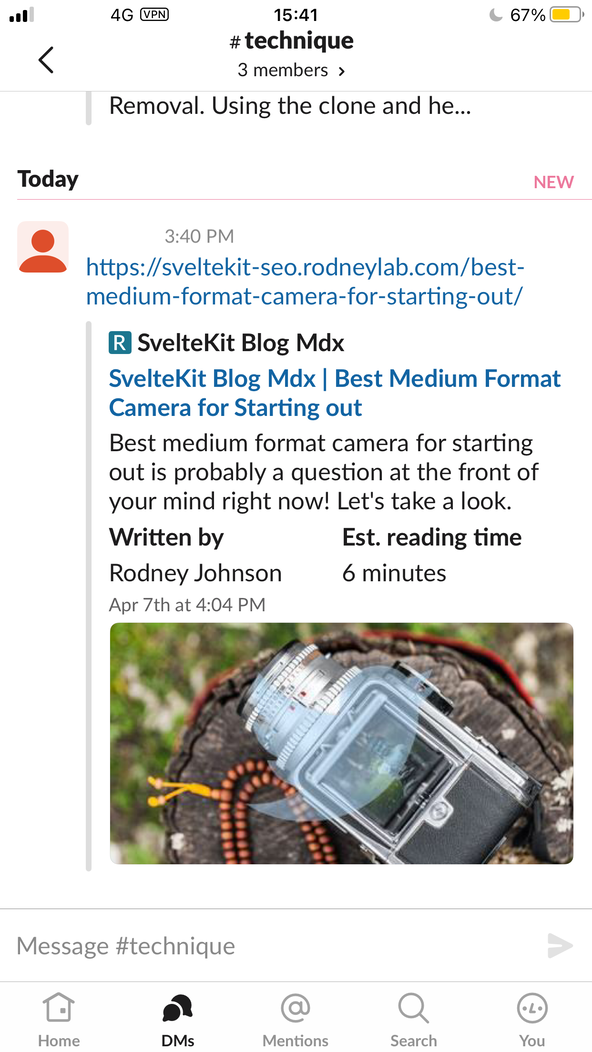
So now you know how automatically to include a reading time whenever your post is shared on Slack. The other tags as used mostly for Twitter.
🗳 Poll #
We need to update the SEO component to include Twitter metadata now:
1 <script>2 import { VERTICAL_LINE_ENTITY } from '$lib/constants/entities';3 import website from '$lib/config/website';4 import Twitter from './Twitter.svelte';5 6 const { author, siteLanguage, siteTitle, siteUrl } = website;7 8 let {9 article = false,10 metadescription,11 slug,12 timeToRead = 0,13 title,14 twitterImage = {15 url:16 'https://rodneylab-climate-starter.imgix.net/home-twitter.jpg?ixlib=js-3.2.0&w=800&h=418&s=1b08b7276d34486234a4e2c1ccb49a74',17 alt:18 'picture of a person with long, curly hair, wearing a red had taking a picture with an analogue camera',19 },20 } = $props();21 22 const pageTitle = $derived(`${siteTitle} ${VERTICAL_LINE_ENTITY} ${title}`);23 const twitterProps = {24 article,25 author,26 twitterUsername: import.meta.env.VITE_TWITTER_USERNAME,27 image: twitterImage,28 metadescription,29 pageTitle,30 timeToRead,31 url: $derived(`${siteUrl}/${slug}`),32 };33 </script>34 35 <svelte:head>36 <title>{pageTitle}</title>37 <meta name="description" content={metadescription} />38 <meta39 name="robots"40 content="index, follow, max-snippet:-1, max-image-preview:large, max-video-preview:-1"41 />42 <html lang={siteLanguage} />43 </svelte:head>44 <Twitter {...twitterProps} />
We specify a fallback image, with alt text in lines 14 – 19. This is used if
we don't specify the twitterImage prop when the
component is consumed. The next piece in the chain is making sure metadata needed
for Twitter SEO is passed through from the blog posts:
1 <script>2 import BannerImage from '$lib/components/BannerImage.svelte';3 import SEO from '$lib/components/SEO/index.svelte';4 5 let { imageData, post, sanitisedHtml } = $props();6 7 const {8 datePublished,9 featuredImageAlt,10 lastUpdated,11 postTitle: title,12 seoMetaDescription: metadescription,13 slug,14 timeToRead,15 } = post;16 17 const twitterImageObject = twitterImage18 ? {19 url: twitterImage,20 alt: featuredImageAlt,21 }22 : null;23 const bannerImageProps = {24 featuredImage,25 featuredImageAlt,26 featuredImageSrc,27 featuredImageSrcset,28 };29 </script>30 31 <SEO32 article={true}33 {slug}34 {title}35 {metadescription}36 {timeToRead}37 twitterImage={twitterImageObject}38 />39 <BannerImage {...bannerImageProps} />
twitterImage in line 17 will be an URL for the image we want to be shared on Twitter (remember, this
should be the dimensions we mentioned above). This value feeds from the individual
post front matter. We give it a default value here, for the case it is undefined.
We assume the Twitter shared image has similar appearance to the main featured
image of the post, so we can recycle the alt text. Remember that alt text should
describe the image for the benefit of visually impaired users.
Finally, we need to install the reading-time package:
pnpm i -D reading-time
💯 Checking Twitter Metadata #
You can test Twitter metadata using the Twitter Card Validator :
Please enable JavaScript to watch the video 📼
The Twitter logo watermark is something I added to the image file itself,
just so you could see Twitter is picking up the specified image (which
doesn't even appear on the shared page). The Twitter meta is used by the
Telegram messaging app too. To request the Telegram server to cache the
image for your page, just start a new conversation in Telegram with @webpagebot and paste, then send, up to 10 URLs at a time as a message:


🙌🏽 OpenGraph and SchemaOrg Metadata #
Is this post, we have looked at:
You might have guessed this is not the end of the story. As mentioned earlier, SEO is a detailed topic and there is too much detail to be able to summarize in a single post. In an upcoming post, we will look at SchemaOrg metadata. This can be used to help your page appear, for example, in HowTo in Google search results.
In this follow-up post, we look at Open Graph SEO in SvelteKit. Although this is used by Facebook, it is also used in other apps, especially messaging apps (like Telegram and Signal). We will also see how the order in which the meta tags are arranged affects whether WhatsApp shows your Card whenever a link to your site is shared.
You can see the code for the story so far on the Rodney Lab GitHub repo .
🏁 SvelteKit SEO: Summary #
🙏🏽 SvelteKit SEO: Feedback #
Please send me feedback! Have you found the post useful? Would you like to see posts on another topic instead? Get in touch with ideas for new posts. Also, if you like my writing style, get in touch if I can write some posts for your company site on a consultancy basis. Read on to find ways to get in touch, further below. If you want to support posts similar to this one and can spare a couple of dollars, rupees, euros or pounds, please consider supporting me through Buy me a Coffee.


❤️ Svelte makes SEO so much easier. Dropping meta tags into pages with no extra dependencies is a game changer.
— Rodney (@askRodney) June 14, 2022
I loved putting together a FREE, three-part tutorial on SvelteKit SEO, taking in:
- basic SEO meta tags
- social sharing images
- SchemaOrg
#learnSvelte
Finally, feel free to share the post on your social media accounts for all your followers who will find it useful. As well as leaving a comment below, you can get in touch via @askRodney on Twitter and also askRodney on Telegram . Also, see further ways to get in touch with Rodney Lab. I post regularly on SvelteKit as well as Gatsby JS among other topics. Also, subscribe to the newsletter to keep up-to-date with our latest projects.