


SvelteKit Forms #
SvelteKit forms and endpoints work a little differently to other frameworks, like Astro or Remix, so it is worth taking a detailed look at how to pass form data from the client browser to your app’s running server instance. To help here, we look at code for a spelling, punctuation and grammar checking tool using LanguageTool. LanguageTool is a service with similar features to Grammarly and offers a free, but limited, API to check text snippets.
Initially, we will look at how you can get data from your server to the client with SvelteKit. Then, we look at how to run an initial grammar check from the client (before the page renders). LanguageTool’s free API limits requests on an IP address basis. This makes running checks from the browser, rather than the server, a good idea. That is because, even with a few users running checks simultaneously, limits could quickly be breached, letting no users complete checks. Running checks from the browser, allows each user’s check requests to be sent from that user’s own IP address and not the server’s.
Form Handling in Client and on the Server #
To end, we will look at client-side and server forms. We use a client-side form to re-run the grammar check on updated (corrected) text. Then, the server-side form is used to submit the final version back to the server for saving to a database.
We will focus on the SvelteKit site, without drilling down into how the LanguageTool API interactions work. The full code is in the Rodney Lab GitHub repo, though, and you will find a link for this further down. For now, let’s get started on the app!
Please enable JavaScript to watch the video 📼
🌱 What are +page.svelte, +page.ts and +page.server.ts? #
+page.svelte, +page.ts and +page.server.ts? #As you start out in SvelteKit, you might be a little overwhelmed by the different files that you can use for each route. SvelteKit works a little differently to Astro, Deno Fresh or Remix where typically, you can combine the server and client code into a single file. So let’s start by seeing what each file does and when you might need them.
Each SvelteKit route can have three files: +page.svelte, +page.ts and +page.server.ts or their JavaScript equivalents.
+page.svelte #
+page.svelte # +page.svelte is home to the markup we want rendered
for the page. As well as markup, it can contain JavaScript logic to run on the client. This is usually wrapped in a <script> tag at the top of the file. You will omit this file for a resource (or non-HTML
route), like an XML sitemap, for example.
+page.ts #
+page.ts # +page.ts is also code which runs on the client.
There is a difference between code here and code in the <script> tag in the .svelte counterpart. We use this file
to prepare any data we want available before the initial render. In our grammar check example, we query the LanguageTool API before
rendering, and that initial API request is run in the +page.ts file.
+page.server.ts #
+page.server.ts # +page.server.ts, like +page.ts, can be used for API fetch requests. You might use this file instead of +page.ts when you do not want to expose a secret API key to the client.
Other use cases are to pull data from a database running on the server or to handle user sessions for logged-in users. The final
common use case is listening for form submissions. We use that here.
Do you need all three of these? #
No. You will not always need all three, though in our example we see the three
working in tandem on the same route. We mentioned the +page.svelte file would be omitted for a non-HTML route. Similarly, if you have neither server
forms nor secret API keys, you might decide to omit the +page.server.ts file. That pattern can work well for a static site, or even, prerendered (static)
pages on an otherwise, SSR
With the basics covered, let’s start looking at the app itself in more detail.
🍶 Server Code #
Our app only has a single route, and all three files sit right under the routes folder. For a more realistic app, you would create a folder for each route (e.g. src/routes/contact/, src/routes/about/ and so on and so forth). In
each folder, you then place any of the three files needed for that route.
We keep things simple, and instead of pulling the text to check from a database (like we probably would in a real-world app), we have a static text string defined in the server route.
1 import type { Actions, PageServerLoad } from './$types';2 3 export const load: PageServerLoad = function load() {4 // add logic here to pull text from database, using a static string here5 const text = 'Is ChatGPT really neccessary? Lets take a loook.';6 return { text };7 };
Avoid over-fetching here and only return data which the client
requires. In the real-world, you might check for a logged-in user then return text
relevant to them (a draft post, for example). Here, we return an object with a single
text field. Next, we see this is available in the +page.ts file, though if we omitted that file, we could still access text from our +page.svelte file.
💾 Client Page Load Code #

Remember, the code in +page.ts loads before the
page first renders. We can run an initial grammar check here on the data which (would
have been stored in the app database). Here is the code for the page load file (src/routes/+page.ts):
1 import { chunkText, grammarCheckChunk, mergeChunkResults } from '$lib/utilities/grammar';2 import type { PageLoad } from './$types';3 4 export const load: PageLoad = async function load({ data }) {5 // check grammar6 try {7 const { text } = data;8 const chunks = chunkText(text);9 10 const chunkResults = await Promise.all(11 chunks.map(async ({ text, offsetAdjust }) => {12 const { matches } = await grammarCheckChunk({ text, offsetAdjust });13 return { matches };14 })15 );16 17 const results = mergeChunkResults(chunkResults);18 19 return {20 results,21 text22 };23 } catch (error: unknown) {24 console.error(`Error in page load: ${error as string}`);25 throw error;26 }27 };
Notice, the data argument of the load function in line 4. This gives us access to
the text field returned from the server. Those results
will be ready, ahead of the initial page render. In lines 19 – 22, you can see we
return the grammar check results, as well as the original text. These will now
be available in the +page.svelte file.
🖥️ SvelteKit Forms: Client Svelte Markup #
The final step is the Svelte markup (src/routes/+page.svelte):
1 <script lang="ts">2 import SaveIcon from '$lib/components/SaveIcon.svelte';3 import UpdateIcon from '$lib/components/UpdateIcon.svelte';4 import { chunkText, grammarCheckChunk, mergeChunkResults } from '$lib/utilities/grammar';5 import type { ActionData, PageData } from './$types';6 7 let { data }: { data: PageData } = $props();8 9 let {10 text,11 results: { matches }12 } = $state(data);13 14 let matchCount = $derived(matches.length);15 </script>
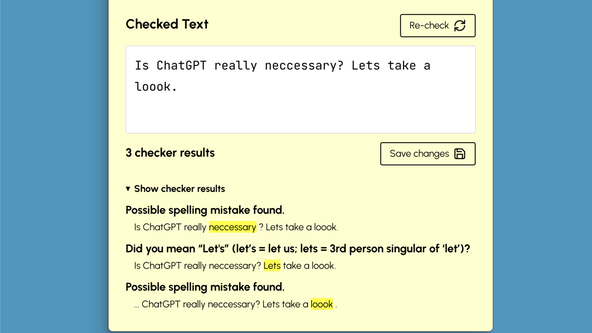
😁 Correcting and Rechecking Text #

All is well and good so far! You might have noticed the text included one or two mistakes. We display the original text in a textarea, this is so the user can take on board the LanguageTool suggestions and update it. Once updated, they will probably want to recheck the text. If you’re thinking let’s submit the updated text to the server as a form, hold fire, we will see how to do that later. For now, we will run the check client side. This saves us a server trip.
SvelteKit Forms: Client‑side From Submission #
Because we want to run a fetch request from the client, but after initial page
load, we call the LanguageTool API from the <script> block in src/routes/+page.svelte:
1 <script lang="ts">2 // ...TRUNCATED3 4 async function handleRecheck() {5 try {6 const chunks = chunkText(text);7 const chunkResults = await Promise.all(8 chunks.map(async ({ text, offsetAdjust }) => {9 const { matches } = await grammarCheckChunk({ text, offsetAdjust });10 return { matches };11 })12 );13 14 const { matches: updatedMatches } = mergeChunkResults(chunkResults);15 matches = [...updatedMatches];16 } catch (error: unknown) {17 console.error(`Error in page load: ${error as string}`);18 throw error;19 }20 }21 22 let matchCount = $derived(matches.length);23 </script>24 25 <main>26 <h1>SvelteKit Spelling, Punctuation & Grammar Checker with LanguageTool</h1>27 <form onsubmit={handleRecheck}>28 <div class="check-form-header">29 <h2>Checked Text</h2>30 <button type="submit">Re-check<UpdateIcon /></button>31 </div>32 <textarea33 bind:value={text}34 name="text"35 placeholder="Enter text"36 rows={3}37 ></textarea>38 </form>39 <!-- TRUNCATED...-->
Note a few features here:
-
We call our
handleRecheckfunction from the formon:submit. -
We bind the form textarea value to the
textvariable in line33letting us access the updated text in the API call. - Our server is not involved anywhere here, we are not using the platform, but this makes sense here.
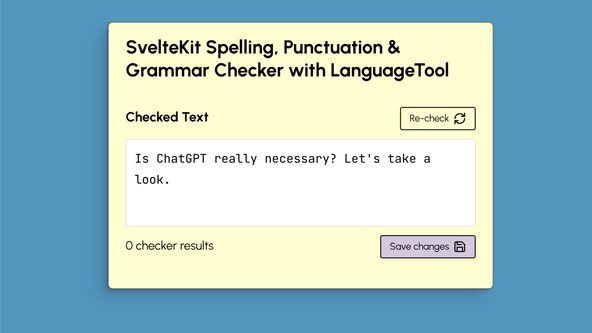
✅ Server Form Handling: Saving Corrections #
Once the user is happy with the text, for sure they will want to save it. This
is where we can use the platform! Here is the same src/routes/+page.svelte file updated:
1 <script lang="ts">2 import SaveIcon from '$lib/components/SaveIcon.svelte';3 import UpdateIcon from '$lib/components/UpdateIcon.svelte';4 import '$lib/styles/fonts.css';5 import '$lib/styles/global.css';6 import { chunkText, grammarCheckChunk, mergeChunkResults } from '$lib/utilities/grammar';7 import type { ActionData, PageData } from './$types';8 9 let { data, form }: { data: PageData; form: ActionData } = $props();10 11 let {12 text,13 results: { matches }14 } = $state(data);15 let { missing, saved = false, text: submittedText } = form ?? {};16 if (typeof submittedText !== 'undefined') {17 text = submittedText;18 }19 20 // TRUNCATED...21 22 let matchCount = $derived(matches.length);23 </script>24 25 <main>26 <h1>SvelteKit Spelling, Punctuation & Grammar Checker with LanguageTool</h1>27 <form onsubmit={handleRecheck}>28 <div class="check-form-header">29 <h2>Checked Text</h2>30 <button type="submit">Re-check<UpdateIcon /></button>31 </div>32 <textarea33 bind:value={text}34 onblur={() => {35 saved = false;36 }}37 name="text"38 placeholder="Enter text"39 rows={3}40 aria-invalid={missing === 'text'}41 aria-describedby={missing !== 'text' ? undefined : 'text-error'}42 ></textarea>43 {#if missing === 'text'}44 <small id={`text-error`} class="error-text">Enter some text before hitting save</small>45 {/if}46 </form>47 <form class="save-form" action="?/save" method="post">48 <span class="status" class:matches={matchCount > 0}> {matches.length} checker results</span>49 <input type="hidden" name="text" value={text} />50 <button type="submit">Save changes<SaveIcon /></button>51 </form>52 {#if saved}53 <div class="saved">Saved</div>54 {:else if missing}55 {JSON.stringify(missing, null, 2)}56 {/if}57 </main>
Notice the differences in the form element:
-
action="?/save"andmethod="post"attributes on the form element -
hidden
textinput to pass the updated text value back to the server (alternative is to include text as a query parameter in theactionvalue on the form element) -
in line
9, we pull in the data expected in response to the form submission, and use it to provide user feedback
Of course, this will not work in isolation. Let’s jump back to where we
started; the server code for the route. There we add the form action code,
returning the form data we see above.
🎬 SvelteKit Form Actions: Server Code Take II #
1 import { fail } from '@sveltejs/kit';2 import type { Actions, PageServerLoad } from './$types';3 4 export const actions: Actions = {5 save: async ({ request }) => {6 try {7 const form = await request.formData();8 const text = form.get('text');9 if (typeof text === 'string') {10 // add logic to save updated text to database11 console.log('Supposed to save here but did nothing 😉');12 return { saved: true };13 }14 return fail(400, { missing: 'text', text: '' });15 } catch (error: unknown) {16 return fail(400, { missing: 'text', text: '' });17 }18 }19 };20 21 // TRUNCATED...
Much of the form handling code here is using the platform, and you will be familiar with it from JavaScript courses or using Astro, Deno Fresh or Remix.
Note the save name for our handler (line 5) matches the name we used for it in the form DOM element. This mechanism
lets us add several form handlers to the same route. The fail function lets us provide feedback when something is wrong with inputs. Finally,
returning the custom saved field in the response
object is another way to provide user feedback, this time letting them know it all
went well.
🗳 Poll #
💯 SvelteKit Forms: Testing #
We have run through the main constituent parts for passing data between server and client in SvelteKit. If you are new to this, you will probably want to clone the full code repo and play around with it. You do not need an API key to run the LanguageTool checks. Consider adding progressive enhancements to the server-side form.
🙌🏽 SvelteKit Forms: Wrapping Up #
In this post, we saw SvelteKit form handling and passing data between server and client. In particular, we saw:
-
why you might use a
+page.server.tsfile -
how you can combine
+page.server.tspage server load with+page.tspage load - how to handle forms in SvelteKit both server-side and in the client browser
Please see the full repo code on the Rodney Lab GitHub repo . I do hope you have found this post useful and can use the code as a starting point for a tool to help cement your understanding. I also hope there is something you can take to an app you are currently working on, or one you plan to build in a future project. Let me know what you decide on! Also, please let me know about any possible improvements to the content above.
🏁 SvelteKit Forms: Summary #
What is the difference between SvelteKit +page.ts and +page.server.ts files? #
- SvelteKit uses up to three files for each route, and you can combine all three! +page.svelte is home to client markup. However, there might be some code you want to run on the client, but before the page first renders. Fetching data from an external source is a classic example here. Add that code to `+page.ts`. You might also have code you only want to run on the server, for example to protect an API key or even to listen for form submissions. Place that code in the route’s +page.server.ts file.
Can you use both a +page.ts and +page.server.ts file for the same SvelteKit route? #
- Yes. If you have both `+page.server.ts` and `+page.ts`, you might need to access server returned data in `+page.ts`. This is also possible: destructure the `data` prop from the `+page.ts` load function parameter. Your server returned data will be available there.
How can you submit a SvelteKit form using the platform? #
- Here, a SvelteKit Action is your friend. In the route `+page.server.ts` file, export an action object. This will have a member for each form you want to listen for, on the route. As an example, if you include an `action="?/save"` attribute on the form element, then the handler key (in actions) will be `save`. The action value will be a handler function which can return values for client feedback. You can access those returned values from the `form` prop in the route’s `+page.svelte` file.
🙏🏽 SvelteKit Forms: Feedback #
If you have found this post useful, see links below for further related content on this site. I do hope you learned one new thing from the video. Let me know if there are any ways I can improve on it. I hope you will use the code or starter in your own projects. Be sure to share your work on Twitter, giving me a mention, so I can see what you did. Finally, be sure to let me know ideas for other short videos you would like to see. Read on to find ways to get in touch, further below. If you have found this post useful, even though you can only afford even a tiny contribution, please consider supporting me through Buy me a Coffee.


Just dropped a new post looking at ❤️ SvelteKit forms and passing data between client and server.
— Rodney (@askRodney) May 1, 2023
Using the ✅ LanguageTool API as an example, we see when you might use each of the 3 page load files.
Hope you find it useful!
#askRodneyhttps://t.co/9adkMspF5T
Finally, feel free to share the post on your social media accounts for all your followers who will find it useful. As well as leaving a comment below, you can get in touch via @askRodney on Twitter and also askRodney on Telegram . Also, see further ways to get in touch with Rodney Lab. I post regularly on SvelteKit as well as Search Engine Optimization among other topics. Also, subscribe to the newsletter to keep up-to-date with our latest projects.