


This Gatsby post was written for Gatsby 3 and is no longer maintained. If you would like to try out SvelteKit or Astro, check out the maintained posts which are based on those. Astro lets you continue to use React but also with partial hydration which can be used to provide an enhanced user experience. SvelteKit offers server side rendering as well as static site generation. See the post on how performance improved switching from Gatsby to Astro for more background.
🔥 Highlight Search Results #
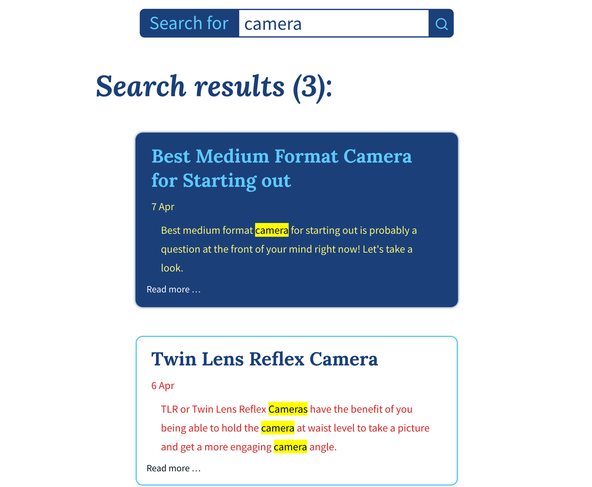
We look at how to highlight search results using Web APIs. Although the example uses Gatsby, the React code can be used on Next.js and other popular React based frameworks. This post follows on from the recent post where we used fast JS Search to generate site search results. When we talk about site search, we mean the user searching for content on your own site, from your own site. In this post, we improve on the user experience, by highlighting search terms in the summaries displayed for results. On top, when the user clicks one of the results, we highlight the search term (as well as related terms) on the actual result. One more thing… We scroll the first search match into view for the ultimate user experience.

We will do most of that using semantic HTML and standard browser APIs as much
as possible. So to highlight code we will use the HTML <mark> text element and for scrolling, Element.scrollIntoView(), from the browser Web API .
First, we will improve the search results we generated last time by adding highlights. After that, we add search to the result itself. Finally, we will scroll the first match into view automatically when the user opens a search result.
✨ Add Highlights to Search Results #
If you want to follow along, it might be easier to start with the earlier post. Just fire up your dev server by following instructions in that post. No problem, though, if you are just looking to see what you can lift for your Next.js project.
First, we will create a utility function for finding occurrences of a search
term and stem equivalents in a block of text. By stem equivalents, we mean if
the user searches for “films” as well as highlight that word, we
also highlight the words “film”, “filmed”,
“filming” and so on. For this we will use the same stemmer, we
used in the earlier post. Create a file at src/utilities/search.js and add the following content:
import { stemmer } from 'stemmer';const getWordArrayFromText = (text) => text.split(new RegExp(/[s!._,'@?]+/));// eslint-disable-next-line import/prefer-default-exportexport const getSimilarWords = (searchTerm, text) => { let unsortedSimilarWords = []; const words = getWordArrayFromText(text); const lowerCaseWords = words.map((element) => element.toLowerCase()); getWordArrayFromText(searchTerm).forEach((element) => { const lowerCaseElement = element.toLowerCase(); const searchTermStem = stemmer(lowerCaseElement); const additionalWords = lowerCaseWords.filter((word) => stemmer(word) === searchTermStem); if (additionalWords.length > 0) { unsortedSimilarWords = unsortedSimilarWords.concat(additionalWords); } else { unsortedSimilarWords.push(element); } }); // remove duplicates unsortedSimilarWords = [...new Set(unsortedSimilarWords)]; // sort similar words by length so that, for example, we find and highlight aardvarks before // aardvark. If we did not do this, for the example, it is possible than only the letters up // to the final 's' in aardvarks would be highlighted. return unsortedSimilarWords.sort((a, b) => b.length - a.length);};
Here we convert the block of text into an array of words, using a regular expression, via a utility function in line 3. This makes the subsequent search easier. We convert all words to lower case, so we can compare apples with apples, so to speak.
Search Component #
Search Component #
You will probably remember, last time we rendered search results in the BlogPostSummary component. We want to highlight search results in that component. For that to
work, we need to pass the search term from the Search component to the BlogPostSumary component. Update
the Search component:
177 return (178 179 <article aria-posinset={index + 1} aria-setsize="-1" key={id}>180 <BlogPostSummary181 frontmatter={frontmatter}182 searchTerm={searchQuery.toLowerCase()}183 slug={value.slug.slice(1)} />184 </article>185 );
It is important that we convert the search term to lower case, as we won’t check it is lower case in the following code.
BlogPostSummary Component #
BlogPostSummary Component #
Next, we update the BlogPostSummary component to
take the new searchTerm prop we are passing in:
1 import dayjs from 'dayjs';2 import { graphql, Link, navigate } from 'gatsby';3 import PropTypes from 'prop-types';4 import React, { useEffect, useRef, useState } from 'react';5 import { v4 as uuidv4 } from 'uuid';6 import { H_ELLIPSIS_ENTITY } from '../constants/entities';7 import { getSimilarWords } from '../utilities/search';8 import { container, content } from './BlogPostSummary.module.scss';9 10 const BlogPostSummary = ({11 frontmatter: { datePublished, postTitle, seoMetaDescription },12 searchTerm,13 slug,14 }) => {15 // TRUNCATED...16 }
We have also imported our new utility function and added some extra imports which we will use later.
Just like we had to pass the search term from the Search component to the BlogPostSummary component, we
need to pass it on to the actual post we will render if the user clicks the summary.
This time we will use a different mechanism, though. We will pass the search term
as a search parameter in the page URL. This makes more sense here, as the post is
not a child component of the BlogPostSummary component
(BlogPostSummary is rendered by the Search component).
Anyway, we need to change the link we navigate to. Let's edit the BlogPostSummary component once more:
15 const containerNode = useRef();16 const titleNode = useRef();17 18 const [similarWords, setSimilarWords] = useState([]);19 20 const postLink = () => `A;/${slug}?s=${searchTerm}`A;;21 22 useEffect(() => {23 if (containerNode.current) {24 // deliberately set style with javascript and not CSS for accessibility reasons25 containerNode.current.style.cursor = 'pointer';26 }27 const listener = (event) => {28 if (containerNode.current && !titleNode.current.contains(event.target)) {29 navigate(postLink());30 }31 };32 containerNode.current.addEventListener('mousedown', listener);33 return () => {34 if (containerNode.current) {35 containerNode.current.removeEventListener('mousedown', listener);36 }37 };38 }, [containerNode, titleNode, searchTerm]);
Note, we now need this useEffect block (lines 22 – 38) to run when searchTerm changes, so we include that variable in the array in line 38. The postLink function (line 20) tacks the search term on the end of the slug as a URL search parameter. We
have added the similarWords state variable, which
we will use next:
40 useEffect(() => { setSimilarWords(getSimilarWords(searchTerm, seoMetaDescription)); }, [searchTerm]);
Here we are using the new utility function to tell us which words in the
summary we will need to highlight. We put those words into an array state
variable, similarWords. Naturally, when the
search term changes (as the user types in the search box in the Search
component), we need to update this array. For that reason, searchTerm is added in line 42.
Highlighting Search Terms and Stem Equivalents #
We have set up all the background work needed to highlight the search term (and stem equivalents) in the component. Now let's add the code which does the actual highlighting:
44 const highlightSearchStemCommonWords = (text) => {45 if (similarWords.length > 0) {46 const parts = text.split(new RegExp(\u0060(${similarWords.join('|')})`A;, 'gi'));47 return (48 <p>49 {parts.map((part) => {50 if (part !== '') {51 if (similarWords.includes(part.toLowerCase())) {52 return <mark key={uuidv4()}>{part}</mark>;53 }54 return <span key={uuidv4()}>{part}</span>;55 }56 return null;57 })}58 </p>59 );60 }61 const parts = text.split(new RegExp(\u0060(${searchTerm})`A;, 'gi'));62 return (63 <p>64 {parts.map((part) => (65 <span key={uuidv4()}>66 {part.toLowerCase() === searchTerm.toLowerCase() ? <mark>{part}</mark> : part}67 </span>68 ))}69 </p>70 );71 };72 73 const formattedSeoMetaDescription = () => (74 <p>{highlightSearchStemCommonWords(seoMetaDescription)}</p>75 );
Let's see what we have done here. In line 46, we split the text at each
occurrence of an element in the similarWords array.
This generates an array of shorter strings, which (combined) reproduce the original
input text. The block in lines 49 – 57 looks at each of these
parts in turn. If the part is a similarWords element,
we wrap it in a <mark> element. By default,
the browser will highlight this text without us having to do anything else. The
rest of the loop just glues everything else back together as it was. We have to
add keys to the elements. There is a nice Twitter thread by React guru Dan Abramov on Why React needs keys . We use uuid to generate unique keys. Install
this package to get the code to work:
npm i uuid
Finally, there are some cases where there will not be any stem equivalents
generated (this might happen for very short search terms), even though, we
want to highlight the search term. Lines 64 – 68 handle this case.
Next, in line 72 we define a function that uses
the new code above to highlight the meta description. We simply need to call this
function to highlight the rendered content:
40 {41 // TRUNCATED...42 return (43 <div className={container} ref={containerNode}>44 <div className={content}>45 <h3 ref={titleNode}>46 <Link47 aria-label={`A;Open ${postTitle} blog post`A;}48 aria-describedby={idString}49 to={postLink()}50 >51 {postTitle}52 </Link>53 </h3>54 <p>{`A;${date.format('D')} ${date.format('MMM')}`A;}</p>55 <p>{formattedSeoMetaDescription()}</p>56 <span aria-hidden id={idString}>57 Read more {H_ELLIPSIS_ENTITY}58 </span>59 </div>60 </div>61 );62 };63 64 BlogPostSummary.defaultProps = {65 searchTerm: '',66 };
There are a couple more updates in here which should make sense without an explanation. That's the first part, and in fact most of the work complete. Next, let’s look at how we highlight the search term in the blog post.
🖋 Add Highlights to Blog Post #
Now we switch to the blog post template component. We want this component to look exactly the same as it did before, when there is no search term. We pass the search term in as a search parameter in the post URL. When a search parameter is included, we will highlight it wherever it occurs in the text, as well as stem equivalents. We need to run a new search for stem equivalents as we do not have access to the previous results, besides, there may be extra stem equivalents which occur in the full post, but not in the meta description.
Let's start by adding new imports:
1 import { MDXProvider } from '@mdx-js/react';2 import { Link } from 'gatsby'; 3 import PropTypes from 'prop-types';4 import React, { useEffect, useState } from 'react';5 import { Helmet } from 'react-helmet';6 import { v4 as uuidv4 } from 'uuid';7 import { getSimilarWords } from '../utilities/search';8 import { isBrowser } from '../utilities/utilities';9 import BannerImage from './BannerImage';10 import { PureLayout as Layout } from './Layout';11 import { ExternalLink, TwitterMessageLink } from './Link';12 import { PureSEO as SEO } from './SEO';
Next we want to pull the search term from the browser URL, we did something
similar in the Search component:
15 const [similarWords, setSimilarWords] = useState([]);16 const { frontmatter, rawBody, slug } = data.post;17 const { bannerImage, featuredImageAlt, seoMetaDescription, postTitle } = frontmatter;18 const { siteUrl } = data.site.siteMetadata;19 20 let searchTerm = '';21 if (isBrowser) {22 const searchParam = new URLSearchParams(window.location.search.substring(1)).get('s');23 if (searchParam !== null) {24 searchTerm = searchParam;25 }26 }27 28 useEffect(() => {29 setSimilarWords(getSimilarWords(searchTerm, rawBody));30 }, [searchTerm]);
As well as getting the search term, we added a similarWords state variable, just like in the BlogPostSumary component. On top, we update this array when the search term updates. We are
not expecting the user to change the search term in this component, but the search
term may not be available on initial render so once it is updated, we need to update
the similarWords array.
### Highlight Search Term and Stem Equivalents
Next, we want to highlight the search term in our blog post. This is a little more complicated than before, as our blog post is in MDX, and we use MDXRenderer to render it. Luckily, MDXRenderer accepts a wrapper. We will use that wrapper to highlight the code. Let’s have a look at how this is done:
32 const highlightWords = (childrenProp) => {33 const result = [];34 React.Children.forEach(childrenProp, (child) => {35 if (child.props && child.props.children) {36 const newChild = React.cloneElement(child, {37 children: highlightWords(child.props.children),38 key: uuidv4(),39 });40 result.push(newChild);41 } else if (!child.props) {42 const parts = child.split(new RegExp(\u0060(${similarWords.join('|')})`A;, 'gi'));43 const highlightedChild = parts.map((part) => {44 if (part !== '') {45 if (similarWords.includes(part.toLowerCase())) {46 return (47 <mark className="highlight" key={uuidv4()}>48 {part}49 </mark>50 );51 }52 return part;53 }54 return null;55 });56 result.push(highlightedChild);57 } else {58 result.push(child);59 }60 });61 return result;62 };63 64 const shortcodes = {65 ExternalLink,66 Link,67 TwitterMessageLink,68 wrapper:69 searchTerm === '' ? null : ({ children: mdxChildren }) => <>{highlightWords(mdxChildren)}</>,70 };
Starting at the bottom, we add the wrapper to the shortcodes, whenever we have a search term (line 69).
We were already using the shortcodes in the rendered
content, so we do not need to change anything with the rendered content we return
for our component. The manipulation of the DOM elements using React APIs, in the
highlightWords function, is a little more involved.
To keep focus on the task at hand, we will not go into this. You can learn more about what we are doing here in an excellent post on React
children on Max Stoibers blog .
Now, if you search for a term which is in the text and open up the search
result, our code will highlight it. Essentially, this just comes from adding <mark> elements. We are almost done now. The last step is to scroll the first occurrence
of a highlighted term into view. This is quite handy for users in a hurry, they
won't need to scan through a potentially long post to find a match and work out
if our post is what they were after.
🌟 Scroll First Match in to View #
We have done all the hard work already. All we need to do now is add one final useEffect block to assist with scroll into view. This will bring the first match to the
top of the browser window:
72 useEffect(() => {73 const highlights = document.querySelectorAll('.highlight');74 if (highlights[0]) {75 highlights[0].scrollIntoView(true);76 }77 }, [searchTerm, shortcodes]);
Here we are using the standard web API. The code just finds the first
highlight element (note, we added this class to highlight terms in the
previous step (line 47)).
💯 Try it Out #
Please enable JavaScript to watch the video 📼
Try going to the home page, clicking the search icon. Search for “optical”. The word “optics” should be highlighted in the second result returned. Although there is a match within the first post's text, the work does not appear in the rendered content in the summary, so there is nothing to highlight. Click the second result and “optics” should be highlighted and at the top of the browser window. What do you think?
You can see the completed code in the Rodney Lab GitHub page . There is also a live demo site at gatsby-site-search.rodneylab.com .
🙌🏽 That’s all Folks! #
In this post, we learned:
- how to use semantic HTML to highlight text;
- some ways to improve user experience when returning search results; and
-
how to use the
scrollIntoViewWeb API in React.
I hope you found this useful. There are more extensions you can add. For example, when the user searches for a term which is in the text but not in the meta description, you could render the passage of text which contains the search term in the summary. Currently, we render the meta description, which doesn't give the user much context in this case. On top, you could add a drop-down list of search terms to the search box. You can then add term selection using up and down arrow keys. Colby Fayock has an excellent video on doing this in Next.js . Finally, you can style the mark elements to highlight text with a different colour to the browser default.
Keen to hear how you plan to use this! Is there something from this post you can leverage for a side project or even client project? I do hope so! Let me know if there is anything in the post that I can improve on, for anyone else creating this project. You can leave a comment below, @ me on Twitter or try one of the other contact methods listed below.
🙏🏽 Highlight Search: Feedback #
If you have found this post useful, even though you can only afford even a tiny contribution, please consider supporting me through Buy me a Coffee.
Finally, feel free to share the post on your social media accounts for all your followers who will find it useful. As well as leaving a comment below, you can get in touch via @askRodney on Twitter and also askRodney on Telegram . Also, see further ways to get in touch with Rodney Lab. I post regularly on SvelteKit as well as Gatsby JS among other topics. Also, subscribe to the newsletter to keep up-to-date with our latest projects.