


🍋 Why use Deno Fresh? #
- Deno Fresh builds fast sites so you get first class user experience (UX),
- it uses the platform so getting started with Deno Fresh is quick if you already know the JavaScript APIs (even if you have to learn them you are not locked into Fresh, use them with Remix, Astro or SvelteKit),
- amazing Developer Experience (DX) — it’s serverless with no build step, deploys are live almost instantly.
🤷🏽 What is Deno Fresh? #
Deno Fresh is a Next Gen site builder. It builds Server-Side Rendered (SSR) sites and supports partial hydration. Fresh runs in the Deno JavaScript runtime which prioritises security and performance. In Deno, JavaScript APIs are first-class citizens — it uses the platform. This makes Deno quicker and easier to learn. Deno renders your site on the server and by default ships zero JavaScript to the browser. This makes Fresh a fine choice for content sites. By content sites we mean those which are largely documentation, blogs and such like, typically not heavily interactive.
When you need interactivity on a Fresh site, you can use Fresh's partial hydration feature set. This means only the parts of the page which are interactive, also known as islands of interactivity, get hydrated. Hydration is just the step in the page loading in the browser where code allowing interactivity gets loaded and the state of these components becomes consistent.
🎬 How do you Spin up a Fresh Fresh App? #
To get going you will need Deno in your development environment. If you do not yet have it installed, it is quick to set up from the Terminal with Homebrew on MacOS or a shell script on Linux:
# macOSbrew install deno # Linuxcurl -fsSL https://deno.land/install.sh | sh # Test installation workeddeno --version
In contrast to Node.js runtime-based tooling, with Deno typically you run apps and access packages via a URL. This is exactly what we can do to spin up a new Deno Fresh app. Once you have Deno installed, type these commands in the Terminal to get going:
deno run -A -r https://fresh.deno.dev my-fresh-app && cd $_deno task start
Please enable JavaScript to watch the video 📼
🧐 Getting Started with Deno Fresh: What’s Inside? #
.├── components│ └── Button.tsx├── deno.json├── deno.lock├── dev.ts├── fresh.gen.ts├── islands│ └── Counter.tsx├── main.ts├── routes│ ├── [name].tsx│ ├── api│ │ └── joke.ts│ └── index.tsx└── static ├── favicon.ico └── logo.svg
-
With Deno Fresh, you write your components in Preact (just pretend
it’s React if its your first time with Preact). Your Preact component files
get placed in the
componentsorislandsdirectory depending on whether they are interactive or not. So a button which changes state can go inislandsbut a form which uses the platform and WebAPIs can go intocomponents. -
deno.jsonthis loosely maps to apackage.jsonfile in Node.js. The includedstarttask is what you run to start your app and tells Deno to run thedev.tsfile (also listed above), -
main.ts: this is where we run the in-built web server from. You can add additional config for TLS and what not here, -
routes: this folder contains files which map to actual pages on your site. If you already use Astro, Remix or Next.js the file-based routing system will be very familiar.routes/index.tsxwill map tohttps://example.com/on your final site, while aroutes/about.tsxwill map tohttps://example.com/about.routes/[name].tsxis a dynamic page template. This provides mechanism for example, to create/offices/london,/offices/berlinand/offices/mumbaiall from a single file without duplicated the content and with access to the city name parameter within the template (/offices/[office-name].tsx). -
staticis for anything which does not need processing like favicons,manifest.webmanifestfiles for PWAs or logos.
What’s deliberately missing? #
Notice there is no:
-
package.json: with Deno Fresh, you can useimport_map.jsonfor dependencies and thetasksfield indeno.jsonfor scripts, -
tsconfig.json: Deno Fresh comes with in-built TypeScript support and selects sensible defaults under the hood to help you get going quicker on new projects, -
eslint.js&eslint.config.js: just use thedeno lintcommand — no need to configure this, -
.prettierrc&.prettierignore: similar to Rust, formatting is also integrated into the tooling. Rundeno fmtwhen you want to tidy your code, -
vitest.config.ts: you guessed it… Deno has integrated testing built into the tooling too!
🗳 Poll #
💫 9 Quick Tips for Getting Started with Deno #
- Permissions: Deno prioritises security and gives you more
control over what your app has access to.
deno.jsonjson{"tasks": {"start": "deno run -A --watch=static/,routes/ dev.ts"}, // ...TRUNCATED}
The
-Aflag in thestartscript grants our app access to all permissions including the file system (read and write), environment variables and the network. If you want finer grained control remove it and restart your app. You will now see prompts asking for various permissions in the Terminal.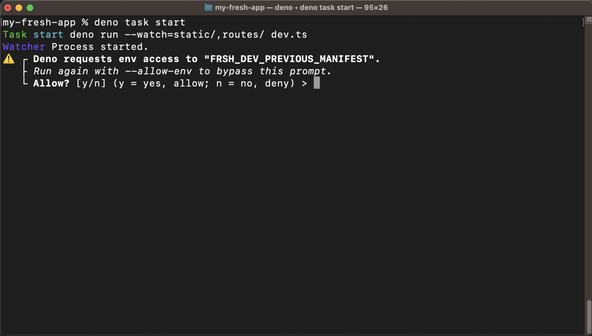
Getting Started with Deno Fresh: Deno Permissions - Environment Variables
In the cloud you can define secrets in the Deno deploy console (or your host’s equivalent). Locally, as with other tooling you can use a
.envfile. Remember to add this to your.gitignorefile so secrets are not committed to your git repo. - VS Code Setup: you might already have a
`.vscode/extensions.json` file in the project (depending on how you
answered the setup prompts).
.vscode/extensions.jsonjson{"recommendations": ["denoland.vscode-deno"]}
This will cause VS Code to prompt you to install the Deno extension when you open the project. I noticed the extension was connecting to the network even in non Deno projects. Because of that, now I install it as normal, then in VS Code Extensions, find Deno, and click the Disable button. Finally, I click the dropdown to select Enable (Workspace).
The extension adds linting hints and formatting capabilities. To format on save, update
.vscode/settings.json:.vscode/settings.jsonjson1 {2 "deno.enable": true,3 "deno.lint": true,4 "editor.defaultFormatter": "denoland.vscode-deno",5 "editor.formatOnSave": true,6 }I notice the auto-format saved files change ever so slightly when I run
deno fmtfrom the Terminal, but imagine this will be addressed soon. - Browser vs. Server in other frameworks you might remember having
to run a little check to make sure a block of code only runs in the client.
You can see an example of how to achieve this in Deno in
components/Button.tsx:components/Button.tsxtsx1 import { JSX } from "preact";2 import { IS_BROWSER } from "$fresh/runtime.ts";34 export function Button(props: JSX.HTMLAttributes<HTMLButtonElement>) {5 return (6 <button7 {...props}8 disabled={!IS_BROWSER || props.disabled}9 />10 );11 }Here the button is disabled if the code is not running in the browser, but you might also use this if you are working with local storage (for example) and need to access it on the client via
window.localStorage. - Deno std we added the
stdpackage toimport_map.jsonearlier to accessdotenv. This is the Deno Standard Library (Deno has a standard library just like C and Rust). Apart fromdotenvyou might also usestdfor:-
$std/crypto: to access WebCrypto APIs in your server side code, -
$std/encoding: for extracting front matter from Markdown files or to generate base64 for BasicAuth HTTP headers, -
$std/httpfor working with HTTP cookies. -
$std/pathfor file manipulations you might find innode:path, -
$std/assert/mod.ts,$std/testing/bddand$std/testing/snapshot.tsfor Jest styleassertsas well as Behaviour Driven Testingdescribeandit. For Chai styleexpecttryhttps://cdn.skypack.dev/[email protected]?dts.
-
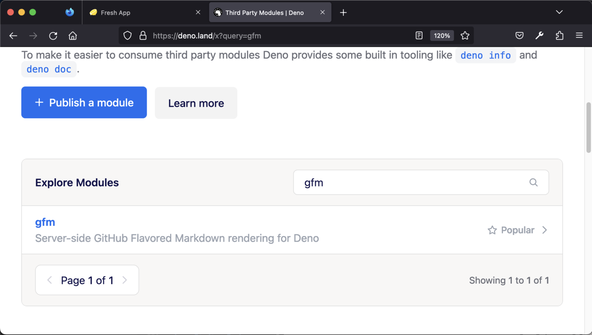
- Finding Packages: Deno is a little different to
Node.js in that you do not have to use NPM as your package repository
and also that you can import packages from URLs. Under the hood, Deno
caches the packages locally (a little like pnpm) so that you do not
need to download them afresh each time you start up your app. Three
sources for third party modules are:
-
Deno X:
https://deno.land/x?find Deno specific modules here, -
Skypack:
https://cdn.skypack.dev/an alternative with NPM packages, -
esm.sh:
https://esm.sh/another NPM package alternative.
Getting Started with Deno Fresh: Deno X -
Deno X:
- More Aliases as well as adding aliases for your external
modules, you can also define them for your project folders. As an example,
update
import_map.json:import_map.jsonjson1 {2 "imports": {3 "@/": "./",11 }12 }Now we can tidy up the import statements in
routes/index.tsx:routes/index.tsxtypescript1 import { Head } from "$fresh/runtime.ts";2 // import Counter from "../islands/Counter.tsx";3 import Counter from "@/islands/Counter.tsx";This can make your code look cleaner and also make it easier mentally to map where the import is coming from.
- 404 Page: create a custom page not found template
by adding a
routes/_404.tsxfile to your project:routes/_404.tsxtsximport { Head } from "$fresh/runtime.ts";import { UnknownPageProps } from "$fresh/server.ts";export default function NotFoundPage({ url }: UnknownPageProps) {const title = "Page not found 😢";const description = "I don’t think you are supposed to be here!";return (<><Head><title>{title}</title></Head><main><h1>{title}</h1><p>Not sure: <code>{url.pathname}</code> exists mate!</p></main></>);}Note we use the
Headcomponent here to add the<title>element to the HTML<head>for our page. - Where do Favicons go? we mentioned earlier you can put
favicons, logos and manifest.webmanifest for a PWA in the project
staticfolder. This is also a great place to add your self-hosted fonts and even CSS. If you are using PostCSS then you might want to have your input CSS in a separatestylesfolder at the root of the project then have PostCSS output the transpiled CSS tostatic/styles. We will see further down how you can automatically append hashes to the served filenames so they cache-bust when updated. - how Deno Fresh Islands work,
- Deno’s inbuilt testing framework,
- creating API Routes and a whole lot more!
- how create a new Deno Fresh app,
- some useful Deno standard library functions,
- how to pass data into a client React page.
Does Deno Fresh work with Svelte? #
- Currently Deno Fresh only supports Preact. Preact uses the React APIs but it highly optimised, so if your reason for preferring Svelte is speed, give Deno Fresh a try anyway. Deno uses web standards so is quick to pick up. Especially for content sites, you should see a massive speed pickup from partial hydration.
Which serverless database services are a good match for Deno? #
- Deno deploys to a serverless environment. For caching, a service like Upstash Redis is a fantastic choice as it is quick to integrate. Also consider Fauna for object storage, though in reality any modern database service designed for serverless applications will fit.
What `batteries` are included with Deno? #
- Deno is a batteries included runtime. By that we mean there is a plethora of tooling included. This can save you time and let you get going on the actual coding phase of your project much quicker. You will not need to set up Prettier, ESLint, TypeScript or Jest. That is because Deno has in-built tooling for handling all of the tasks those are designed for. On top, there is even a benchmarking utility. As well as benchmarking, we have `deno fmt` to format your code, `deno lint` to spot those errors ESLint handles in node. Finally, there is no `tsconfig.json` file: Deno comes with sensible defaults baked in.

.env.DS_Store
DATABASE_PASSWORD="open-sesame"
By default, the main.ts file in the project root
directory includes a $std/dotenv/load.ts import,
which adds local .env support to your project.
In your source code, you can access a secret variable using Deno.env.get():
const DATABASE_PASSWORD = Deno.env.get("DATABASE_PASSWORD");if (typeof DATABASE_PASSWORD !== 'string') { throw new Error("env `DATABASE_PASSWORD` must be set");}
9 Quick Tips for Getting Started with Deno Continued (5 – 9) #
As an aside, the import format from $std/fmt/bytes.ts for formatting file sizes into easily human readable strings.

Anatomy of a Deno Route File #
As a first step, take a look at the routes/index.tsx file included in the Deno Fresh skeleton content. It exports a default
function which is a Preact component. If you are familiar with React or
Preact then there is nothing too interesting for you here.
Even on a fairly basic site you might want to use content from a
database or even Markdown files within the project. This is work
which Deno Fresh lets you do on the server and sourced using a Deno handler function. The handler function can sit in the same file as the rendered
content (the exported React component in routes/index.tsx, for example). I like this pattern of sourcing the data in the
same file as the rendered content. For smaller sites it can help
debug a lot faster or even help you remember how a page you wrote a
few months back works.
Deno Fresh Route Request Handler #
I trimmed down a source file from a little Deno app for scheduling Tweets, it’s a kind of poor cousin of Hootsuite or Buffer. This will help us illustrate some more real-world Deno Fresh features. Let’s see the data handling part first:
1 import { Handlers, PageProps } from "$fresh/server.ts";2 import type {3 ScheduledTweet,4 } from "@/utils/twitter.ts";5 import { Temporal } from "js-temporal/polyfill/?dts";6 import { Fragment } from "preact";7 8 interface HappyPathData {9 scheduledTweets: ScheduledTweet[];10 error?: never;11 }12 interface ErrorData {13 scheduledTweets?: never;14 error: string;15 }16 type Data = HappyPathData | ErrorData;17 18 export const handler: Handlers<Data> = {19 GET(request, context) {20 21 // my own function to get list of already scheduled tweets22 const scheduledTweets = getScheduledTweets() ?? [];23 24 return context.render({25 scheduledTweets,26 });27 },28 POST(request, context) {29 const form = await request.formData();30 const action = form.get("action");31 const id = form.get("id");32 33 if (action === "retweet" && typeof id === "string") {34 const text = form.get("text");35 const date = form.get("date");36 const time = form.get("time");37 38 if (typeof date === "string" && typeof time === "string") {39 // my own function to schedule a tweet40 scheduleRetweet({41 id,42 scheduleTime,43 text,44 });45 } 46 47 }48 const { scheduledTweets } = getScheduledTweets() ?? [];49 50 return context.render({51 scheduledTweets,52 });53 },54 };
The TypeScript support comes out of-the-box and we add nothing to
get it to work. You can see the handler has a two components: a GET handler,
while will be called when the page loads and a PUT handler which we will invoke by submitting a form (front-end code coming
up). Notice how GET and PUT are named after HTTP request methods — Deno loves the platform!
These functions take a request and context parameter as inputs. The request is
a standard WebAPI Request and we can apply the formData(), json() or text() methods to manipulate the request body. We can also destructure headers, method, url etc. from it.
Meanwhile context contains a params object. For a template route (remember the offices in london, mumbai, etc. example)? There our
template file name was routes/offices/[office-name].tsx. Well, if for example, we want to pull the phone number for the
right office from the database when the visitor goes to https://example.com/offices/mumbai we can access the mumbai part using
the context:
GET(request, context) { const { params: { 'office-name': officeName }, } = context; const phoneNumber = getPhoneNumber(officeName); // ...TRUNCATED
context.render() #
context.render() #
As well as letting us access path parameters, the context object
also defines a render method. This is
what provides the server-side rendering for us. By returning it, we can
pass the data into the client template. Let’s see that next.
Client React Code #
Remember we can keep things simple, placing this code in the same
file as the handler. We didn’t handle it above in the handler
(to keep things simple), but we could have returned an error if we
had some issue pulling scheduled tweets from the database. Checking
for that error in the client code, we can let the user know
something is not right. Here <Fragment></Fragment> is syntactically equivalent to using <></>. If you are new to React or Preact you might not know, our
rendered elements must have a single top level element (that is why
wrap the other elements in Fragment,
otherwise HTMLHead, Header, etc would all be top level elements).
57 export default function TweetQueue(ctx: PageProps<Data>) {58 const {59 data: { error, scheduledTweets, tweets },60 } = ctx;61 62 if (error) {63 return (64 <Fragment>65 <HTMLHead66 title="Isolinear 🖥 | Twitter | Tweet Queue"67 description="Isolinear tweet queue."68 />69 <Header />70 <h1>Something went wrong!</h1>71 <p>{error}</p>72 </Fragment>73 );74 }75 76 const { url } = ctx;77 const { searchParams } = url;78 const retweet = searchParams.get("retweet");79 const id = searchParams.get("id");80 const minDate = Temporal.Now.plainDateTimeISO().toPlainDate().toString();81 82 return (83 <Fragment>84 <h1>Twitter</h1>85 <h2>Retweet</h2>86 {retweet === "true" && typeof id === "string"87 ? (88 <Fragment>89 <h3 id="retweet">Retweet</h3>90 <form action="/twitter/tweet-queue" method="post">91 <input type="text" name="id" value={id} />92 <input93 type="text"94 name="text"95 placeholder="Tweet text"96 maxLength={280}97 />98 <input type="date" name="date" min={minDate} />99 <input type="time" list="tweet-schedule" name="time" />100 <input type="hidden" name="action" value="retweet" />101 <button type="submit">[ retweet ]</button>102 </form>103 </Fragment>104 )105 : null}106 </Fragment>107 );108 }
If we need to access the page URL, we can do so using the ctx prop. Finally, notice we have a form to handle submitting a new tweet.
This works using the platform and with no need for additional JavaScript.
Check the MDN docs if you are new to this. Learn it once and use it here
in Deno Fresh, in SvelteKit, in Remix, in Astro or even a plain old HTML/CSS
website! When the user clicks the button, the action="/twitter/tweet-queue" method="post" on the form element means the browser will send a POST HTTP request to /twitter/tweet-queue (this exact route). The POST function
in the handler above will then take care of it. Are you not entertained
😅
🙌🏽 Getting Started with Deno Fresh: Wrapping Up #
We’re only just getting started! However, so the post doesn’t get too long, in a follow-up we will see:
The journey so far… we have taken a quick look at getting started with Deno Fresh. In particular, we saw:
Check out the Fresh docs for further details. Get in touch if you would like to see more content on Deno and Fresh. I hope you found the content useful and am keen to hear about possible improvements.
🏁 Getting Started with Deno Fresh: Summary #
🙏🏽 Getting Started with Deno Fresh: Feedback #
Have you found the post useful? Would you prefer to see posts on another topic instead? Get in touch with ideas for new posts. Also, if you like my writing style, get in touch if I can write some posts for your company site on a consultancy basis. Read on to find ways to get in touch, further below. If you want to support posts similar to this one and can spare a few dollars, euros or pounds, then please consider supporting me through Buy me a Coffee.


Just dropped a new post on getting started with 🦖 Deno Fresh...
— Rodney (@askRodney) January 6, 2023
🍋 Deno Fresh:
- builds fast SSR sites,
- lets you use the platform,
- deploys instantly with no build step for marvellous DX
Have a read, hope you find it useful!
https://t.co/rdXCCvEDus
Finally, feel free to share the post on your social media accounts for all your followers who will find it useful. As well as leaving a comment below, you can get in touch via @askRodney on Twitter, @[email protected] on Mastodon and also the #rodney Element Matrix room. Also, see further ways to get in touch with Rodney Lab. I post regularly on Astro as well as Deno. Also, subscribe to the newsletter to keep up-to-date with our latest projects.