


📝 Deno Fresh Testing #
In this post, we see how you can set up Deno Fresh Testing on your Fresh app. We focus on end-to-end testing, though you can use the APIs seen here for unit testing utility functions in your project, for example.
Unit testing typically shines a spotlight on a single function or component; that is, to check that it behaves as expected. Those tests are performed in isolation, and integration tests might be added to check for side effects that arising from combining components. You will combine components in a way they will be used in production for integration tests, though end-to-end tests are an ideal way to check everything works as expected. End-to-end testing is applied at a higher level, interacting with the app as the end user would. That applies both to HTML page contents and API routes. Ideally, end-to-end test design makes no assumptions on the actual implementation used.
We focus on that last kind of test here, though there is an outline of running Deno unit tests in the post on Getting Started with Deno Fresh.
🧱 What are we Building? #
It makes most sense to design tests for an app you are working on, rather than building out an app just for the sake of seeing tests. For that reason, we focus on adding tests to an existing Deno project. This might be a nascent project, if you prefer to follow the test-driven development (TDD) approach.

We add tests to a very basic Deno Fresh app, which should help get started with adding tests to your own app. The full code is available in a GitHub repo (link further down).
Hopefully you can benefit from the post independently of which testing philosophy you prefer. Let’s get started!
⚙️ Project Config #
Deno has a built-in test runner, which you can call with the deno test command. This looks for test files within your project (we use the something_test.ts naming pattern in this post, though Deno will also automatically pick up something.test.ts files). If you prefer another pattern, deno.json accepts test.include, as well as test.exclude, letting you
customize the test search paths . The Deno Standard Library provides the testing assertions which we need.
For DOM testing we add deno_dom here to write queries
on returned HTML.
Update deno.json adding a test script, as well as
the deno-dom import and @std dependencies:
1 {2 "lock": false,3 "tasks": {4 "check": "deno fmt --check && deno lint && deno check **/*.ts && deno check **/*.tsx",5 "start": "deno run -A --watch=static/,routes/ dev.ts",6 "build": "deno run -A dev.ts build",7 "preview": "deno run -A main.ts",8 "test": "deno test --allow-env --allow-read --allow-net",9 "update": "deno run -A -r https://fresh.deno.dev/update ."10 },11 "fmt": { "exclude": ["static/*.css"] },12 "lint": {13 "rules": {14 "tags": [15 "fresh",16 "recommended"17 ]18 }19 },20 "exclude": [21 "**/_fresh/*"22 ],23 "imports": {25 "@/": "./",26 "@b-fuze/deno-dom": "jsr:@b-fuze/deno-dom@^0.1.52",29 "@std/assert": "jsr:@std/assert@^1.0.13",30 "@std/dotenv": "jsr:@std/dotenv@^0.225.5",33 },34 "compilerOptions": {35 "jsx": "react-jsx",36 "jsxImportSource": "preact"37 }38 }
HTML Lang Attribute #
If your site is not written in English (as spoken in the US), you will want to
include an HTML lang attribute on generated HTML pages. In Deno Fresh, this is
done by adding a routes/_app.tsx file, where you
can directly edit the html tag:
1 import type { PageProps } from "$fresh/server.ts";2 3 export default function App({ Component }: PageProps) {4 return (5 <html lang="en-GB">6 <head>7 <meta charSet="utf-8" />8 <meta name="viewport" content="width=device-width, initial-scale=1.0" />9 </head>10 <body>11 <Component />12 </body>13 </html>14 );15 }
Update the language in line 5 to match your site
language. See the separate video on the Deno Fresh HTML lang attribute for more on this.
🏡 Home Page Tests #
Let’s add a tests folder to the project root
directory for our end-to-end tests. You can add unit tests adjacent to the files
they test (utils/network_test.ts for example).
We will have a test file in tests/routes for each
route. Add a tests/routes/index_test.ts file for
the index route with this content:
1 import { createHandler } from "$fresh/server.ts";2 import config from "@/fresh.config.ts";3 import manifest from "@/fresh.gen.ts";4 import { assertEquals, assertStringIncludes } from "@std/assert";5 import { load } from "@std/dotenv";6 import { DOMParser } from "jsr:@b-fuze/deno-dom";7 8 await load({ envPath: ".env.test", export: true });9 10 const url = "http://127.0.0.1:8001/";11 12 Deno.test("Home route", async (t) => {13 const handler = await createHandler(manifest, config);14 15 await t.step("it returns a 200 status code", async () => {16 const response = await handler(new Request(url));17 const { status } = response;18 assertEquals(status, 200);19 });20 });
We have our first test! You can see that we mostly rely on JavaScript Web APIs, which will not be a surprise if you’ve used Deno before!
A few details are a little different, so let’s have a look at them:
-
We import environment variables in line
8. TheenvPathparameter lets you add a separate environment variable file (.env.testhere) just for testing. Skip that parameter if you want to use.envinstead. Adding theexport: trueoption lets you access environment variables usingDeno.env.get('SOME_SECRET')in your project files. -
We use a Fresh server handler in line
16to load the page content as the end user sees it. -
Finally, we make an assertion in line
18, using Deno asserts (imported in line4). See the Deno docs for a full list of available Deno assert functions .
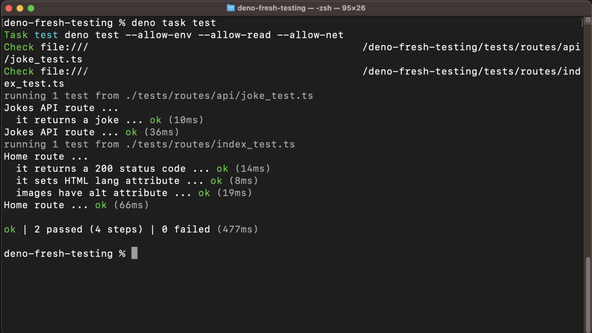
Try running your tests from the Terminal with:
deno task test
🥱 More Home Page Tests #
We mentioned accessing the DOM earlier. Let’s add a couple more tests to see this. We will:
-
check the HTML tag includes the
langattribute (<html lang="en-GB">); and -
that all images have
alttext, required for accessibility.
Update tests/routes/index_test.ts:
17 Deno.test("Home route", async (t) => {18 const handler = await createHandler(manifest, startOptions);19 20 await t.step("it returns a 200 status code", async () => {21 /* TRUNCATED... */22 });23 24 await t.step("it sets HTML lang attribute", async () => {25 const response = await handler(new Request(url));26 27 const body = await response.text();28 assertStringIncludes(body, `<html lang="en-GB">`);29 });30 31 await t.step("images have alt attribute", async () => {32 const response = await handler(new Request(url));33 const body = await response.text();34 const doc = new DOMParser().parseFromString(body, "text/html")!;35 const images = doc.getElementsByTagName("img");36 37 images.forEach((element) => {38 const altText = element.attributes.getNamedItem("alt")?.value;39 assertEquals(altText && typeof altText, "string");40 });41 });42 });
The way we access the HTML body, using JavaScript Web APIs, is probably already familiar to you. Then, DOMParser, again, uses standard APIs. Hopefully you included alt tags on your own page’s images, and these tests pass too!
🤖 API Route Tests #
For the sake of completeness, let’s add a test for an API route. As you might expect, there is not much difference here.
We will write code to test the Joke API route included in Deno Fresh skeleton
projects. It responds to GET requests with a joke
in plain text.
Create tests/routes/api/joke_test.ts with this content:
1 import { createHandler } from "$fresh/server.ts";2 import config from "@/fresh.config.ts";3 import manifest from "@/fresh.gen.ts";4 import { assert, assertEquals } from "@std/assert";5 import { load } from "@std/dotenv";6 7 await load({ envPath: ".env.test", export: true });8 9 const url = "http://127.0.0.1:8001/api/joke";10 11 Deno.test("Jokes API route", async (t) => {12 const handler = await createHandler(manifest, config);13 14 await t.step("it returns a joke", async () => {15 const response = await handler(new Request(url, {}));16 const { status } = response;17 assertEquals(status, 200);18 19 const body = await response.text();20 assert(body);21 });22 23 });
Hopefully, that was easy to adapt to your own app.
🗳 Poll #
🙌🏽 Deno Fresh Testing: Wrapping Up #
We saw how you can set up Deno Fresh Testing in your own project. In particular, we saw:
- how you can end-to-end test HTML pages on your Deno Fresh site;
- how you make sure environment variables are defined in your tests; and
- a way to test API routes.
The complete code for this post . I do hope the post has either helped you in testing an existing project or provided some inspiration for getting started with setting up TDD on a new project.
Get in touch if you have some questions about this content or suggestions for improvements. You can add a comment below if you prefer. Also, reach out with ideas for fresh content on Deno or other topics!
🏁 Deno Fresh Testing: Summary #
Does Playwright work with Deno Fresh? #
- Playwright does not currently work with Deno, though we have seen that you can use Deno’s Standard Library for end-to-end testing. To access the DOM in your tests, there is the third-party deno_dom package (https://deno.land/x/deno_dom).
How can you end-to-end test a Deno Fresh website? #
- For the most part, you just need the Deno Standard Library to add end-to-end testing to your Deno Fresh site. You can create a tests folder in the root folder of your project, and follow a file naming pattern like `tests/about-us_test.ts` for Deno to pick up your test files. Within your test file, import `createHandler` from `$fresh/server`. Then, call `createHandler` from within a test file, using the regular Deno test methods. Assertions, such as `assert`, `assertEquals` and `assertStringIncludes` are available from `$std/testing/asserts.ts`. Finally, you can traverse the DOM using the third-party Deno package `deno_dom`, checking for `alt` tags on images, for example.
How about Deno API testing? #
- Deno Fresh API end-to-end testing works very much like HTML page testing. You can assert the server returns 400 and 500 errors as expected, and of course that it returns the documented payload on the happy path. For your utility helper function unit testing, you can also use Deno testing APIs. You might want to place unit tests files adjacent to the source files that you are testing (in a file like `utils/network_test.ts`, for example).
🙏🏽 Deno Fresh Testing: Feedback #
Have you found the post useful? Would you prefer to see posts on another topic instead? Get in touch with ideas for new posts. Also, if you like my writing style, get in touch if I can write some posts for your company site on a consultancy basis. Read on to find ways to get in touch, further below. If you want to support posts similar to this one and can spare a few dollars, euros or pounds, then please consider supporting me through Buy me a Coffee.


Just dropped a new post on how you can add end-to-end testing to your 🍋 Deno Fresh apps.
— Rodney (@askRodney) July 10, 2023
Hope you find it useful!
#tdd #learndeno #askRodneyhttps://t.co/1cGkG95VzU
Finally, feel free to share the post on your social media accounts for all your followers who will find it useful. As well as leaving a comment below, you can get in touch via @askRodney on Twitter, @[email protected] on Mastodon and also the #rodney Element Matrix room. Also, see further ways to get in touch with Rodney Lab. I post regularly on Astro as well as Deno. Also, subscribe to the newsletter to keep up-to-date with our latest projects.