


🧑🏽🎓 Astro JS Tutorial #
In this Astro JS tutorial, we will see how to create an Astro JS site from spinning up a local development server right up to getting the app into the cloud and hosted. Although we will build a fairly simple site, we will see some important Astro features like hydration in action. We will also take advantage of Astro’s Islands architecture to add Svelte and React components. This is just a quick introduction to Astro, so be sure to explore the related posts and videos listed at the bottom of the page to boldly go further!
🧱 Astro JS Tutorial: What we’re Building #
Please enable JavaScript to watch the video 📼
We build a simple app which shows YouTube videos in Svelte and React, as well as an Astro Markdown component. We will do that in three steps. First, is the setup, which should take a couple of minutes. Then we will add our own content to the minimal app we created in the previous step. Finally, we will see how to deploy the app to the cloud.
🧑🏽🦼 Quick Start #
Please enable JavaScript to watch the video 📼
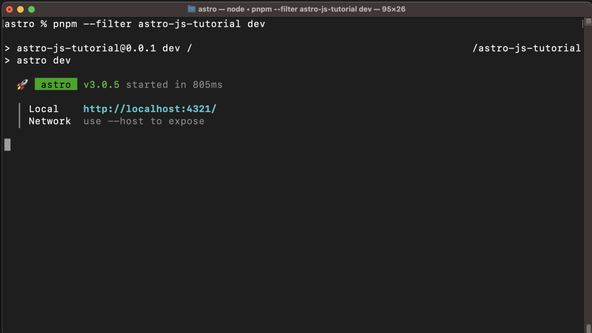
You spin up a new Astro project from the command line. First, you need to create a new directory for the project, then change into that directory and spin up Astro. We will be using Svelte and React in our Astro JS tutorial app. We can configure Astro to use these as part of the setup. Let’s do that now, running these commands:
pnpm create astro@latest astro-js-tutorial && cd $_pnpm installpnpm astro telemetry disablepnpm astro add react sveltepnpm dev
In the init astro step, select Empty. Then in the astro add step, enter yes so Astro
configures React and Svelte for you. We disable telemetry here, skip that step if
you want to keep telemetry enabled. After the final step, you should have a dev
server running. The Terminal will give you the URL for it, so you can open it in
your browser. Typically, it will be running on http://localhost:4321/. However, Astro will automatically find a free port if there is already
something running on port 4321.

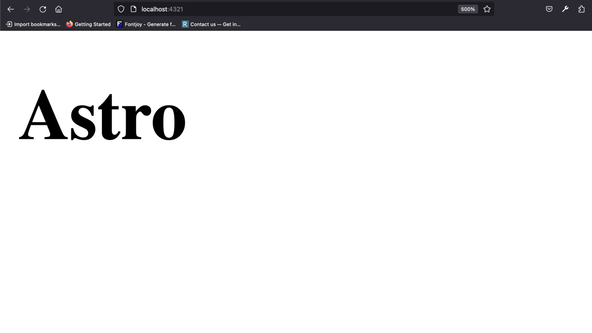
Open up the browser using the given URL and you should just see the word ‘Astro’ in black text. We will add our own content to this minimal app next.

astro.config.mjs #
astro.config.mjs #
Just before moving on, open up astro.config.mjs in the project root folder. This is Astro’s main config file. You will
see the setup tool has imported the necessary Svelte and React integration packages
and added them to the config for you.
🖋 Content #
In this section, we are going to build out our app, and learn a little about the structure of an Astro project in the process. We will also see how to add vanilla CSS styling in Svelte.
Astro routing works similar to NextJS, Remix and Deno Fresh. Astro generates pages from files in src/routes. So the file you saw in the browser is generated from the content in src/routes/index.astro. Let’s look at that file next.
src/routes/index.astro #
src/routes/index.astro #Replace the content in the file with this:
1 ---2 import "~styles/styles.css";3 import ReactVideo from "~components/react/Video.jsx";4 import SvelteVideo from "~components/svelte/Video.svelte";5 import { Content as MarkdownVideoContent } from '~siteContent/video.md';6 ---7 8 <html lang="en-GB">9 <head>10 <meta charset="utf-8" />11 <link rel="icon" href="/favicon.png" />12 <meta name="viewport" content="width=device-width" />13 14 <title>Rodney Lab Minimal Astro Example</title>15 </head>16 <body>17 <main class="container">18 <h1>Astro JS Tutorial Site</h1>19 <p>20 This demo is not endorsed by Ben Awad, just thought the video content21 was fitting!22 </p>23 <ReactVideo client:load />24 <SvelteVideo client:load />25 <section class="mdx-container">26 <MarkdownVideoContent />27 </section>28 </main>29 </body>30 </html>31 32 <style>33 .container {34 display: flex;35 flex-direction: column;36 background: hsl(37 var(--colour-dark-hue) var(--colour-dark-saturation)38 var(--colour-dark-luminance)39 );40 color: hsl(41 var(--colour-light-text-hue) var(--colour-light-text-saturation)42 var(--colour-light-text-luminance)43 );44 padding: var(--spacing-8) var(--spacing-0) var(--spacing-32);45 }46 47 .container a {48 color: hsl(49 var(--colour-secondary-hue) var(--colour-secondary-saturation)50 var(--colour-secondary-luminance)51 );52 }53 .mdx-container {54 display: flex;55 flex-direction: column;56 background: hsl(57 var(--colour-alternative-hue) var(--colour-alternative-saturation)58 var(--colour-alternative-luminance)59 );60 align-items: center;61 width: 100%;62 padding: var(--spacing-8) var(--spacing-0) var(--spacing-12);63 color: hsl(64 var(--colour-light-text-hue) var(--colour-light-text-saturation)65 var(--colour-light-text-luminance)66 );67 }68 </style>
We have a fair bit in here. Broadly, the file has three sections. The first is
the front matter in lines 1 – 6. In the first line,
we import our global stylesheet. We will create that file in a moment. We also
add the components which we will use to add video here. This might be new if
you are coming from an HTML / JavaScript / CSS background. Though, the other
two sections might look a little more familiar. In the front matter, we can
write JavaScript which defines any variables we want to use in the following
section. In our case, we are just importing items which we will use in the
main markup.
The main markup (lines 8 – 30) looks a lot like
HTML, with a head and body section. As well as regular HTML elements, we use our ReactVideo and SvelteVideo
components.
The final section contains styles. The styles in this file will be automatically scoped just to the content of this file. Our app will not work for the moment; we need to add some new content we reference in the front matter first.
Hydration #
By default, Astro does not load JavaScript — it will not hydrate the
page. By including the client:load directive in
lines 23 & 24, we tell Astro to hydrate our components. Because of this, when we click
the buttons in the app, our JavaScript code will change the background colour.
tsconfig.json #
tsconfig.json #
We will put our components in a new src/components directory. You might notice though that the import statement mentions ~components. This is just an alias for src/components which
we will use for convenience. For the alias to work, we need to update the tsconfig.json file in the project root folder. Let’s do that:
1 {2 "compilerOptions": {3 "baseUrl": ".",4 "paths": {5 "~*": ["src/*"]6 }7 },8 "extends": "astro/tsconfigs/strict"9 }
You can add any other aliases that might make sense for the project you are
working on. Note we only add these for convenience, they are optional and as
an example we could instead have written import '../styles/styles.css'. I prefer the alias, as well as looking neater, on larger projects where
you might have to traverse multiple directories to get to your file, the
syntax is more manageable.
src/styles/styles.css #
src/styles/styles.css #
Speaking of styles, let’s add our global styles. Astro works with SCSS,
Tailwind and other styling frameworks. To keep this project simple, and also
because modern CSS is now quite powerful, we stick to vanilla CSS. Create a src/styles folder and inside, add a styles/css file with
the following content:
src/styles/styles.css — click to expand code.
1 :root {2 /* colours */3 /* honey-yellow */4 --colour-brand-hue: 39;5 --colour-brand-saturation: 92%;6 --colour-brand-luminance: 57%;7 8 /* safety orange blaze orange */9 --colour-secondary-hue: 21;10 --colour-secondary-saturation: 89%;11 --colour-secondary-luminance: 52%;12 13 /* moss green */14 --colour-alternative-hue: 84;15 --colour-alternative-saturation: 29%;16 --colour-alternative-luminance: 43%;17 18 /* pine tree */19 --colour-dark-text-hue: 100;20 --colour-dark-text-saturation: 18%;21 --colour-dark-text-luminance: 13%;22 23 /* old lace */24 --colour-light-text-hue: 50;25 --colour-light-text-saturation: 66%;26 --colour-light-text-luminance: 95%;27 28 --colour-dark-hue: 206;29 --colour-dark-saturation: 46%;30 --colour-dark-luminance: 37%;31 32 /* spacing */33 --spacing-px: 1px;34 --spacing-0: 0;35 --spacing-4: 1rem;36 --spacing-6: 1.5rem;37 --spacing-8: 2rem;38 --spacing-12: 3rem;39 --spacing-32: 8rem;40 }41 42 /* roboto-regular - latin */43 @font-face {44 font-family: "Roboto";45 font-style: normal;46 font-weight: 400;47 src: local(""), url("/fonts/roboto-v29-latin-regular.woff2") format("woff2"),48 url("/fonts/roboto-v29-latin-regular.woff") format("woff");49 }50 51 /* roboto-700 - latin */52 @font-face {53 font-family: "Roboto";54 font-style: normal;55 font-weight: 700;56 src: local(""), url("/fonts/roboto-v29-latin-700.woff2") format("woff2"),57 url("/fonts/roboto-v29-latin-700.woff") format("woff");58 }59 60 body {61 margin: var(--spacing-0);62 background: hsl(var(--colour-dark-hue) var(--colour-dark-saturation));63 font-family: Roboto;64 text-align: center;65 }66 67 h1 {68 font-size: 3.815rem;69 margin-bottom: var(--spacing-12);70 }71 72 h2 {73 font-size: 1.802rem;74 margin-bottom: var(--spacing-8);75 }76 77 p {78 margin: var(--spacing-6) var(--spacing-6) var(--spacing-8);79 }80 81 button {82 cursor: pointer;83 margin: var(--spacing-6);84 border: solid var(--spacing-px)85 hsl(86 var(--colour-light-text-hue) var(--colour-light-text-saturation)87 var(--colour-light-text-luminance)88 );89 border-radius: 50%;90 padding: var(--spacing-8);91 }92 93 .video-container {94 position: relative;95 aspect-ratio: 16 / 9;96 width: 100%;97 max-width: 560px;98 margin: var(--spacing-0) var(--spacing-6);99 }100 101 .video-container iframe {102 position: absolute;103 inset: 0;104 width: 100%;105 height: 100%;106 border: 0;107 }108 109 .screen-reader-text {110 border: 0;111 clip: rect(1px, 1px, 1px, 1px);112 clip-path: inset(50%);113 height: 1px;114 margin: -1px;115 width: 1px;116 overflow: hidden;117 position: absolute !important;118 word-wrap: normal !important;119 }120 121 .react-container {122 display: flex;123 flex-direction: column;124 background: hsl(125 var(--colour-secondary-hue) var(--colour-secondary-saturation)126 var(--colour-secondary-luminance)127 );128 align-items: center;129 width: 100%;130 padding: var(--spacing-8) var(--spacing-0);131 color: hsl(132 var(--colour-light-text-hue) var(--colour-light-text-saturation)133 var(--colour-light-text-luminance)134 );135 }136 137 .react-container-alt {138 background: hsl(139 var(--colour-alternative-hue) var(--colour-alternative-saturation)140 var(--colour-alternative-luminance)141 );142 }143 144 .react-button {145 background: hsl(146 var(--colour-alternative-hue) var(--colour-alternative-saturation)147 var(--colour-alternative-luminance)148 );149 }150 151 .react-button-alt {152 background: hsl(153 var(--colour-secondary-hue) var(--colour-secondary-saturation)154 var(--colour-secondary-luminance)155 );156 }
In lines 42 – 58 you will notice we have
some self-hosted fonts. We will download those to our project shortly. At the bottom
of the file you will see we have some style for our React component. We take a different
approach for the Svelte component, taking advantage of in-built scoped styles, similar
to what we have for the index.astro page.
src/components/react/Video.jsx #
src/components/react/Video.jsx #
Next, we can paste in the React code. Create a src/components/react folder and then create a Video.jsx file with the following content inside:
1 import { useState } from "react";2 3 export const ReactExample = function ReactExample() {4 const [altColours, setAltColours] = useState(false);5 6 return (7 <section8 className={`react-container${altColours ? " react-container-alt" : ""}`}9 >10 <h2>Example React Component</h2>11 <div className="video-container">12 <iframe13 width="560"14 height="315"15 src="https://www.youtube-nocookie.com/embed/PJ0QSJpJn2U"16 title="Should you Stop Using React"17 frameBorder="0"18 allow="accelerometer; autoplay; clipboard-write; encrypted-media; gyroscope; picture-in-picture"19 allowFullScreen20 ></iframe>21 </div>22 <button23 className={`react-button${altColours ? " react-button-alt" : ""}`}24 onClick={() => {25 setAltColours(!altColours);26 }}27 >28 <span className="screen-reader-text">Toggle colours</span>29 </button>30 </section>31 );32 };33 34 export default ReactExample;
src/components/svelte/Video.svelte #
src/components/svelte/Video.svelte #
The final component we need to add is the Svelte one. Create the Video.svelte file in a new src/components/svelte folder, with
this content:
1 <script>2 let altColours = $state(false);3 </script>4 5 <section class="container" class:container-alt={altColours}>6 <h2>Svelte Component</h2>7 <div class="video-container">8 <iframe9 title="Trying Svelte for the Third Time"10 width="560"11 height="315"12 src="https://www.youtube-nocookie.com/embed/xgER1OutVvU"13 frameborder="0"14 allow="accelerometer; autoplay; clipboard-write; encrypted-media; gyroscope; picture-in-picture"15 allowfullscreen16 ></iframe>17 </div>18 <button19 class="button" class:button-alt={altColours}20 onclick={() => {21 altColours = !altColours;22 }}><span class="screen-reader-text">Toggle colours</span></button23 >24 </section>25 26 <style>27 .container {28 display: flex;29 flex-direction: column;30 background: hsl(31 var(--colour-brand-hue) var(--colour-brand-saturation)32 var(--colour-brand-luminance)33 );34 align-items: center;35 width: 100%;36 padding: var(--spacing-8) var(--spacing-0);37 color: hsl(38 var(--colour-dark-text-hue) var(--colour-dark-text-saturation)39 var(--colour-dark-text-luminance)40 );41 }42 43 .container-alt {44 background: hsl(45 var(--colour-secondary-hue) var(--colour-secondary-saturation)46 var(--colour-secondary-luminance)47 );48 49 color: hsl(50 var(--colour-light-text-hue) var(--colour-light-text-saturation)51 var(--colour-light-text-luminance)52 );53 }54 55 .button {56 background: hsl(57 var(--colour-secondary-hue) var(--colour-secondary-saturation)58 var(--colour-secondary-luminance)59 );60 }61 62 .button-alt {63 background: hsl(64 var(--colour-brand-hue) var(--colour-brand-saturation)65 var(--colour-brand-luminance)66 );67 }68 </style>
src/siteContent/video.md #
src/siteContent/video.md #
As well as our Svelte and React components displaying video, we have a video
embedded in Markdown. Let’s add the source. The app should work again
once we have this in place. Create a src/siteContent folder and inside, make a video.md file, with
this content:
1 ---2 ---3 4 ## Astro in 100 Seconds5 6 <div class="video-container">7 <iframe8 title="Astro in 100 Seconds"9 width="560"10 height="315"11 src="https://www.youtube-nocookie.com/embed/dsTXcSeAZq8"12 frameborder="0"13 allow="accelerometer; autoplay; clipboard-write; encrypted-media; gyroscope; picture-in-picture"14 allowfullscreen15 ></iframe>16 </div>
Fonts #
We mentioned that we are using self-hosted fonts above. For the hosting to
work, we need to include the fonts in our repo, so our host can serve them. Download the Roboto Font in Regular, 400 and 700 . Extract the zip and then create a new fonts folder
in the project’s public folder. Drop the two unzipped files in that folder.
The public folder is for anything which we do not need Astro (or Vite, under the
hood) to process. As well as fonts, web manifest files for PWA and favicons fall
into this category.
We won’t optimize fonts here, just to get finished a little quicker. There is a nice video which focusses on self-hosted fonts in Astro together with optimization. If you are interested in optimization, do have a look. You can save 80% on some fonts files, especially where, for example, you only use the 900 weight font in titles.
🗳 Poll #
🍧 Hosting #
The app should be working just fine now, with a nice Roboto sans serif font and all the colours. Try pressing the buttons below the React and Svelte components to check they work. You should notice the background colour change.
The next step is to build the site locally to check it is all working as
expected. Run these commands to build and preview the site (stop the dev
server with Ctrl + C first):
pnpm buildpnpm preview
If all is well, commit the code to a git repo and upload it to your GitHub or
GitLab account, so we can host it as a static site. You might notice your site
gets built to the dist directory in your project.
There is no need to include this in your repo, as your host will generate the site
there for you.
It is worth adding a .nvmrc file to the project
root folder, whichever host you are using. This will let the host know which version
of Node.js to use. We will go for the Node.js LTS version, which is 22 at the time of writing:
22
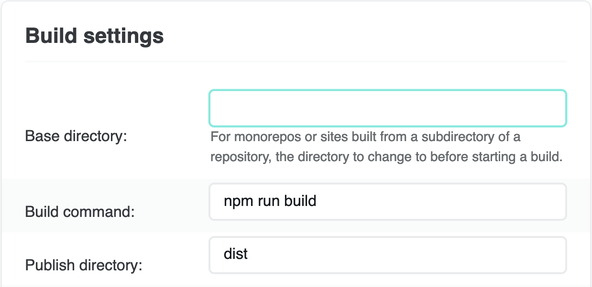
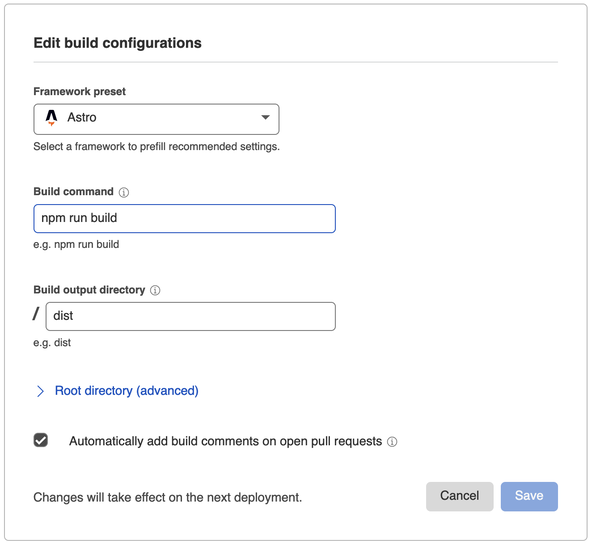
Configuration #
Although we have used pnpm in this tutorial to build
the site, for maximum compatibility, in the cloud use npm run build as your build command. We just mentioned that Astro outputs projects to the dist directory, so on your host console, set the build output directory or publish directory to dist.
Here are screenshots for Netlify and Cloudflare Pages which should help you out. Other services will be similar. Select the Astro preset
if your host has one, then just check the build command and output / publish directory
is dist.


🙌🏽 Astro JS Tutorial: Wrapping Up #
In this post, we have run through the pipeline for building a static Astro site. We have seen:
- how to spin up a new Astro project with Svelte and React integrations;
- how you can add global CSS styles, local scoped styles and style React components with plain CSS; and
- configuration for deploying your static Astro site to the cloud.
The Astro JS tutorial code is in the Rodney Lab GitHub repo . You can also try it on Stackblitz .
I hope you found this article useful and am keen to hear how you will the starter on your own projects as well as possible improvements.
🏁 Astro JS Tutorial: Summary #
Where can you host an Astro site? #
- Astro should work on any host able to build static sites with node. We have seen more detailed build instructions for Netlify and Cloudflare Pages, though you should also be able to get a hassle-free build on Render, Vercel and other similar services.
What are Astro import aliases? #
- Astro lets you define import aliases, which are essentially syntactic sugar. They let you use an absolute alternative path in your import statements. Because this path is absolute rather than the default relative paths, it does not need to be updated if you move your source file from one folder to another. On top, the syntax is cleaner. We have seen how to define your own custom aliases in the tsconfig.json file.
How do you add vanilla CSS styling in Astro? #
- We have seen a few different ways to add styling in Astro. We can add a global stylesheet and import this into Astro pages with the regular ES Module import syntax. For less complex apps, we can add React component styling here. On top, we can add locally scoped styles in a script tag at the bottom of an Astro page. As this is also a Svelte feature, we can style Svelte component in this way too. Using these styling methods, Astro is able to optimize our CSS.
🙏🏽 Astro JS Tutorial: Feedback #
Have you found the post useful? Would you prefer to see posts on another topic instead? Get in touch with ideas for new posts. Also, if you like my writing style, get in touch if I can write some posts for your company site on a consultancy basis. Read on to find ways to get in touch, further below. If you want to support posts similar to this one and can spare a few dollars, euros or pounds, please consider supporting me through Buy me a Coffee.


Just dropped a new 🚀 Astro JS tutorial going from creating a minimal app, right up to deploying it as a static site.
— Rodney (@askRodney) April 13, 2022
On the way you add Svelte, React and Markdown components.
I hope you find it useful!
#boldlyGoingWhereNoFrameworkHasGoneBeforehttps://t.co/2m9tgMr11b
Finally, feel free to share the post on your social media accounts for all your followers who will find it useful. As well as leaving a comment below, you can get in touch via @askRodney on Twitter and also askRodney on Telegram . Also, see further ways to get in touch with Rodney Lab. I post regularly on Astro as well as SvelteKit. Also, subscribe to the newsletter to keep up-to-date with our latest projects.