


🍃 Leaflet Map Library #
In this Astro JS location map post, we see how you can use the Leaflet library together with SvelteKit to add interactive location maps to your Astro sites. Astro builds fast static sites, making it a great choice for brochure sites. These are where you have a basic site with home page, about, some product details and a contact page. Using the code in this tutorial, you can improve the user experience (UX) on the map you might add to a contact page. This will let visitors, zoom in and out as well as pan to work out directions or find nearest public transport connections.
Leaflet is a library for adding interactive maps. Basically, with just latitude and longitude coordinates, you can add a custom map for any location with Leaflet. The maps are responsive and let you pinch and zoom on mobile devices, as well as pan to see the vicinity on the map. Leaflet can work independently of a framework, though we will use Svelte here. This will make it easier to control how the map loads using Astro later. If that all sounds exciting, then why don’t we make a start?
🧱 Astro JS Location Map: What we’re Building #
We will build a basic map, like one you might find on a contact page. The maps we use will be sourced from OpenStreetMap . As well as that, we use the Mapbox service to provide tiles. These are smaller units of the map focussed on the area of interest. Fortunately we do not have to sweat the details of finding the right tile for our map as Mapbox and Leaflet couple well.
The map will show a location, with a marker. On top, we will add some custom text to the marker. This will appear when the user hovers over it.

⚙️ Getting Started: Astro JS Location Map #
Let’s start by spinning up a fresh project. From the Terminal, type the following commands:
pnpm create astro@latest astro-js-location-mapcd astro-js-location-mappnpm astro telemetry disablepnpm astro add sveltepnpm add --save-peer typescriptpnpm run dev
When prompted, choose Empty project, Yes to install pnpm dependencies.
I opted for Strict (recommended)TypeScript, so just delete any type
annotations (in the code blocks below) if you prefer pure JavaScript. For the pnpm add astro add svelte command, accept the config changes proposed, and also to install the Svelte package.
Apart from those options, pick what makes most sense for you.
We need to add a couple more packages to get up and running with Leaflet:
pnpm add -D @types/leaflet leaflet
That’s all the setup. The Terminal output should give you a URL for the
dev server (something like: http://localhost:3000/). Copy that into your browser and you will see the skeleton template page.
Import Aliases #
As a last piece of setup, we will add an import alias to tsconfig.json. These lets us write import statements like import Component from '../../../Component.tsx' as import Component from '~components/Component.tsx':
1 {2 "compilerOptions": {3 "baseUrl": ".",4 "paths": {5 "~*": ["src/*"]6 }7 },8 "extends": "astro/tsconfigs/strict"9 }
🗺 Map Component #
OK, we’ll start by creating a Map component in Svelte. Create a src/components folder and in there, add a Map.svelte file with
the following content:
1 <script lang="ts">2 import { setMap } from '~shared/actions/map';3 4 let {5 location,6 zoom = 19,7 markerMarkup = "",8 }: {9 location: { latitude: number; longitude: number };10 zoom: number;11 markerMarkup: string;12 } = $props();13 14 const { latitude, longitude } = location;15 </script>16 17 <figure use:setMap={{ latitude, longitude, zoom, markerMarkup }} ></figure>18 19 <style>20 figure {21 width: 38rem;22 height: 21rem;23 box-shadow: var(--shadow-elevation-low);24 }25 </style>
This will, essentially, be a shell for the Map component, rendering it to a figure HTML element. We will add the Leaflet logic in a Svelte action (coming soon). In fact, the code in line 2 imports
that action for us. Note the script tag in line 1 includes the attribute lang="ts". Omit the
attribute if you want to use plain JavaScript. Next, we expect a location as
an object composed of latitude and longitude fields and an optional zoom
factor. This is optional because we specify a default value of 19. Finally, we import some HTML markup (markerMarkup), which the action place on the marker label for us.
Actions are a way to access the component lifecycle. We see more on Svelte
actions in the tutorial on creating a Svelte video blog . You will notice a use:setMap attribute on the
figure tag in line 14. This is exactly where we use the action. Let’s define it next.
🎬 Svelte, Map, Action! #
We will now add the code for the action. This is where we link in Leaflet,
Mapbox and OpenStreetMap. Create a src/shared/actions directory and in there add a map.ts (or map.js) file with this content:
1 import type { TileLayerOptions } from "leaflet";2 3 export function setMap(4 mapElement: HTMLElement,5 {6 latitude,7 longitude,8 zoom,9 markerMarkup = '',10 }: { latitude: number; longitude: number; zoom: number; markerMarkup?: string },11 ) {12 (async () => {13 const {14 icon: leafletIcon,15 map: leafletMap,16 marker: leafletMarker,17 tileLayer,18 } = await import('leaflet');19 20 const markerIcon = leafletIcon({21 iconUrl: '/marker-icon.png',22 iconSize: [25, 41],23 iconAnchor: [10, 41],24 popupAnchor: [2, -40],25 iconRetinaUrl: '/marker-icon-2x.png',26 shadowUrl: '/marker-shadow.png',27 });28 29 const tileLayerOptions: TileLayerOptions & { accessToken: string } = {30 attribution:31 'Map data © <a href="https://www.openstreetmap.org/copyright">OpenStreetMap</a> contributors, Imagery © <a href="https://www.mapbox.com/">Mapbox</a>',32 maxZoom: 19,33 id: "mapbox/streets-v11",34 tileSize: 512,35 zoomOffset: -1,36 accessToken: import.meta.env.PUBLIC_MAPBOX_ACCESS_TOKEN,37 detectRetina: true,38 };39 const map = leafletMap(mapElement).setView([latitude, longitude], zoom);40 tileLayer(41 'https://api.mapbox.com/styles/v1/{id}/tiles/{z}/{x}/{y}{r}?access_token={accessToken}',42 tileLayerOptions43 ).addTo(map);44 45 if (markerMarkup !== '') {46 leafletMarker([latitude, longitude], { icon: markerIcon }).bindPopup(markerMarkup).addTo(map);47 } else {48 leafletMarker([latitude, longitude], { icon: markerIcon }).addTo(map);49 }50 })();51 }
This is mostly just boilerplate code to link in the Leaflet package. You will
see the function we define has two arguments, while we only used one in the Map.svelte file. That is because Svelte automatically sets the first argument to the node
or element itself. Notice, we are able to pass in multiple parameter values, using
an object for the second argument.
We use a dynamic import for the leaflet objects (lines 13 – 18). Typically, this
is not necessary. We do it here specifically because importing the leaflet
library causes Vite to evaluate the window object.
Although this is fine and dandy when code runs in the browser. Before that, Vite
runs the code in Server Side Render (SSR) mode and on the server, that window object is undefined. As an aside, because we are using an action (which is only
called on a mounted element), we do not need a check within the function body that
the code is running in the browser (and not on the server).
Marker Icon #
Leaflet has default Retina display and regular icons for the map marker icon.
The easiest way to make sure icons are rendered correctly is to copy from the leaflet package and serve them from the Astro public directory. This (i) ensures Vite does not tree-shake them out, (ii) that Astro
image processing does not step in where we do not need it to. You can copy:
-
marker-icon-2x.png; -
marker-icon.png; and -
marker-shadow.png
from node_modules/leaflet/dist/images/ to public/. Then, our definition of the marker icon in lines 20 – 27 will pick out these
files. Note, you can alter those lines to use your own marker image.
In line 36, we reference a Mapbox API key.
We’ll set that up next.
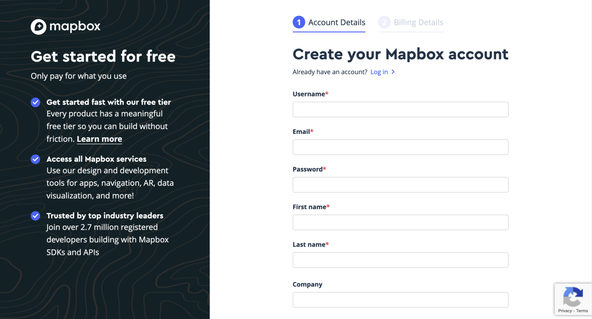
🔑 Mapbox API Config #
You will need a Mapbox account for this part. On the free tier, you can have up to 50,000 monthly loads , which should be plenty enough to set up a test site. To get an API key, fill out the signup form .

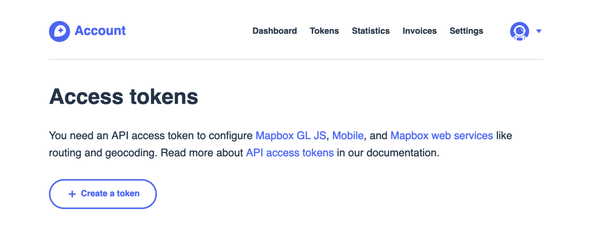
Once you have set up your account and logged in, select Tokens from the links at the top of the page, then click + Create a token. You can call it whatever you like, you only require the actual public key value for this project. Copy this down or save it to a safe place.

Finally, for this section, create a .env file in
the root folder of your project and paste in the content below (adding your new
API key instead of the placeholder):
PUBLIC_MAPBOX_ACCESS_TOKEN="PLACEHOLDER-FOR-YOUR-OWN-KEY"
If you are using TypeScript, you might also want to edit src/.env.d.ts in the project:
/// <reference types="astro/client" />interface ImportMetaEnv { readonly PUBLIC_MAPBOX_ACCESS_TOKEN: string;}interface ImportMeta { readonly env: ImportMetaEnv;}
That’s all set up now. We should be able to read the key in line 28 of the action file just fine now!
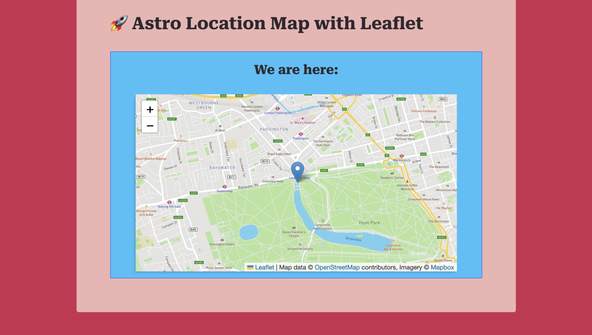
📍 Home Page #
To see this map, we just need to replace the content in our src/pages/index.astro, add some styling and a touch more config. We’re on the home straight
now. Replace the src/pages/index.astro content with
this:
1 ---2 import Map from '~components/Map.svelte';3 import '~styles/fonts.css';4 import '~styles/global.css';5 import 'leaflet/dist/leaflet.css';6 7 const location = { latitude: 51.51089, longitude: -0.17563 };8 ---9 10 <html lang="en">11 12 <head>13 <meta charset="utf-8" />14 <meta name="viewport" content="width=device-width" />15 <title>Astro Location Map with Leaflet</title>16 </head>17 18 <body>19 <main class="container">20 <h1>🚀 Astro Location Map with Leaflet</h1>21 <section class="wrapper">22 <h2>We are here:</h2>23 <Map client:load {location} zoom={14} markerMarkup="<p>We are here!</p>" />24 </section>25 </main>26 </body>27 28 </html>29 30 <style>31 .container {32 background-color: var(--colour-light);33 border-radius: var(--spacing-1);34 padding: var(--spacing-8);35 width: min(100% - var(--spacing-16), var(--max-width-wrapper));36 margin: var(--spacing-16) auto;37 }38 39 .container h1 {40 padding: var(--spacing-0) var(--spacing-8);41 }42 43 .wrapper {44 display: grid;45 place-items: center;46 background-color: var(--colour-brand);47 border: var(--spacing-px) solid var(--colour-alt);48 border-radius: var(--spacing-px);49 padding: var(--spacing-8) auto;50 margin: var(--spacing-8);51 }52 </style>
This will not work yet, but let’s see what we have so far. In line 23, we use the Map component which we defined earlier. Most important in this
line is the client:load directive. Astro ships zero
JavaScript by default and without client:load,
the map would not load. If the map was going to appear far down the page, you
might opt for client:visible instead. In that case,
Astro will instruct the browser only to load it when the user is about to scroll
it into view.
The map coordinates are set in line 7. Feel
free to change these to a location near you. To get coordinates, go to OpenStreetMap and search for your preferred location. Then right-click on the map (above your
preferred location) and choose Show Address. You should now
see the latitude and longitude in the left pane.
💅🏽 Finishing Off: Astro JS Location Map #
Astro JS Location Map: Styling #
We are using the new Google font Roboto Serif. Create a src/styles folder, then add font face CSS in fonts.css:
src/styles/fonts.css — click to expand code.
1 /* roboto-serif-regular - latin */2 @font-face {3 font-family: 'Roboto Serif';4 font-style: normal;5 font-weight: normal;6 src: local(''), url('/fonts/roboto-serif-v7-latin-regular.woff2') format('woff2'),7 /* Chrome 26+, Opera 23+, Firefox 39+ */ url('/fonts/roboto-serif-v7-latin-regular.woff')8 format('woff');9 /* Chrome 6+, Firefox 3.6+, IE 9+, Safari 5.1+ */10 }11 12 /* roboto-serif-700 - latin */13 @font-face {14 font-family: 'Roboto Serif';15 font-style: normal;16 font-weight: bold;17 src: local(''), url('/fonts/roboto-serif-v7-latin-700.woff2') format('woff2'),18 /* Chrome 26+, Opera 23+, Firefox 39+ */ url('/fonts/roboto-serif-v7-latin-700.woff')19 format('woff');20 /* Chrome 6+, Firefox 3.6+, IE 9+, Safari 5.1+ */21 }
We link to fonts in /fonts here. This is a location
which will be available on the built site. We make a public/fonts folder in our project for this to work. Download these fonts from google-webfonts-helper . Unzip the downloaded file and copy the .woff and .woff2 files to the new public/fonts folder. We have a more detailed look at self-hosting fonts with Astro in a separate video post.
Finally, create the global CSS stylesheet file (src/styles/global.css) and paste in this content:
src/styles/global.css — click to expand code.
1 :root {2 --colour-dark: hsl(309 7% 17%);3 --colour-theme: hsl(347 64% 49%);4 --colour-brand: hsl(197 94% 58%);5 --colour-alt: hsl(233 89% 60%);6 --colour-light: hsl(1 63% 82%);7 8 --shadow-color: 203deg 64% 40%;9 --shadow-elevation-low: -1px 1px 1.6px hsl(var(--shadow-color) / 0.34),10 -1.7px 1.7px 2.7px -1.2px hsl(var(--shadow-color) / 0.34),11 -4px 4px 6.4px -2.5px hsl(var(--shadow-color) / 0.34);12 13 --spacing-px: 1px;14 --spacing-0: 0;15 --spacing-1: 0.25rem;16 --spacing-4: 1rem;17 --spacing-8: 2rem;18 --spacing-16: 4rem;19 --spacing-12: 3rem;20 21 --max-width-wrapper: 48rem;22 }23 24 html {25 font-family: 'Roboto Serif';26 color: var(--colour-dark);27 background-color: var(--colour-theme);28 }
In line 4 of src/pages/index.astro, we include the Leaflet CSS stylesheet, so this will get bundled.
The site should all be working now. Finally, you can have a look in your browser!
Please enable JavaScript to watch the video 📼
🗳 Poll #
👷🏽 Build #
Notice the blue marker shows up at the centre of the map. Let’s build the site now:
pnpm buildpnpm preview
The page is small, so it will literally have a few seconds to build. If all is well, you should see the map, with markers in all its glory!
🙌🏽 Astro JS Location Map: Wrapping Up #
We have had a look at adding an Astro JS Location maps in this post. In particular, we saw:
- how to use Svelte action with Astro;
- a trick for making sure Vite bundles assets at build time; and
- how to set up Leaflet with Mapbox and OpenStreetMap.
Leaflet is highly customizable, and I recommend checking their docs to explore other possibilities. As a challenge, you might consider adding extra pins to the map, for example showing the nearest public transport terminals. Have a look at the full project code on the Rodney Lab GitHub page . I hope you found this article useful and am keen to hear how you will the starter on your own projects as well as possible improvements.
🏁 Astro JS Location Map: Summary #
What’s the easiest way to add an interactive map to your Astro site? #
- Leaflet is a fantastic map library which lets you add interactive maps to your projects. We saw it is possible to combine Leaflet with OpenStreetMap as well as Mapbox. We can do this with a Svelte map component in our Astro project. That component can contain a `figure` element, which we can render the map to. We use a Svelte action to perform the Leaflet setup. Vite calls this code when the map component mounts.
Can you use Svelte actions with Astro? #
- Yes, Svelte features like actions, stores, and use directives are not just limited to SvelteKit. They work in Astro just fine. To use Svelte in Astro, just run `pnpm astro add svelte` in the Terminal. The tool will even offer to update your Astro config and install the Svelte package for you. You might also want manually to add the typescript as a peer dependency using the command `pnpm add --save-peer typescript`.
How can you make sure Vite bundles your assets? #
- We saw using Leaflet that although map markers showed up fine in dev mode, they were missing when we built the site. To avoid this happening, we imported the image files within our JavaScript source and made sure they were linked in the JavaScript source code. More generally, when working with images, import the image files as before. However, link the `<img>` `src` tag to the imported variable.
🙏🏽 Astro JS Location Map: Feedback #
Have you found the post useful? Would you prefer to see posts on another topic instead? Get in touch with ideas for new posts. Also, if you like my writing style, get in touch if I can write some posts for your company site on a consultancy basis. Read on to find ways to get in touch, further below. If you want to support posts similar to this one and can spare a few dollars, euros or pounds, please consider supporting me through Buy me a Coffee.
Finally, feel free to share the post on your social media accounts for all your followers who will find it useful. As well as leaving a comment below, you can get in touch via @askRodney on Twitter and also askRodney on Telegram . Also, see further ways to get in touch with Rodney Lab. I post regularly on Astro as well as SvelteKit. Also, subscribe to the newsletter to keep up-to-date with our latest projects.